Posted by
Mangozac on April 29, 2012
Some small progress this weekend: painting has begun!
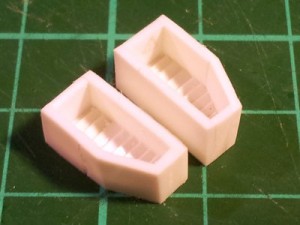
First up, last weekend while playing around with the chassis I dropped it, smashing one of the vents that sits behind the top hatch. Although the vents were just Kotobukiya detailing bits, I didn’t have any spare. But I did have the original SAW chassis mould! So I mixed up a little bit of resin and cast just that area, giving me a spare vent:

Easy!
Before I could prime the parts I had to have a method of holding them while the paint is being applied. Since I had some threaded rod left over from the base I decided to use it and some wooden dowel to temporarily screw to the chassis assembly and legs assembly. These screwed into the chassis-pelvis joint areas so the holes would be hidden once assembled. The dowel for the chassis was then screwed to a piece of plywood for a base. The railguns, gattling cannons and sensor turret were all mounted on kebab skewers for painting.
My primer of choice is Tamiya Surface Primer (in the spray can). It’s grey and in my experience gives superior adhesion (at least to styrene, which I admit is irrelevant here). Yes, it’s more expensive than the cheap acrylic rattle cans people buy from Bunnings to prime with, but for good models you’ve spent a lot of money on why risk it? Pro tip: buy the 180ml can; it’s only a couple of dollars more than the 100ml can and gives you 80% more!
Here’s how things looked post priming:

Just like on a scratchbuild, the priming stage shows up all of the little flaws leftover from cleaning up the casts and gap filling. So I’ve done a quick run around with some Tamiya Putty. Those spots will need some quick sanding later, then some touch up with the primer and priming will be complete.
Since this is my first time airbrushing a model I’ve been hassling my mate Jas for a lot of painting advice. He’s an awesome painter and if I can get this to turn out half a nicely as his Elysian Sentinels I’ll be happy!
After a lengthy phone call with him the other night I think I’ve got the process sussed. The next stage will be to airbrush everything black as the first step in pre-shading. Hopefully I’ll get a chance to do this one night this week…
That’s all for now!
Posted by
Mangozac on April 21, 2012
I’ve only just realised how long it has been since a proper update on the Centurion. While progress has been slower over the last few weeks (mainly due to my hobby time being hijacked by my SAW build up), there has been progress. I guess I just haven’t posted about it because I’m working on the torso and still aren’t 100% sure of the direction it’s going it. It really is just “build and see” (and then rebuild because the first go didn’t work out).
Anyway I made some progress today that I’m proud of and decided to share. Again I’ve run into the headache of photographing tiny styrene parts (as encountered on my BFG scratchbuild diaries) so I apologise in advance for the crappy photos 
First up we have the motivation for the update: the main hatch. I’ve put way more work into this than one would expect, but it turning out really nicely. This pic is a collage, so clockwise from top left we have:
1. Hatch mounted to the cockpit top ring (there is a technical name for this; I just can’t remember). Hatch hinge yet to be added.
2. Hatch underside. Note the handwheel and locking bolts.
3. Hatch top side. Lever and other detail yet to be added.
4. Inspiration for the hatch mechanism. This is from a large scale model tank.

Next up we have the two symmetrical vents that will mount either side of the torso front. They need to be sanded down a little so they’re not so deep, but the overall design has turned out really nicely. The baffles inside are technically pointing in the wrong direction, bit I only realised this far into their construction and I wasn’t going to redo fiddly stuff like that again if I don’t need to!

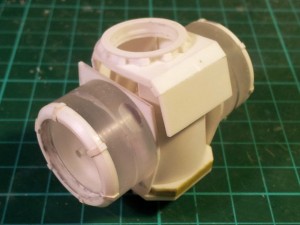
Finally we have a very crude shot showing the torso itself. The central core is hollow (that’s where the cockpit is) but for the time being I have some strategically glued temporary braces holding it all together for the construction process. I have a set of shoulder armour plates made up but they’re far too small and need to be replaced so I didn’t bother showing them. It’s all still very WIP so probably isn’t really worth commenting on….

Hopefully that will tide all of my fans over until the next update! The torso is really going to start coming together soon!
Posted by
Mangozac on April 8, 2012
And the dirt is done! I think… 😳
As I said in the last update I had to build up the ground a bit under one of the rear feet so I did that with some foam and plaster/dirt mix. Then following the instructions in Bryan Krueger’s Groundwork PDF I taped up the black areas of the base and did a final coat of dirt, gel medium and pigment over the top of the plaster/dirt mix. This is by far the best technique to use, although it would have worked better if I had some super fine dirt in the mix as well. Overall though the final result looks good and feels pretty solid. Oh and the tape is definitely necessary as this final dirt/acrylic mix tends to get everywhere. I used 10mm Tamiya tape due to its general awesomeness, particularly for this kind of application.
The bottom of the feet and Tau figures were both sprayed with mould release before they were seated into the still wet final sand mix. This would ensure that I could actually remove them again for painting without breaking up all of the ground around them.
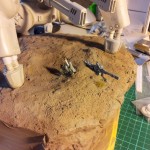
After the groundwork had dried for 48 hours I then attacked it with the airbrush and various mixes of sand and brown Vallejo model colour paints thinned with clear Windex. Works a treat! Any random rocks and the cliff face were sprayed with a lot of grey added to the mix to give them some contrast (even if that might be less realistic). Unfortunately I forgot to mask off the cliff face when I was spraying the black on the sides of the base, so the paint has ended up too thick in a few spots near the sides, which is unfortunate.
So here’s how it’s looking now. Next step is to apply the Mininatur grass tufts around the place. I had planned to dust some pigments around too (I’ve got a bunch of Secret Weapon ones), but some experiments with them during airbrushing proved pretty disastrous. The main problem is that I don’t have any that match the tones I’ve airbrushed with properly, so maybe I just have to source an appropriate pigment…
The SAW itself has been receiving attention too. The holes in the hips where the pins were mounted have been filled with putty and sanded smooth. The larger gaps in the hip ball joints were puttied up also. I dare say that the next step will be priming! However that will have to wait until I’ve finished cleaning up the chassis so it can all be primed in one go. The beauty of the method I’ve used to fix the legs to the base is that it’s really quick and easy to remove for painting (I had it removed while painting the base).
Air brushing the base was really good practice for when I’m ready to do the SAW itself. I’ve been using the airbrush for priming and stuff like that, but nothing that required fine control of the colours. I’m pretty confident that I’m now ready to do the big model!
Posted by
Mangozac on April 1, 2012
I’ve just got a quick update for tonight to show off the current state of the pilot’s seat. It’s about to be handed over to my mate Wereweevil who will be sculpting the pilot for it while I continue on with the rest of the torso. There’s still heaps of detail to be added (in the way of brass etch bits and pieces) but I’m happy with how it’s progressing!

Enjoy!


