Category: Superheavy Assault Walker

Complete: Superheavy Assault Walker

Posted by Mangozac on January 20, 2013

Epic does not even begin to describe the journey that has been this project. From such humble beginnings in early 2008, far before Resin Addict was even dreamed of, I embarked on my first scratchbuilding project. The sheer amount I learned along the way was just mind blowing and after two years of construction it was finally completed. The problem was that after such an epic modelling project I found myself burned out and since I didn’t play 40k any more I had no desire to actually build up one of my own!

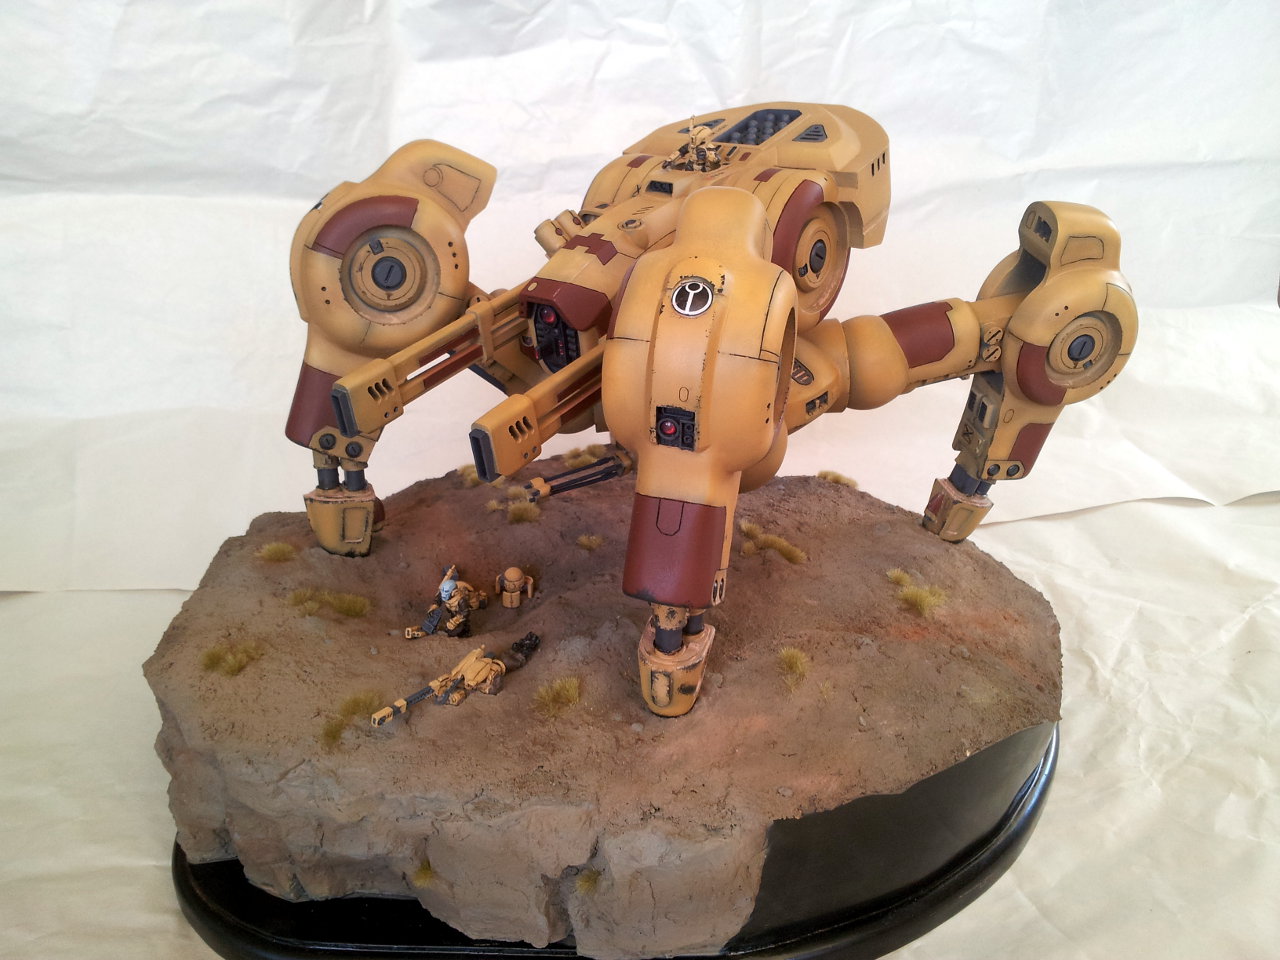
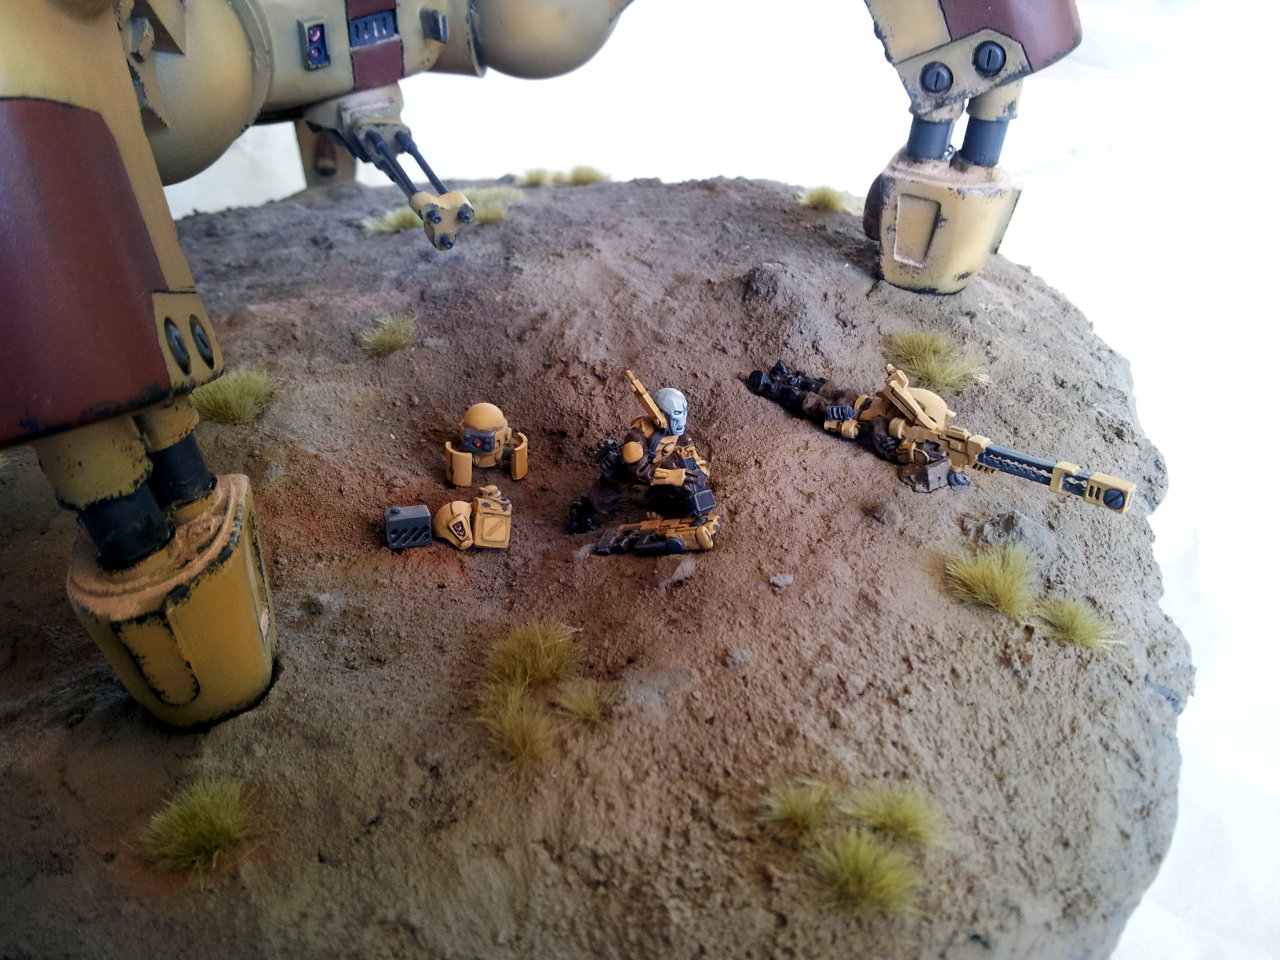
It was over a year later that I decided I was ready to build up my own SAW kit to proudly display. The problem is that it has taken me almost another two years to finish the damn thing! Due to the size of it just making the base was a mission in itself.

Just like with the original scratchbuild, painting has been a massive educational adventure too. This was my first time using “advanced” modelling techniques such as airbrushing, clear coats, oil paints and using pigments for anything other than rust. I screwed up a lot along the way and the finished model still isn’t perfect, but it’s good enough that for now at least I’m happy to call it done.

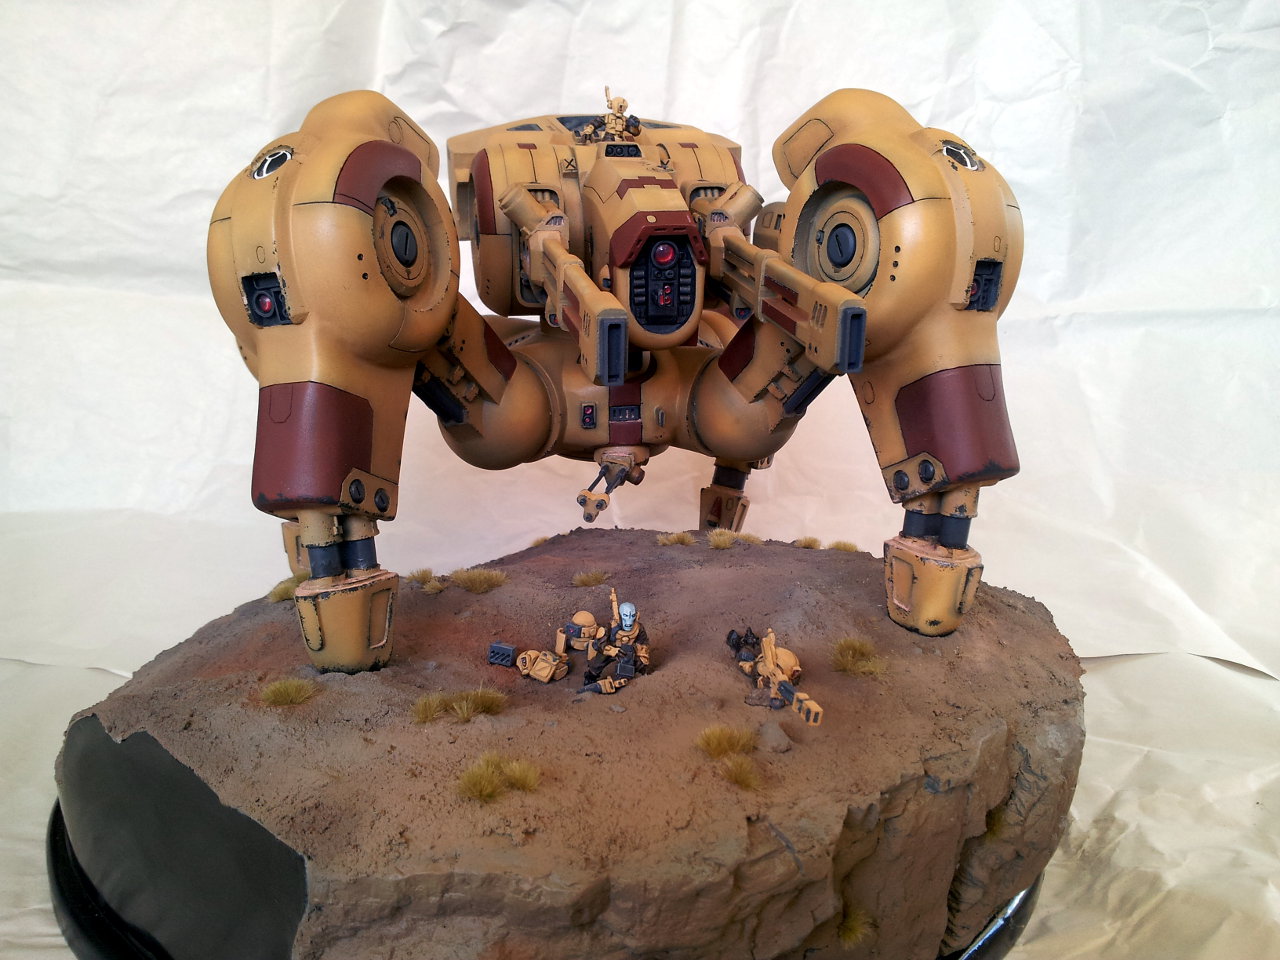
So enough jibber-jabber and on to the pictures. Thanks to our beautiful Queensland Summer weather light levels were perfect to take photos this morning. I didn’t take a massive number of shots – I figure I can always take more another time if need be 😉

The next project I’ll be completing is a new BFG ship, followed by painting either a Warhound Titan or an FDV1Mako kit from Filbot (yet to decide which one to do first). I guess I’ll get stuck back into the Centurion again some time this year so I can get it finished off…

Enjoy!

Superheavy Assault Walker and Exploding Paint Tubes

Posted by Mangozac on August 26, 2012

You know it’s not a good start to trying out a new hobby technique when the new tube of oil paint explodes when you open it… :(

So yesterday I picked up some oil paints and some odourless thinner. They are Winsor and Newton series 1 paints and I was quite surprised how expensive they are, but since that’s what all the other hobbyists around here seem to recommend that’s what I went with. I’m waiting for my painting tutor Jas to get back from an overseas trip but figured what the hell I might as well have a go at using the oils to blacken the panel lines.

I got everything set up and unscrewed the lid from the tube of black paint. Bam! There must have been a LOT of excess pressure in the tube as I ended up with black oil paint [i]everywhere[/i]. Not a good start! Fortunately the SAW wasn’t in the immediate vicinity so it avoided any paint shrapnel. To say I was not impressed would be an understatement. Now I was under the impression that oils are supposed to be a breeze to clean up using thinners. Not so. I now have a jumper covered in black specks and marks all over my messy work hobby bench (where I do my airbrushing and casting).

Still I decided I’ve made a mess I might as well continue on. So I grabbed the railguns from the SAW. I mixed up a wash by dropping some black paint into some thinners and started applying it to the panel lines on the railguns. Capillary action works well and sucks the wash everywhere. I was starting to feel confident! But I then noticed that as the was mixture dried there was very little pigment left over. So I had to do each panel line a couple of times. Oh well not such a big deal. I did find that by ensuring constant agitation of the jar in which I made the wash I could achieve a better pigmentation – I guess the paint separates from the thinner pretty quickly.

OK we’re halfway there. I let it dry for a short while and then got out the Q-tips. I dunked them in the thinners, wiped off the excess and then began wiping the excess oil paint from around the panel lines. What a mess! I found that although the bulk of the paint was removed, what was left was a faint smudge of black around the area. No amount of rubbing, even with a fresh Q-tip would help. So at the moment my railguns look like this:

I guessing the problem here is that my clear coat is not glassy enough. I’m using Pascoes Long Life, since Johnson’s Klear and Pledge One Go are no longer available here in Oz, but from other reports Pascoes is supposed to work just fine. Perhaps I need to concentrate on getting a more consistent, physically flat coating so that the oil paint can’t sit in the tiny divots in the finish caused by an uneven coat?

The only good thing is that I didn’t get too excited and do the main chassis and legs of the SAW, so I’ve got a chance to give it some more coats of clear first. I might just have to wait until Jas gets back before I can work up the courage to do that!

SAW Painting Continued

Posted by Mangozac on May 17, 2012

More painting done!

First up a shot showing what the masking is like. Fun fun! I’ve gone through a bit of Tamiya tape on this project (need to buy some more 10mm wide type).

And next the one everybody has been waiting for! I unscrewed my “painting handles” and sat it all together on the base to see how it’s coming together:

Probably wasn’t optimal to do the lower legs in brown like that, but there’s no turning back now! Oh and my taping was a bit anaemic so I’ve got a few spots of brown overspray on the desert yellow. I’ll fix them up on the weekend. Overall I’m pretty happy with how it’s turning out. Obviously it still has a long way to go, but just having three colours applied really gives a feeling of progress.

Remember how I said I thought I’d damaged my airbrush needle? Well it turns out I didn’t. I think I just needed to strip it right back and give it a really good clean out. I might have had needles and nozzles mixed up too. Last night I carefully matched up the needles and corresponding nozzles and am now running my beloved 0.3mm combo again. 0.3mm really is the perfect size!

Next major step: gloss coat in preparation for oil panel lining and washing.

I guess I’d best start painting up my figures – will probably hit them with the airbrush too! Oh my Forge World tank commander turned up too so now I have to bring myself to chopping off his legs so he can be mounted in the SAW top hatch.

SAW Build: Painting Continues

Posted by Mangozac on May 13, 2012
Alright I’ve been doing a lot of painting this last week (this is what’s been keeping me from the Centurion)! First real painting I’ve done in quite a while actually! Since much of this painting process has been an educational exercise I haven’t documented much of it. But I felt that things are starting to look pretty smart now so I would take a pic 😉

Massive props go to Jas for his continual tuition (both in person and via my steady stream of messages) 😉

The technique I’m using (as taught by Jas) is “preshading” based. The process goes like this:
1. Prime (I used Tamiya Surface Primer rattle can which is grey)
2. Airbrush a black coat over the entire model
3. Airbrush a white coat, heavier on the upper surfaces (and almost non-existant on the lower surfaces) but avoiding the panel lines.
4. Coat the entire model in the base colour. The pre-shading should leave subtle variations.
5. Mask off alternate colour areas and airbrush them
6. Hand paint dark grey “metal” areas

And that brings us to where I am now. Well kind of – I’m yet to do the alternate colour areas for the legs assembly. The upcoming steps will be something like:

7. Coat with a gloss clear (wanted to use Pledge One Go but it’s not available in Oz anymore :()
8. Use oil paints to do all of the panel lining and vent areas.
9. Apply decals
10. Gloss clear coat again
11. Chipping and final detailing
12. Matte clear coat

Anyway I actually did a lot of agonising over the weekend trying to decide what secondary colour to use on the SAW. I had a look through IA3: Taros Campaign, paying particular attention to the Tau aircraft colour schemes.

There was one I liked with white detail panels, but I decided that in order to pull it off the desert yellow colour would need a brown camouflage pattern applied (as per the Barracuda in question in IA3). I really wanted to avoid doing camo on this model if I could help it (would rather practice on something else first!) so I was leaning back towards brown detail panels (from another Barracuda). In the end I bit the bullet and picked up a pot of Tamiya Nato Brown. I masked around some panels with Tamiya tape (seriously, the most awesome tape around!) and hit it with the airbrush late this arvo (yes, after spending Mothers Day with my dear Mum).

I’m definitely pleased with the results:

And that’s us up to date! I’ll get the legs assembly taped up over the next couple of nights and then hit them with the brown too. Then I have to track down a decent gloss varnish that I can airbrush. Jas was kind enough to offer some of his Pledge but I do need a more sustainable solution…

SAW Buildup: Painting has commenced

Posted by Mangozac on April 29, 2012

Some small progress this weekend: painting has begun!

First up, last weekend while playing around with the chassis I dropped it, smashing one of the vents that sits behind the top hatch. Although the vents were just Kotobukiya detailing bits, I didn’t have any spare. But I did have the original SAW chassis mould! So I mixed up a little bit of resin and cast just that area, giving me a spare vent:

Easy!

Before I could prime the parts I had to have a method of holding them while the paint is being applied. Since I had some threaded rod left over from the base I decided to use it and some wooden dowel to temporarily screw to the chassis assembly and legs assembly. These screwed into the chassis-pelvis joint areas so the holes would be hidden once assembled. The dowel for the chassis was then screwed to a piece of plywood for a base. The railguns, gattling cannons and sensor turret were all mounted on kebab skewers for painting.

My primer of choice is Tamiya Surface Primer (in the spray can). It’s grey and in my experience gives superior adhesion (at least to styrene, which I admit is irrelevant here). Yes, it’s more expensive than the cheap acrylic rattle cans people buy from Bunnings to prime with, but for good models you’ve spent a lot of money on why risk it? Pro tip: buy the 180ml can; it’s only a couple of dollars more than the 100ml can and gives you 80% more!

Here’s how things looked post priming:

Just like on a scratchbuild, the priming stage shows up all of the little flaws leftover from cleaning up the casts and gap filling. So I’ve done a quick run around with some Tamiya Putty. Those spots will need some quick sanding later, then some touch up with the primer and priming will be complete.

Since this is my first time airbrushing a model I’ve been hassling my mate Jas for a lot of painting advice. He’s an awesome painter and if I can get this to turn out half a nicely as his Elysian Sentinels I’ll be happy!
After a lengthy phone call with him the other night I think I’ve got the process sussed. The next stage will be to airbrush everything black as the first step in pre-shading. Hopefully I’ll get a chance to do this one night this week…

That’s all for now!

SAW Build Up: Dirt is Done!

Posted by Mangozac on April 8, 2012

And the dirt is done! I think… 😳

As I said in the last update I had to build up the ground a bit under one of the rear feet so I did that with some foam and plaster/dirt mix. Then following the instructions in Bryan Krueger’s Groundwork PDF I taped up the black areas of the base and did a final coat of dirt, gel medium and pigment over the top of the plaster/dirt mix. This is by far the best technique to use, although it would have worked better if I had some super fine dirt in the mix as well. Overall though the final result looks good and feels pretty solid. Oh and the tape is definitely necessary as this final dirt/acrylic mix tends to get everywhere. I used 10mm Tamiya tape due to its general awesomeness, particularly for this kind of application.

The bottom of the feet and Tau figures were both sprayed with mould release before they were seated into the still wet final sand mix. This would ensure that I could actually remove them again for painting without breaking up all of the ground around them.

After the groundwork had dried for 48 hours I then attacked it with the airbrush and various mixes of sand and brown Vallejo model colour paints thinned with clear Windex. Works a treat! Any random rocks and the cliff face were sprayed with a lot of grey added to the mix to give them some contrast (even if that might be less realistic). Unfortunately I forgot to mask off the cliff face when I was spraying the black on the sides of the base, so the paint has ended up too thick in a few spots near the sides, which is unfortunate.

So here’s how it’s looking now. Next step is to apply the Mininatur grass tufts around the place. I had planned to dust some pigments around too (I’ve got a bunch of Secret Weapon ones), but some experiments with them during airbrushing proved pretty disastrous. The main problem is that I don’t have any that match the tones I’ve airbrushed with properly, so maybe I just have to source an appropriate pigment…

The SAW itself has been receiving attention too. The holes in the hips where the pins were mounted have been filled with putty and sanded smooth. The larger gaps in the hip ball joints were puttied up also. I dare say that the next step will be priming! However that will have to wait until I’ve finished cleaning up the chassis so it can all be primed in one go. The beauty of the method I’ve used to fix the legs to the base is that it’s really quick and easy to remove for painting (I had it removed while painting the base).

Air brushing the base was really good practice for when I’m ready to do the SAW itself. I’ve been using the airbrush for priming and stuff like that, but nothing that required fine control of the colours. I’m pretty confident that I’m now ready to do the big model!

SAW Buildup: Groundwork

Posted by Mangozac on March 18, 2012

I made a lot of progress on the SAW yesterday. The legs are all pinned (which took ages to do!) and are now ready for painting. I’m tossing up whether to glue the legs to the pelvis prior to painting or not. Each “hip” ball joint has two pins inserted from the outside so if I paint first it means I will then need to putty up the holes and patch up the paint in those spots once I do assemble them…

I didn’t get a shot of the final pose (which has the front legs facing forward more) but here’s one of the test poses:

Anyway I also got the foot to base mounting points sorted, which meant that I could finally do the initial sand/gravel layer:

As is the sand coating is a bit ordinary. It’s a mix of sand, small rocks, plaster, PVA glue and water. I tried “patting” down the mixture after application but it still left a far too uneven effect (I know a degree of unevenness is good, but this is a bit false looking). Then I remembered I had this groundwork article saved, which recommends the use of acrylic gel medium. So I’m going to do a second, thinner coat over the top of the current groundwork, which should even things out a bit. I’m thinking I might pick up a tube of this texture gel rather than muck around with the plaster/PVA recipe again. I didn’t tint the first coat although the dirt I’ve used is probably pretty close to the kind of colour I want anyway!

Superheavy Assault Walker Build Up

Posted by Mangozac on March 11, 2012

It was two years ago that I completed my Superheavy Assault Walker design. Following this and subsequently casting half a dozen copies for some people I got a bit sick of the project and had lost the urge to have one of my own. A year back (and a year on from completing the original design) though I suddenly felt the urge to have a SAW of my own built up!

I’ve now seen a handful of these built up and painted around the internet, but I don’t feel that any of them have captured the kind pose I had intended for the model. So this is my chance to set the record straight as to how it was supposed to be assembled 😉

Since my moulds were partially worn out and I didn’t have the time or motivation to cast it up myself, I decided to order a kit from Chapterhouse (exercising my designer’s discount and purchasing it at cost). It still worked out pretty expensive by the time I paid for post, but I’m not complaining. I got most of the parts cleaned up and ready to go and then got sidetracked with non-hobby stuff (girlfriend, work, commissions) so it got shelved. Actually the larger reason for shelving the project was because I was struggling with the base that I was going to mount it onto. I did periodic work on the base building it up with foam but was still pretty uninspired with it.

Recently I caught up with my mate Jas and decided to show him the progress I had made and ask for his advice on where to take it. I explained that I wanted to represent the edge of a cliff in an arid Afghan style landscape. He gave me the perfect answer: Woodland Scenics Rock Moulds. So I had a browse and ordered a C1243 Base Rock mould. Postage was stupidly slow for some reason (probably because it was so cheap) but then this week, after a month in transit, it finally arrived. I hit the mould with some release spray and mixed up a 4PU resin (tinted grey) and talc (as a filler so not to waste resin) combination, which was then sloshed around in the mould until it gelled. The idea being to cast the rocks “hollow” (even though they are single sided).

I had built up the base with another layer of foam since the pics above, and these were the perfect height for the large rock mould parts. So I hacked off part of the foam and hot glued the rocks in place. The edges of the base that represent where the base had been “cut from the earth” I wanted to be flat and painted black so I glued in some styrene sheets and used a heat gun to curve them around.

With all this done the last step was to attack the base with expanding foam to fill all of the gaps and level things out. Man the expanding foam really expands! That brings us to the current state as of 11:30 this morning:


Next step will be to trim the foam back and then I can start looking at the ground cover mix. The bush out the back of my work has provided a perfect sand/gravel mixture that I have washed and dried in preparation for the base. The legs and pelvis are all ready to go, so soon I will be ready to drill the holes into the base for the bolts that will screw into the feet to hold it in place.

Don’t expect frequent updates on this one, since this little flurry of activity has happened while waiting for another mate Wereweevil to sculpt me up a pilot blank for my Centurion Mecha project (which he also completed this week).