Posted by
Mangozac on August 6, 2014
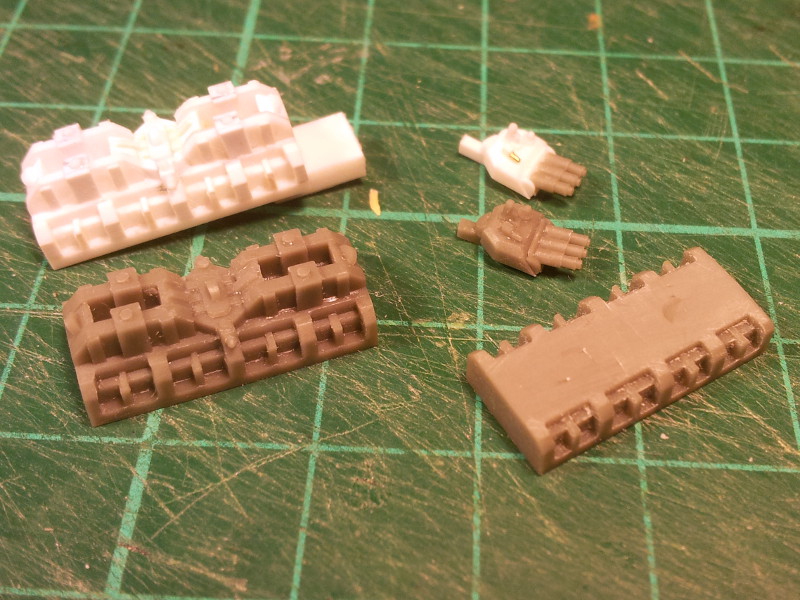
So here’s a little something else I’ve been working on recently: some alternative weapons modules for the Zeus Cruiser/Light Cruiser.
I originally set out to make a beam turret deck but somewhere along the line made some design decisions that I didn’t like so it got converted into a hanger bay. I also built up a triple-barrel beam turret (using the barrels I made for the Strike Cruiser Conversion Kit) but it turned out a little too big to use on the weapons modules.
But all is not lost! I’ve moulded up the hanger bay and have sanded much of the structure off a resin copy. I’ll use this as a base for a new beam turret deck 😉
Posted by
Mangozac on July 2, 2013
You may have noticed parts of the RA site being unavailable lately. I’ve been having issues with the server for some time and last week I decided to try out a new server. The transfer went fairly smoothly other than a small mistake I made, which delayed things a bit 
Anyway I’m sorry for the site’s down time and hope that the new server gives us much better performance!
Mangozac
Posted under
Uncategorized
Posted by
Mangozac on May 31, 2013
Resin Addict member and hobby friend Shane Barnbrook (Barn) suffered a lot of misfortune last year with regards to his health. Something as seemingly inane as accidentally swallowing a chicken bone resulted ultimately in a coma and paralysis! While doctors expect him to make a full recovery, it will be a very long journey. In order to take the first steps Barn needs to get out of rehab and back to his home so that he can be with his lovely wife and children. This however requires extensive and expensive improvements and mobility assistance equipment.
In order to help raise funds for Barn and his family I am auctioning off a one-of-a-kind custom Battlefleet Gothic fleet on ebay: http://cgi.ebay.com.au/ws/eBayISAPI.dll?ViewItem&item=190848743706.

Every cent from the auction will be donated to the Barnbrooks (the models, listing fees and postage are all coming out of my own pocket). Even if you’re not into BFG yourself, please spread the word so that we can get lots of bidding!
Posted under
Uncategorized
Posted by
Mangozac on May 23, 2013
Let me start with a disclaimer: THIS PROJECT IS NOT MY OWN WORK
OK I don’t do this too often but every now and then I see a hobbyist with whom I can’t help but feel some affinity. It’s not necessarily solely a display of amazing hobby skills, but a combination including the design itself and the topic. In this case it’s an amazing Mars style Warlord Titan being built by Dakka member Fiorhellheart (Rory). The guy is still in his teens but his work is as professional as a seasoned veteran. I am very jealous of his clean styrene work!
A Warlord Titan is an ambitious project for anybody to undertake – hell even I’m not crazy enough to attempt one (yet)! But Rory has a very promising start by first creating his design in 3D CAD. I’m ripping off a couple of pictures from his Dakka thread to post here:


Rory has devised a beautiful design for the lower leg and foot – I love this rear view and in the particular what he’s done for the rear toe:

Like any truly devoted hobbyist, Rory is hinting at moulding and casting the model when he completes it (with the amount of work going into building those beautiful forms it would be criminal not to!). Unfortunately though the project has had to take a back seat to Rory’s studies (he’s studying physics but I think he may have missed his calling in engineering!) so we just have to stay subscribed to the thread and wait patiently for updates (is patience one of your virtues – it’s certainly not one of mine!).
Check out the Dakka thread and salivate over the scratchbuilding goodness: http://www.dakkadakka.com/dakkaforum/posts/list/0/458325.page.
Posted under
Uncategorized
Posted by
Mangozac on April 26, 2013
Soldiering on!
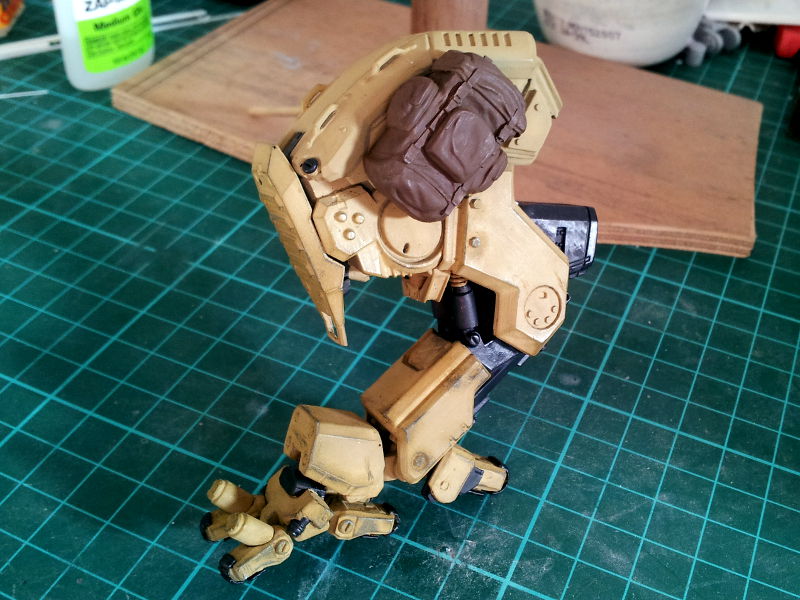
As you can see, painting is progressing. I was having an issue with the chipping fluid but I sorted it out: the Mig Productions Absolute Chipping product required you to also use the fluid to chip the paint (rather than just warm water as is used with hairspray and other dedicated products). However after painting all of the rest of the parts in one big batch and then trying to chip them it still wasn’t working as it should. I believe where I went wrong this time was the use of a clear coat over the German Grey colour. The chipping fluid has relatively high surface tension and the gloss coat prevents it from giving an even coat over the top of the gloss. Apparently you shouldn’t need to use any kind of clear between your base colour and the chipping fluid, but I was really paranoid about removing paint back to the actual primer. Further research concluded that I should mix in some Tamiya X-21 Flat Base with the gloss to flatten it down a bit and allow the chipping fluid to cover evenly.
I won’t be using the Mig Productions product again though. I’ve purchased some AK-Interactive Worn Effects fluid and will try that next time. Having to use the chipping fluid for the removal too means you go through a lot of the Mig Productions stuff, so the AK-Interactive product should be more economical too.
Anyway, on to the pics. Nothing too exciting here: you can see the failed chipping on the leg. I’m just going to have to do the traditional “sponge and brush” chipping technique. I’ve given all parts except the torso their grey paint. Once that’s done I’ll do the chipping, hit it all with gloss clear and then pinwash all of the details. Then weathering (the exciting bit!).
I think these shots show just how naturally matte Tamiya paints are: they make the Vallejo paint (the dark grey parts) look super glossy!
Hopefully I’ll get another update done over the weekend 😉
Posted by
Mangozac on September 17, 2012
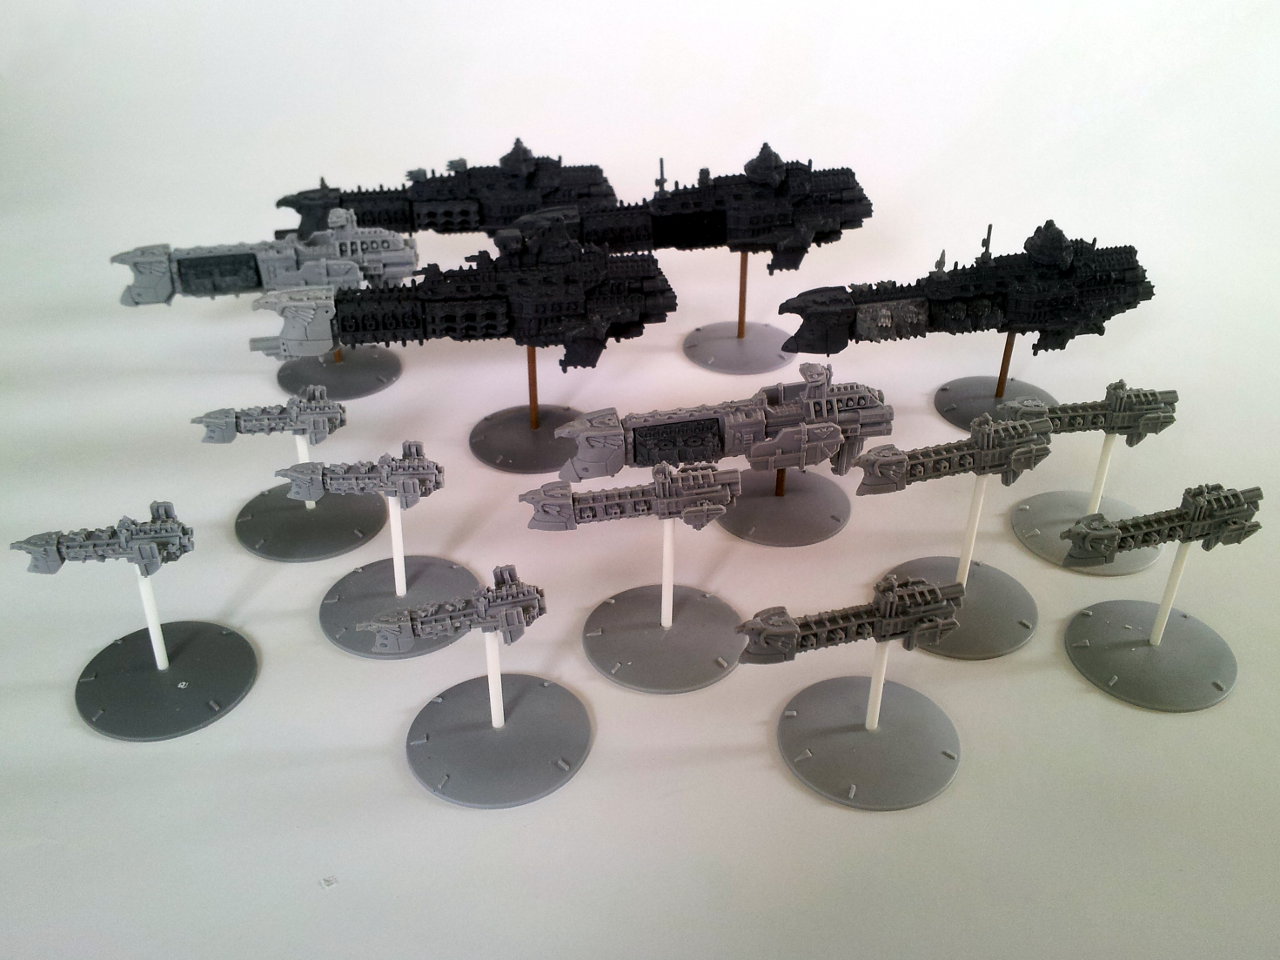
I’ve recently received a few emails from people alerting me to some eBay auctions for some of my resin Battlefleet Gothic style kits (as seen here). From what I can tell there’s nothing sinister going on here: none of them look to be recasts, but rather people just onselling kits of mine that they have acquired.
Now since I don’t advertise my BFG kits for sale you might be wondering how the have come to be on the secondhand market. I wanted to take this opportunity to explain that there have been a few avenues:
- Prizes: For the last few years I have sponsored the Gothicomp BFG painting competition by offering a few copies of my kits as prizes.
- Gifts: I’ve given copies of my kits to good hobby friends (both local and international).
- Paulson Games: In 2010 Paulson Games and I teamed up to sell the Zeus Light Cruisers in their online store. The feedback we received was that people felt that it was too similar to Games Workshop products so after only a couple of weeks we decided to stop selling them. A handful of lucky people managed to pick up some kits that way.
- Trading: A big part of the modelling hobby is bartering and trading bits with other people. I have traded many copies of my kits for other model bits I’ve been interested in.
While I’m a little upset that people are selling some of my kits on eBay, they are entirely within their rights to do so and thus I really shouldn’t complain. I can’t believe the prices they’re fetching though!
Posted by
Mangozac on March 29, 2012
Well things are coming together! The legs have been epoxied and pinned to the pelvis. The sides of the base have been painted gloss black. M5 threaded rods have been screwed into the base and the feet drilled and tapped to accept the rods. So finally the walker is connected to the base!
It’s not sitting as tightly against the ground as it should in the following pics – that’s because I need to cut a tiny bit of length off the threaded rods. Also, because I glued and pinned the hip joints before fixing it to the base, I screwed up and one of the rear legs is sitting about 15mm off the ground. So I’m going to have to build up that area with some foam before I do the final basing layer. Oh and one of the mounting rods for the front legs ended up miles off course, so I’ll just stick with three mounting points rather than try drilling and tapping another one.
The dirt, plaster and PVA mix for the groundwork actually seems to have worked really well. If I hadn’t already bought the gel medium I’d try another layer of just that mix to get the ground appropriately even. Hopefully this will happen over the weekend.
Anyway here’s some pics for now. Note that the front cliff is partially covered in masking tape.
Posted under
Uncategorized
Posted by
Mangozac on February 21, 2012
Well I thought it’s about time I posted an update 😉
If I’m honest I kind of wore myself out a bit over the first few weeks stuck back into this project, so progress has slowed to a more subdued pace. This is probably mainly due to me having a heap of other stuff going on, such as spending the last weekend catching up with mates on the Gold Coast.
Anyway I’ve been working on what is best described as the waist/spine piece. The arrangement of the pelvis and groin armour means that the waist connection needs to be offset to the rear of the mecha. This allows the waist to rotate without fouling on the groin armour. I decided to incorporate a ball joint that will form the “spine” and allow the torso to bend and tilt. Similar to the hip ball joints the spine will have a pair of pistons on the front. Of course much of this will be covered with armour plates on the actual model!
This is the waist piece:

The area below the ball will have a heap of recessed hex bolt heads. There will also be some triangular braces added. I actually screwed it up and had the piece at too steep an angle so have just tonight hacked it off and reset to a shallower angle. I’ll fill all of the gaps with some Milliput after I post this 😉
And just to show what’s going on here’s a pic of it mounted to the pelvis:

Plenty more cool ideas for the torso design are milling around in my head so I’m feeling confident about my “design as I build” approach!
Posted under
Uncategorized
Posted by
Mangozac on February 15, 2012
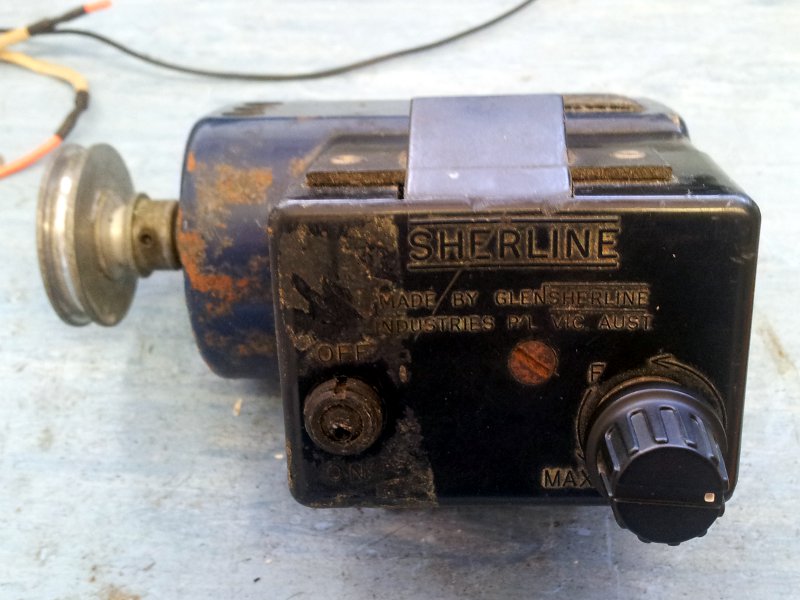
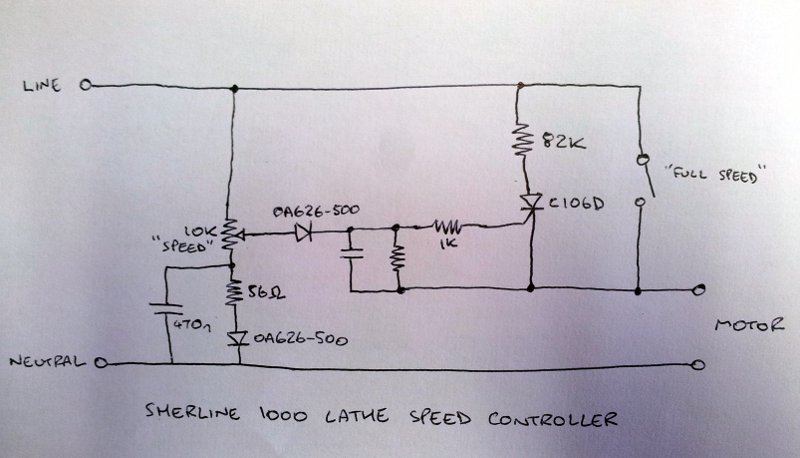
Huh? Isn’t this a hobby blog? What’s with this electronics stuff? Well over the last 18 months I’ve become quite reliant on my Sherline model 1000 lathe (and its attachments) for a large portion of my modelling work. It has an electronic speed controller built onto the motor and I had noticed that the maximum speed had been gradually getting slower. Not surprising since the machine is about 10 years older than I am!
Well a couple of nights ago the speed controller gave up and would only give two speeds: slow-crawl and insane-fast. So this morning I pulled it apart to have a look at the problem.
The setup is a basic DC motor running on half wave rectified 240VAC, with an SCR chopping the wave to control the speed. You can see a schematic I reverse engineered from the PCB below. It’s using pretty old-school components, including some carbon composition resistors. I at first suspected one of the semiconductors but some basic testing with a multimeter proved that the diodes and SCR were most likely fine. So I checked out the speed control pot, thinking maybe the wiper had gotten dirty. But that too seemed fine. Capacitors checked out OK so the last things left were the resistors.
I can’t recall ever having a faulty resistor, but I figured since these ones were so old I’d best stick the ohmmeter across them. Lo and behold, the 82k resistor in series with the SCR anode had crept up to approaching 1 meg! I pulled it off the PCB and checked again. The expensive Fluke meter never lies! I had no idea what the power rating of the failed resistor was, but I found a similar sized part with the same value in my box of odd resistors and stuck that in. I’ll check it again in a few weeks and make sure there’s no signs of overheating that would present is the power rating of the replacement resistor was too low.
So that’s the story! I decided to post it here in case anybody else has the same problem and is Googling it 😉
Posted under
Uncategorized
Posted by
Mangozac on August 9, 2011
Yeah I know, GW bashing is the cool thing to do. But I love their models and as a modeller only (rather than a gamer or model hoarder with a 5 second attention span) their periodic price rises don’t really have any effect on me. Until today.
You see I go through a lot of small flying bases. I should clarify that by a lot I mean I went through a bag of 32 over a couple of years. I must have bought that bag in 2009 and recently I discovered that I had run out, so I went onto the GW online store to buy some more. Surprise surprise they have changed things. You now buy them in a pack of 5 for AU$7.00. That’s $1.40 a pop. Not exactly cheap and more than I would expect to pay for two uncomplicated clear styrene shapes, but in the scheme of things it’s not going to break the bank.
But hang on, I paid AU$13.00 for a bag of 32 just two years ago. That’s a much more sensible $0.4062 each.
Now it doesn’t take an engineering degree to do the maths and calculate that there has been a 344% increase in the price of a single flying base. That is just insane. It annoys me even more that GW still list the pack of 32 on their website as out of stock.
Based on that I refuse to pay their stupid $7.00 for a pack of 5 and instead will design and cast my own flying bases. I’m certain it won’t be any more economical (but hell it won’t be any less economical either!) but it lets me make a stand (no pun intended), however insignificant it may be. Stay tuned for progress as I design it!
Posted under
Uncategorized