Airbrushing Tamiya Surface Primer
Posted by Mangozac on December 30, 2013Warning: epic blog post ahead!
OK so it’s no secret that Tamiya Fine Surface Primer (in the small and large spray cans) is the best hobby primer out there. Some people say they get great results with other brands but either they haven’t tried the Tamiya product or are not willing to pay for it (because let’s admit it, it’s expensive stuff). Note that some people highly recommend automotive primers as an economical alternative to specialist hobby products. That may be the case but I’ve not yet felt the need to try it out.
The Problem
I recently found myself looking for a primer that I could airbrush onto master parts (specifically for my Centurion project). There are two reasons I like to prime master parts:
- A single colour makes it much easier to get an appreciation for where the parts is at aesthetically, rather than if it’s comprised of many colours (like white styrene, yellow Milliput, clear 3D prints).
- It does some very light filling and will reveal any flaws with the surface texture.
Note that grey is my preferred priming colour – both for master parts and models to be painted. It’s very important that a quality primer is used, since it will often end up being removed by scraping and sanding. Good adhesion will prevent any flaking around scrapes and a smooth transition to sanded areas.
Usually I’d just hit the parts with the Fine Surface Primer from the spray can, but those who are familiar with it will be aware that it lays down a fairly heavy coat. For master parts you want the coat to be as light as possible to that details remain as sharp as possible. Also, for every square millimetre of primer applied to the part about 10 times that amount is wasted into the air (did I mention it’s expensive?)!
Potential Solutions
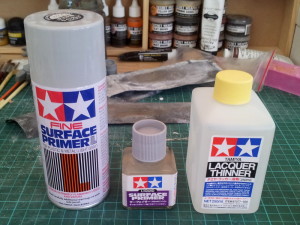
I did some research and came up with two options. The first was to decant some of the spray can into a jar and then spray it through the airbrush. Certainly improves control of application but is still relatively expensive. The other option is to use Tamiya Liquid Surface Primer thinned with Tamiya Lacquer Thinner. Here’s the three items:

So what’s the best way to determine suitability of a new product? Try it out, of course!
The Experiment
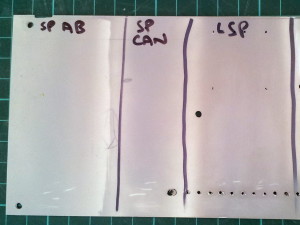
I grabbed a piece of scrap styrene sheet that had a bunch of holes drilled in it and prepped it for priming. I then divided it up and sprayed three separate test strips:
- Fine Surface Primer directly from the spraycan.
- Fine Surface Primer decanted into a jar, mixed with some Lacquer Thinner and sprayed using the airbrush.
- Liquid Surface Primer applied using the airbrush.
I used my trusty Iwata HP-CS airbrush (0.35mm nozzle).
This is probably a good spot to mention that the Liquid Surface Primer does not thin with Mr Hobby Thinner. It just globs up. So there’s obviously something different about them. I didn’t have any automotive thinners handy to try out, but for what it’s worth just use the Tamiya brand stuff.
Results
My very first comment in this post stands: Tamiya Fine Surface Primer in the spray can is the best. It applies a much smoother coat than the airbrushed mixtures, however admittedly that is likely due to the high flow rate. To test the quality of the samples I used various techniques to scratch the paint:
- Scratching the samples using my fingernails did leave marks but on none of the samples did it go through to the plastic.
- Scratching with a bamboo skewer did eventually wear down to the plastic. It’s hard to tell but I think the spray can applied primer was a little hardier in this test.
- Metal tools scratch straight through to the plastic. Kind of to be expected. Importantly though, this did not result in any flaking around the scratch, proving that the primer is exhibiting good adhesion.
- There doesn’t seem to be any difference between airbrushed Fine Surface Primer and Liquid Surface Primer.
So my recommendation: for priming master parts airbrushed Liquid Surface Primer seems to be great. For actual models I’d still stick with the rattle can version, just to be absolutely sure (perhaps just airbrush on specific areas where detail preservation is of utmost importance).
Addendum
I should probably come clean: the reason for the above experiment is because I was very silly and after buying the Liquid Surface Primer and lacquer thinner I decided to apply it straight to a Centurion master part. Very bad idea! The primed part had a glossy finish to it and has remained with a slightly tacky feel. It seems it just won’t fully cure.
I must have thinned the primer too much, as it took many coats to get an opaque covering and not being too familiar with spraying lacquer paints it seems I made a rookie mistake. From what have read applying too thick a coat of lacquer (especially when it is heavily thinned) will result in curing problems like this. Bugger.
I did the above experiment to ensure that the problem was actually with my technique and not the Liquid Surface Primer itself. That was proven. My tip is this: don’t shake up the Liquid Surface Primer bottle before sucking some out with a dropper for mixing in the airbrush. The primer and some of the thinners it sits in separate when it’s standing and it seems best to leave them that way.
TL;DR (Summary)
- Tamiya primers are awesome.
- Liquid Surface Primer (in the bottle) and Fine Surface Primer (in the spray can) seem to be the same base product, but the rattle can stuff is ever so slightly better.
- Thin the Liquid Surface Primer with Tamiya Lacquer Thinner (yellow lid).
- Don’t thin the Liquid Surface Primer too much for spraying and ideally don’t shake the bottle before dispensing the primer for thinning.
- Apply only thin coats. Heavy and/or especially “wet” coats will result in curing issues.
I hope this will be useful to someone! Thanks for reading!


