Category: Tools and Materials

Games Workshop remains the price gouging champion 2014

Posted by Mangozac on April 23, 2014

[I was going to place a picture of the Citadel tool kit here, but Games Workshop would probably harass me for it so I decided not to]

Once again Games Workshop has proven that it reigns supreme when it comes to gouging prices and has now taken things to a new level with the release of their new Citadel Tool Set. Tom Schadle has written a great post explaining just how ridiculously overpriced this is and shows you how to get a better range of tools for literally half the price!

To be fair, I do think the new GW tools and their packaging look very nice, but let’s be honest: the only thing that really matters for tools in functionality. I’m not going to pay double the cost for a tool just because it looks better!

I’ve got a really old thread discussing the tools I use over on the RA forum, however it’s now quite old and out of date. I’ve upgraded a lot of the tools and now have a much more efficient set. I’ll have to do an updated post some time soon…

Airbrushing Tamiya Surface Primer

Posted by Mangozac on December 30, 2013

Warning: epic blog post ahead!

OK so it’s no secret that Tamiya Fine Surface Primer (in the small and large spray cans) is the best hobby primer out there. Some people say they get great results with other brands but either they haven’t tried the Tamiya product or are not willing to pay for it (because let’s admit it, it’s expensive stuff). Note that some people highly recommend automotive primers as an economical alternative to specialist hobby products. That may be the case but I’ve not yet felt the need to try it out.

The Problem

I recently found myself looking for a primer that I could airbrush onto master parts (specifically for my Centurion project). There are two reasons I like to prime master parts:

  1. A single colour makes it much easier to get an appreciation for where the parts is at aesthetically, rather than if it’s comprised of many colours (like white styrene, yellow Milliput, clear 3D prints).
  2. It does some very light filling and will reveal any flaws with the surface texture.

Note that grey is my preferred priming colour – both for master parts and models to be painted. It’s very important that a quality primer is used, since it will often end up being removed by scraping and sanding. Good adhesion will prevent any flaking around scrapes and a smooth transition to sanded areas.

Usually I’d just hit the parts with the Fine Surface Primer from the spray can, but those who are familiar with it will be aware that it lays down a fairly heavy coat. For master parts you want the coat to be as light as possible to that details remain as sharp as possible. Also, for every square millimetre of primer applied to the part about 10 times that amount is wasted into the air (did I mention it’s expensive?)!

Potential Solutions

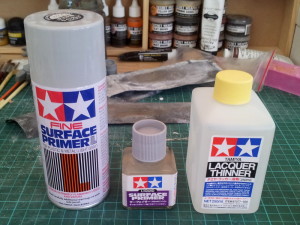
I did some research and came up with two options. The first was to decant some of the spray can into a jar and then spray it through the airbrush. Certainly improves control of application but is still relatively expensive. The other option is to use Tamiya Liquid Surface Primer thinned with Tamiya Lacquer Thinner. Here’s the three items:
Primers
So what’s the best way to determine suitability of a new product? Try it out, of course!

The Experiment

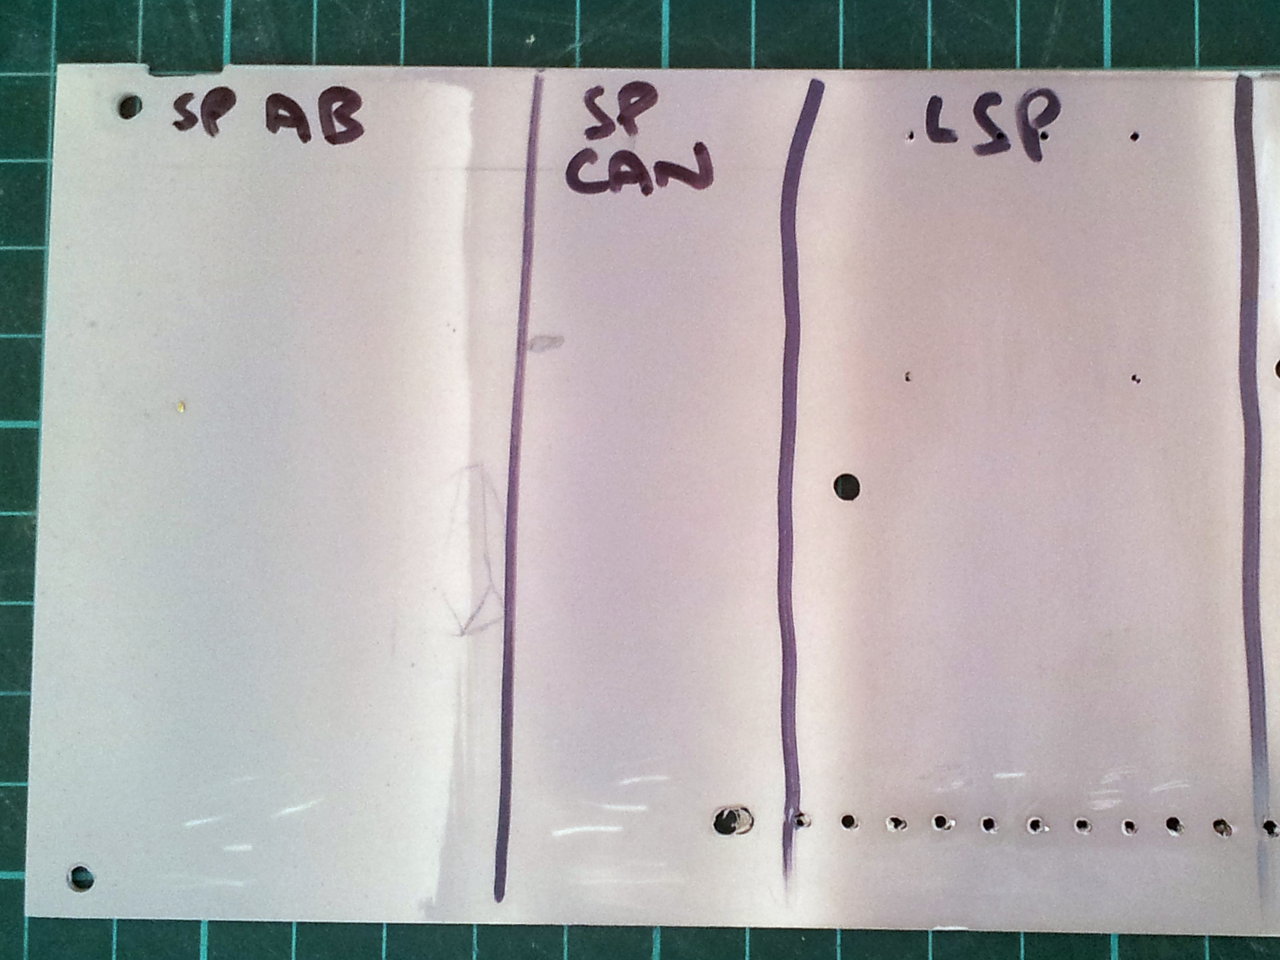
I grabbed a piece of scrap styrene sheet that had a bunch of holes drilled in it and prepped it for priming. I then divided it up and sprayed three separate test strips:

  1. Fine Surface Primer directly from the spraycan.
  2. Fine Surface Primer decanted into a jar, mixed with some Lacquer Thinner and sprayed using the airbrush.
  3. Liquid Surface Primer applied using the airbrush.

I used my trusty Iwata HP-CS airbrush (0.35mm nozzle).

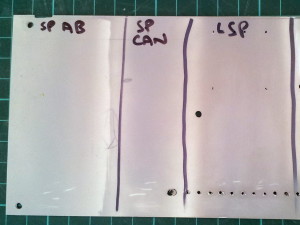
This is what it looked like:
Primers

This is probably a good spot to mention that the Liquid Surface Primer does not thin with Mr Hobby Thinner. It just globs up. So there’s obviously something different about them. I didn’t have any automotive thinners handy to try out, but for what it’s worth just use the Tamiya brand stuff.

Results

My very first comment in this post stands: Tamiya Fine Surface Primer in the spray can is the best. It applies a  much smoother coat than the airbrushed mixtures, however admittedly that is likely due to the high flow rate. To test the quality of the samples I used various techniques to scratch the paint:

  • Scratching the samples using my fingernails did leave marks but on none of the samples did it go through to the plastic.
  • Scratching with a bamboo skewer did eventually wear down to the plastic. It’s hard to tell but I think the spray can applied primer was a little hardier in this test.
  • Metal tools scratch straight through to the plastic. Kind of to be expected. Importantly though, this did not result in any flaking around the scratch, proving that the primer is exhibiting good adhesion.
  • There doesn’t seem to be any difference between airbrushed Fine Surface Primer and Liquid Surface Primer.

So my recommendation: for priming master parts airbrushed Liquid Surface Primer seems to be great. For actual models I’d still stick with the rattle can version, just to be absolutely sure (perhaps just airbrush on specific areas where detail preservation is of utmost importance).

Addendum

I should probably come clean: the reason for the above experiment is because I was very silly and after buying the Liquid Surface Primer and lacquer thinner I decided to apply it straight to a Centurion master part. Very bad idea! The primed part had a glossy finish to it and has remained with a slightly tacky feel. It seems it just won’t fully cure.

I must have thinned the primer too much, as it took many coats to get an opaque covering and not being too familiar with spraying lacquer paints it seems I made a rookie mistake. From what  have read applying too thick a coat of lacquer (especially when it is heavily thinned) will result in curing problems like this. Bugger.

I did the above experiment to ensure that the problem was actually with my technique and not the Liquid Surface Primer itself. That was proven. My tip is this: don’t shake up the Liquid Surface Primer bottle before sucking some out with a dropper for mixing in the airbrush. The primer and some of the thinners it sits in separate when it’s standing and it seems best to leave them that way.

TL;DR (Summary)

  • Tamiya primers are awesome.
  • Liquid Surface Primer (in the bottle) and Fine Surface Primer (in the spray can) seem to be the same base product, but the rattle can stuff is ever so slightly better.
  • Thin the Liquid Surface Primer with Tamiya Lacquer Thinner (yellow lid).
  • Don’t thin the Liquid Surface Primer too much for spraying and ideally don’t shake the bottle before dispensing the primer for thinning.
  • Apply only thin coats. Heavy and/or especially “wet” coats will result in curing issues.

I hope this will be useful to someone! Thanks for reading!

New Paint Shelving

Posted by Mangozac on May 26, 2013

Since getting back into a lot more painting in this last year work desk space has been at a premium due to the number of paint and consumables bottles sitting on my desk. I recently realised how much of a waste of space this was and devised a shelving system to rectify it. I finally got a chance to build it this weekend and am pretty pleased with the result.

It’s pretty simple construction made from 40mm x 8mm pine strip. The size was determined by what I could make from two 1200mm lengths, however in hindsight I should have been less stingy and sprung for another length. That way I could have made it a bit wider (as constructed it’s 450mm wide), as I will be running out of space very quickly. I’d recommend 600mm wide.

The back is just a sheet of 3mm MDF.

The pieces of timber were cut to size on a drop saw. I used nails and PVA glue to fasten the pieces together, but due to how thin the pine strips are I pre-drilled all nail locations to ensure no splitting occurred.

I was quite surprised how stable the finished shelving unit is. I was expecting to have to add a base with a larger area, but in practice this is completely unnecessary.

So here’s the finished product in all its populated glory (please excuse the crappy picture – there was something weird going on with light levels):

Paint Rack

Those with really keen eyes will see some new project on their way 😉

New Hobby Desk

Posted by Mangozac on July 24, 2012

Sorry for the neglect of the blog lately but to tell the truth I’ve actually been doing hardly anything hobby related for quite a few weeks now. It’s just been one of those periods of constant real life distractions. Not least of which has been moving house.

Since this has been my first chance to actually have all of my own furniture and stuff I’ve taken the opportunity to actually go with some kind of decor/theme. I like the aged vintage beach and French industrial styles so I’ve been buying furniture to fit in with that. Some stuff though it’s easier/cheaper to do yourself – the hobby desk being one such item. I have to admit though that primary inspiration for this came from my mate Seb – he recently picked up a cool looking vintage hobby desk and emailed me a photo to brag share his excitement 😉

Since my hobby desk will again be in my bedroom (it’s a single bedroom duplex bachelor pad) I decided that my existing hobby desk was just too “office furniture” looking. I didn’t want to spend big money on a new desk though, so after looking around I came across an old used timber desk for $50. It’s a lot smaller than my old desk but since it has 5 drawers I figure I’ll be able to make more efficient use of the desktop space.

I got some paint mixed up and painted it “Calypso Blue”. Then distressed it (which entails attacking the edges randomly with sandpaper). Then wiped on a dark grey-brown glaze to give the paint an aged appearance. The end result is great.

The top that the desk came with was just crappy laminate so I decided it had to go. I bought a sheet of laminated pine from the hardware with the intention of staining it an aged colour. But I found that I quite liked the juxtaposition of the aged blue and the new pine so I simply lacquered it as it was. Admittedly I made the top a bit wide for the base – I might yet cut a little bit off each end so it looks more appropriate.

Here’s a pic:

The next trick is to sort out some drawer handles and then it will be properly finished, but in the meantime I couldn’t help but get the desk set up. I was right about the usefulness of the drawer space! The wide single drawer on the right is fantastic for storing all of the various stock materials (styrene strip and tube, etc.). The other drawers are organised into:

  • Large hand tools (the Chopper II, saw, calipers, dial gauge)
  • Mould making (Lego, clay, MDF boards)
  • Other consumables (terrain making supplies, sandpaper)
  • Misc figures and kits

I’m sure it will get organised differently once I start actively using it again. My next trick is to get my compressor and casting gear setup so that I can continue painting my SAW!

Next week on Homemaker Addict we’ll be discussing crochet for the modern housewife….. :p

Materials: Tamiya Putty (Basic Type)

Posted by Mangozac on June 19, 2011

A few months ago I discovered that my local hobby shop was stocking a larger range of Tamiya products than it had in the past. One of these new products was the Tamiya Basic Type Modelling Putty:

This kind of putty serves a very specific purpose in the world of modelling and scratchbuilding: gap filling with a very fast curing time. You see traditionally many modellers with a wargaming background would just use Greenstuff, Milliput (my preference) or many of the other similar products available when a gap or seem needs to be filled. The problem with using such two-part putties is that they require quite a long curing time (at least 12+ hours) to get to the point where they can be further sanded or worked with. When filling very small gaps this curing time can really destroy productivity.

Enter the single part putty.

Single part putties are essentially really thick primer (think the consistency of toothpaste) that comes in a tube. They are generally lacquer based and from the moment you squeeze a portion out of the tube it begins to set quite rapidly as the lacquer evaporates. So fast, in fact, that the work time is likely to be as little as 15 seconds – enough to quickly and roughly apply the putty to the model with a sculpting tool. 15 minutes to 1 hour later (depending on the thickness applied) the putty will be fully cured and you can then continue on with the model.

Because of the relative messiness of the putty application it’s best used in applications such as filling small gaps such as along seams on larger kits (i.e. vehicles), or between joined styrene sheets when scratchbuilding. Once it’s cured you generally need to sand the seam smooth to clean it up. Unless you can apply with superhuman speed and dexterity so that there’s nothing to clean up!

Remember too that being lacquer based it can eat into the styrene a little. This generally isn’t a problem as it will fill the etched surface once it sets.

These two pictures show how the putty has been used to fill the gaps between the base prow shape and the added styrene edges:

Before using the Tamiya Putty I had been using some automotive spot putty (i.e. Bondo, but mine was a generic brand) for the same purpose and honestly it’s about the same in terms of performance. Both seem to have about the same curing time. I know it’s an ignorant way to think but I feel a preference for the Tamiya putty purely because it’s intended for modelling. The tube of Tamiya is cheaper than the spot putty, but it’s also a much smaller tube so economy wise the spot putty is better. Both types have a pretty strong smell though – if you have smelled lacquer thinner you’ll know what I’m talking about!

When you get adventurous you can also do advanced techniques with the spot putty, like creating a cast iron texture!

That’s all for now! Enjoy!