Posted by
Mangozac on January 29, 2013
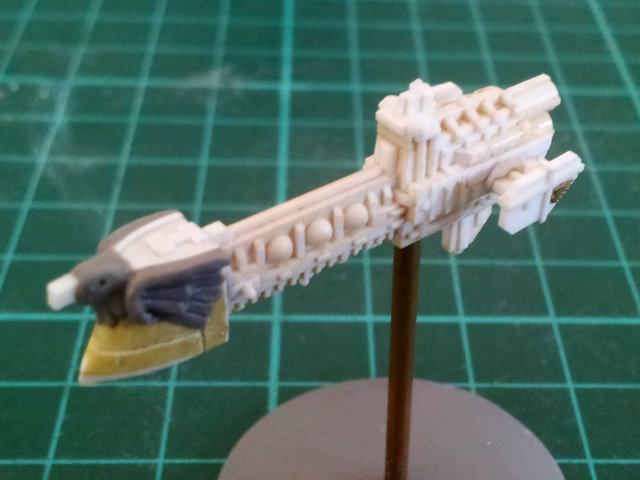
Well despite the wild weather we’ve had over the Australia Day long weekend I managed to fit in a little bit of work on the Frigate; namely making a new prow with better proportions. The new prow is a lot thinner and slightly shorter. I had intended for it to be not as tall also, but somewhere along the line that didn’t happen (and I didn’t realise until after I’d sculpted the eagle). The height wasn’t the main problem anyway.
Despite the new prow I’m still not convinced though and I think I’ve worked out the problem: the upper half of the midships section (where the cannon domes are mounted) is too skinny. Above the cannons the design tapers to a really narrow cross section and this causes the whole section to appear skinnier than it really is. So I’m toying with some concepts for how I can bulk out this top level which I think will make all the difference 😉
The path to perfection is never simple!


Posted by
Mangozac on January 24, 2013
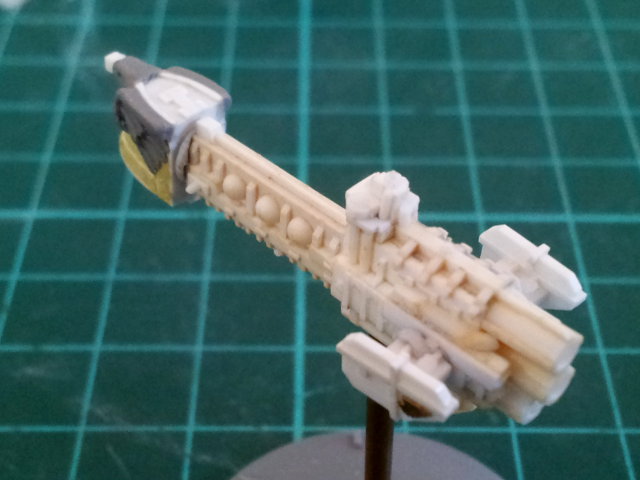
I made a bit more progress over the last couple of nights (would have been more on schedule if damn real life didn’t keep interrupting!). The other side fin has been completed and the standard prow has had a fair bit of work done – I’ve sculpted the eagle head and one of the wings.
The last update showed the prow just after it had had putty applied. It made the prow look much too big and bulky but after it had cured the prow was sanded down and looked much more appropriate. The problem is that with the addition of the wings sculpted on the prow it has bulked up a bit more. I think it looks good side on (some may disagree), however from higher angles the prow looks too wide compared to the relatively skinny hull. This far in I really don’t want to have to rework the prow that dramatically (it would require resculpting the eagle too) to shave off some of the width, but I suspect I don’t have a choice. I’ll deliberate on it…

Posted by
Mangozac on January 20, 2013
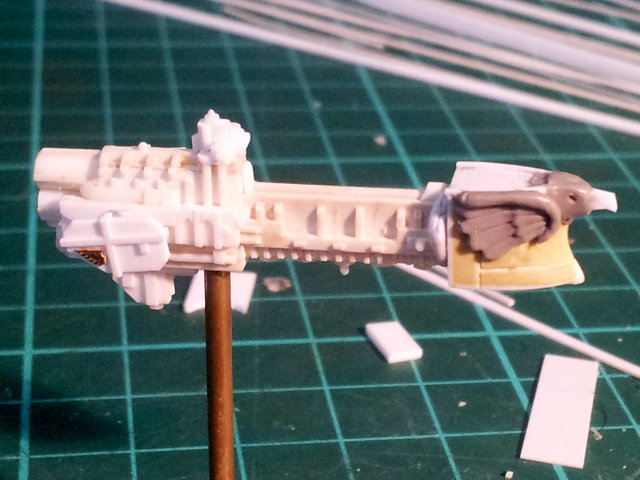
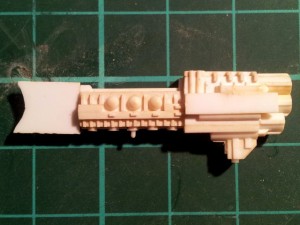
I’ve just got a quick update for tonight. Have been feverishly chopping and gluing styrene over the weekend making some really good progress on the Zeus Frigate model. Have got one of the two prow styles puttied up and ready for sanding. Actually I think it might be slightly too big so I’ll probably have to sand it back to a more appropriate size. Actually prow size is such an inconsistent thing. In some of the BFG concept art the prow almost dwarfs the rest of the ship!
Note the brass etch eagle wings on the rear of the side fin. A nice little touch if I say so myself 😉
The level of detail is pretty insane – I found myself last night cutting up tiny arched windows less than a millimetre in size! This model is a little smaller than the GW Sword model but has about double the amount of detail! Those hemispheres on the side of the hull will be cannon turrets – they just need barrels added (will probably have to machine barrels out of brass to give them nice fine detail).
If all goes to plan I’m hoping to be finished by next weekend…
Posted by
Mangozac on January 20, 2013
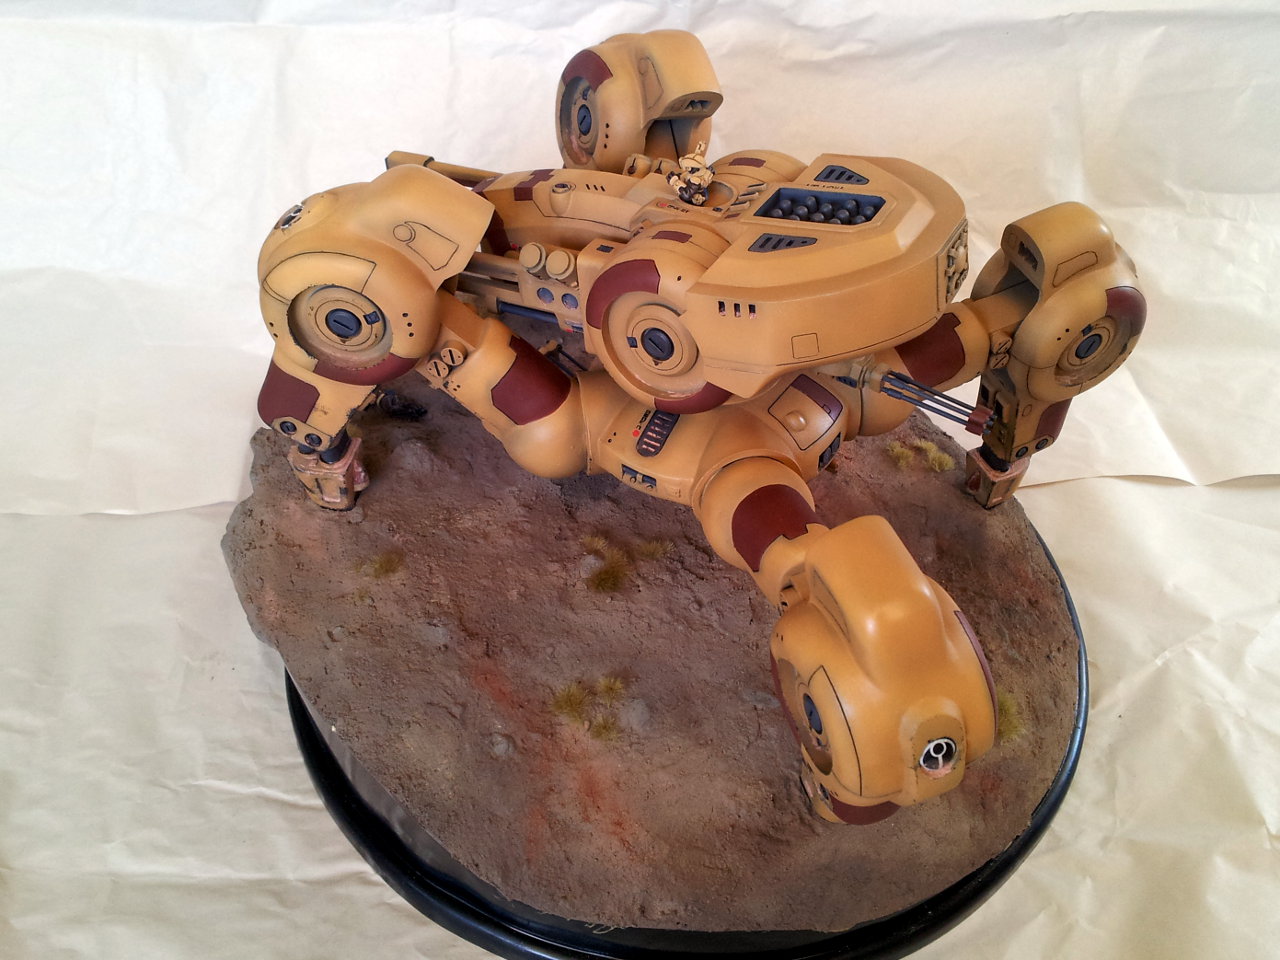
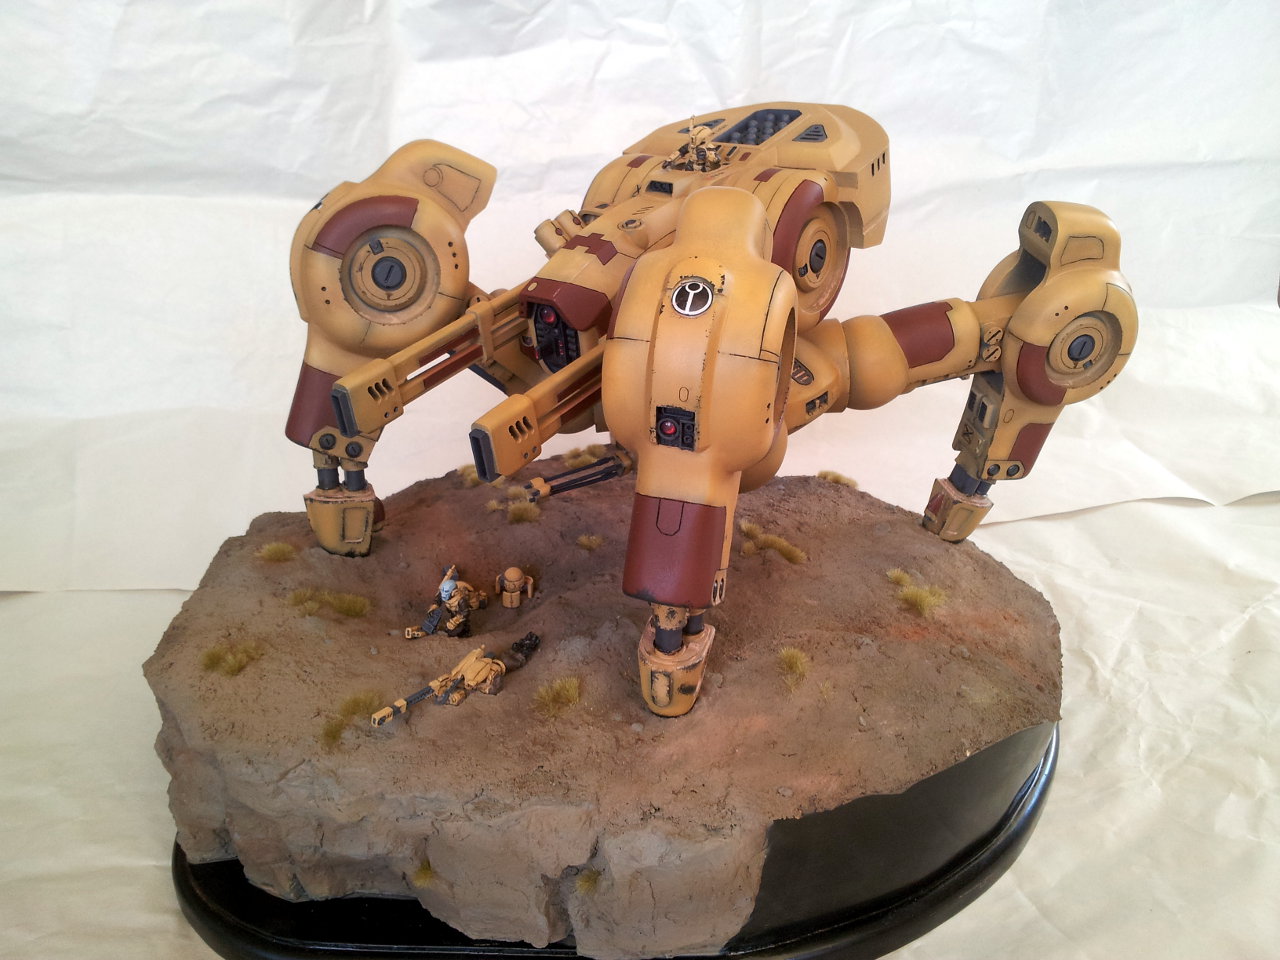
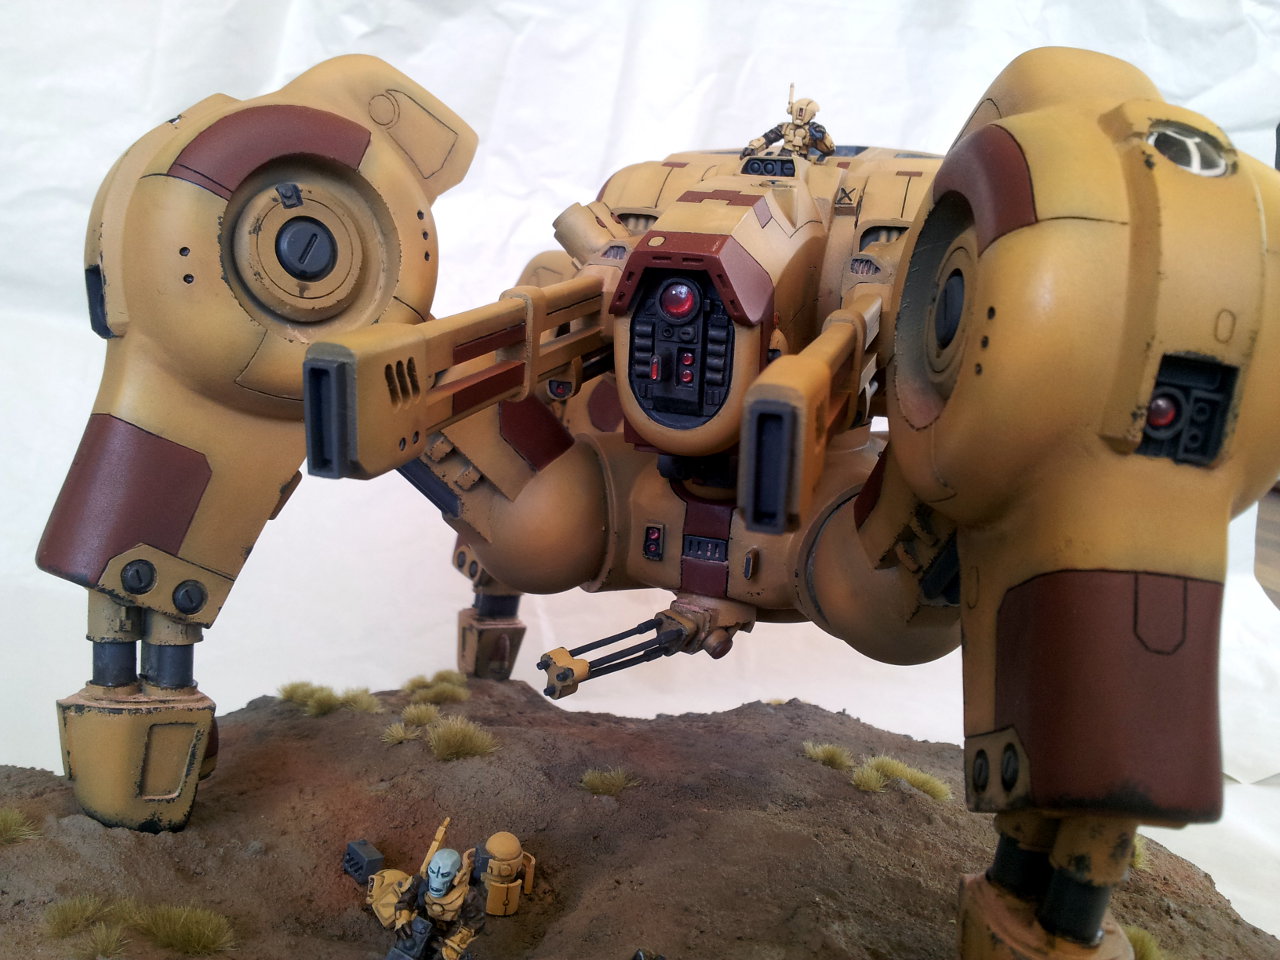
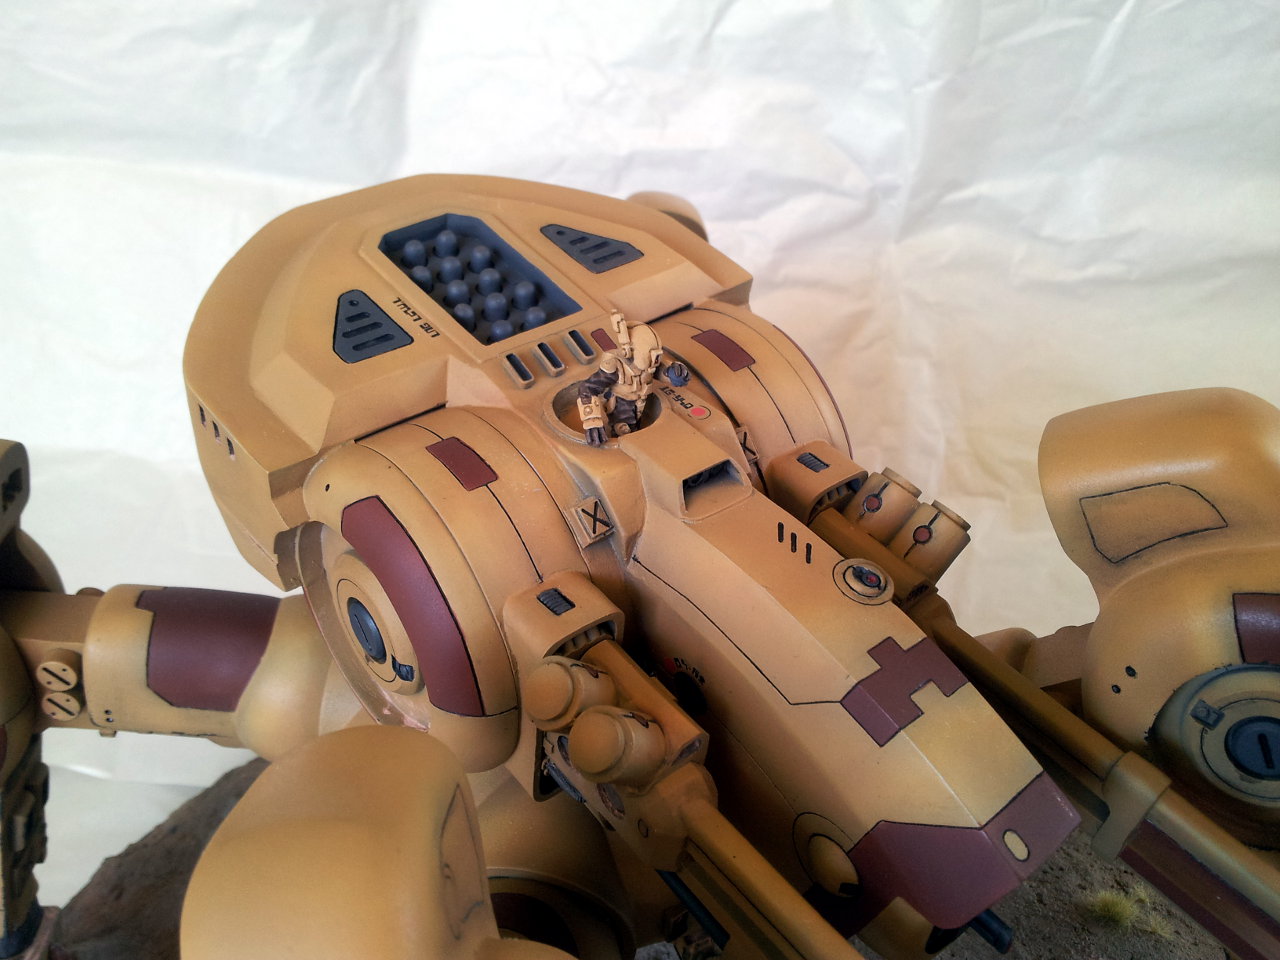
Epic does not even begin to describe the journey that has been this project. From such humble beginnings in early 2008, far before Resin Addict was even dreamed of, I embarked on my first scratchbuilding project. The sheer amount I learned along the way was just mind blowing and after two years of construction it was finally completed. The problem was that after such an epic modelling project I found myself burned out and since I didn’t play 40k any more I had no desire to actually build up one of my own!
It was over a year later that I decided I was ready to build up my own SAW kit to proudly display. The problem is that it has taken me almost another two years to finish the damn thing! Due to the size of it just making the base was a mission in itself.
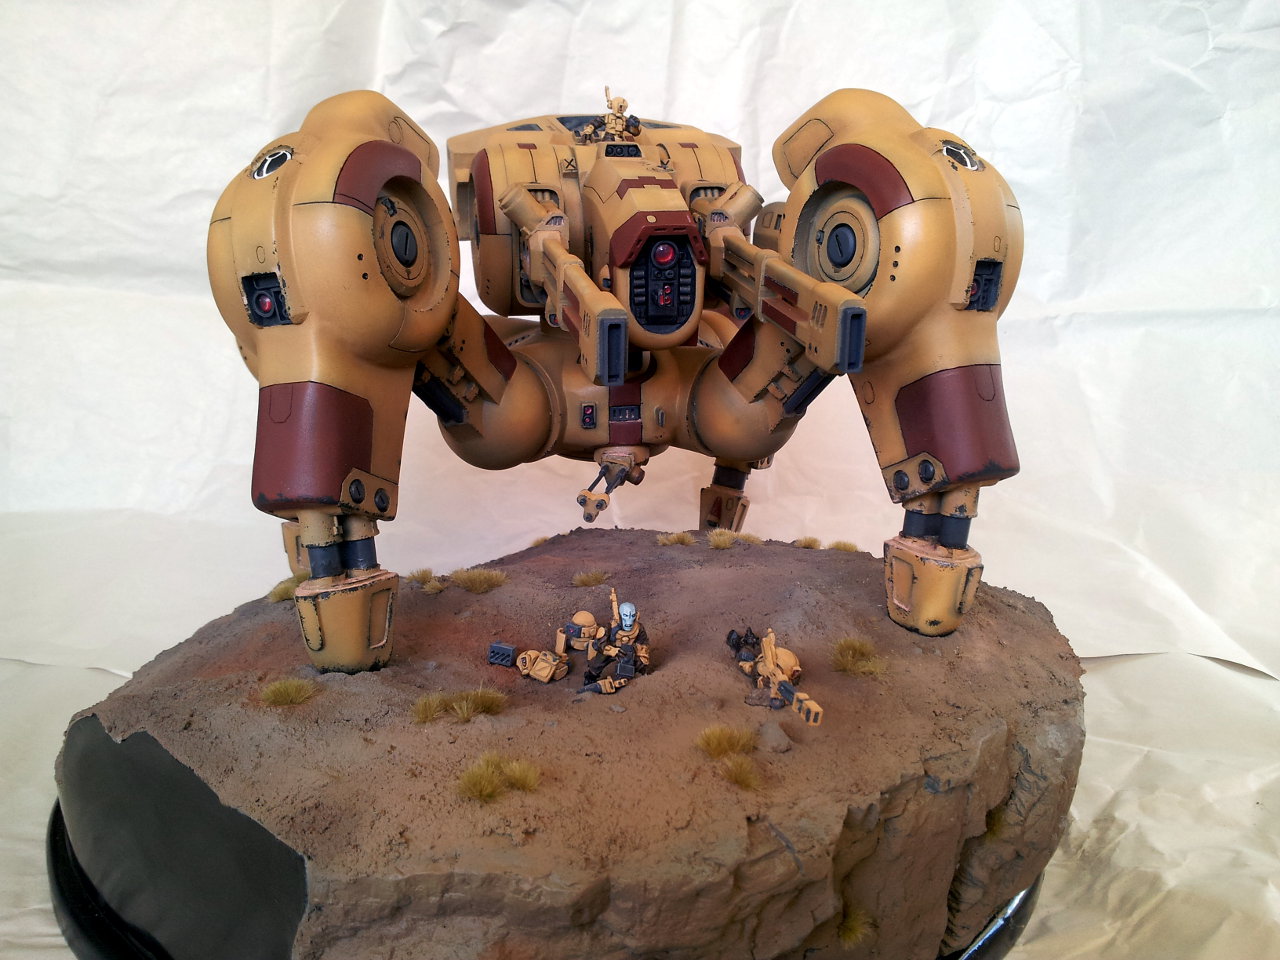
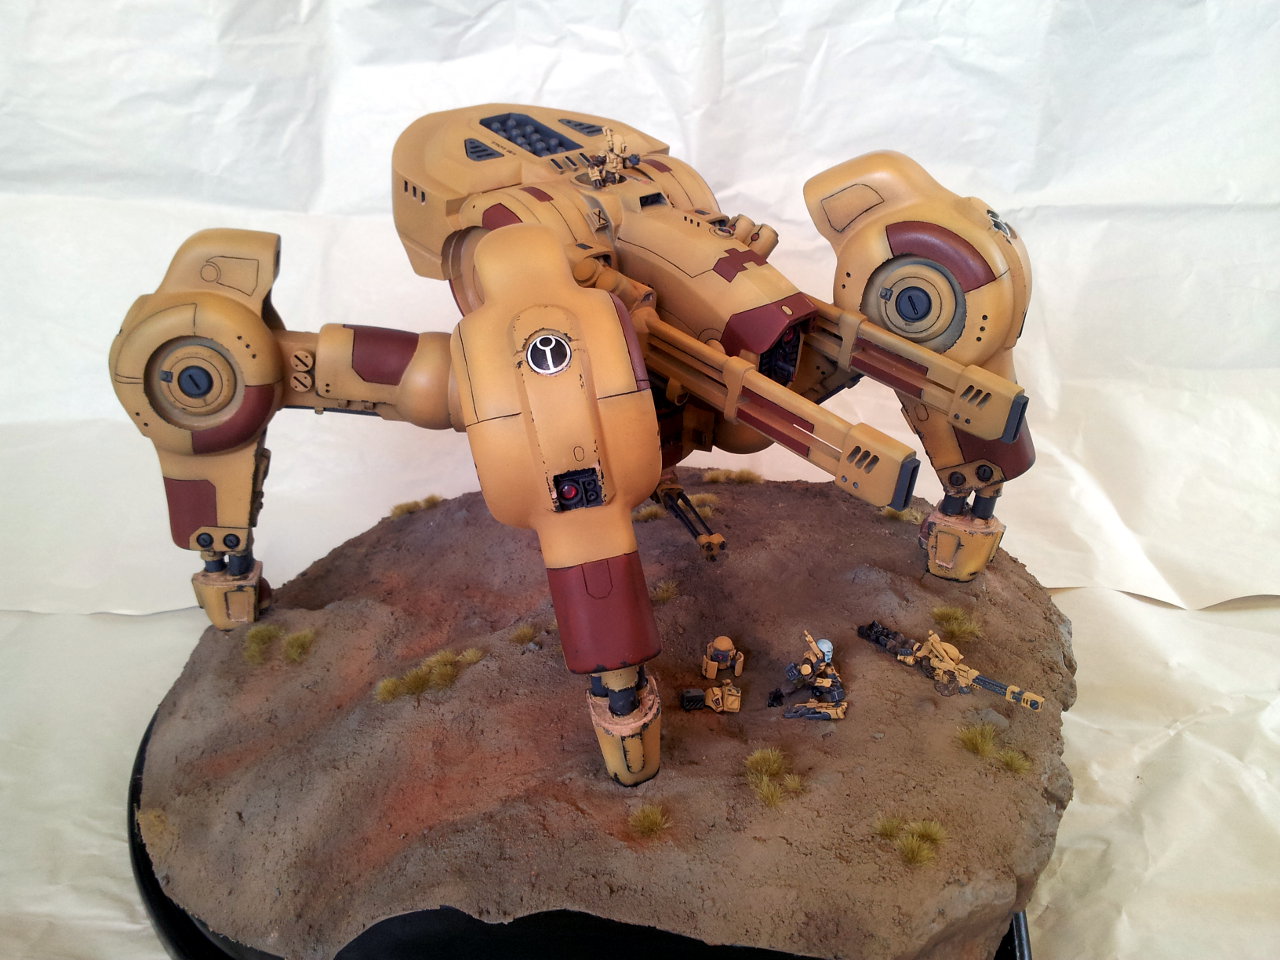
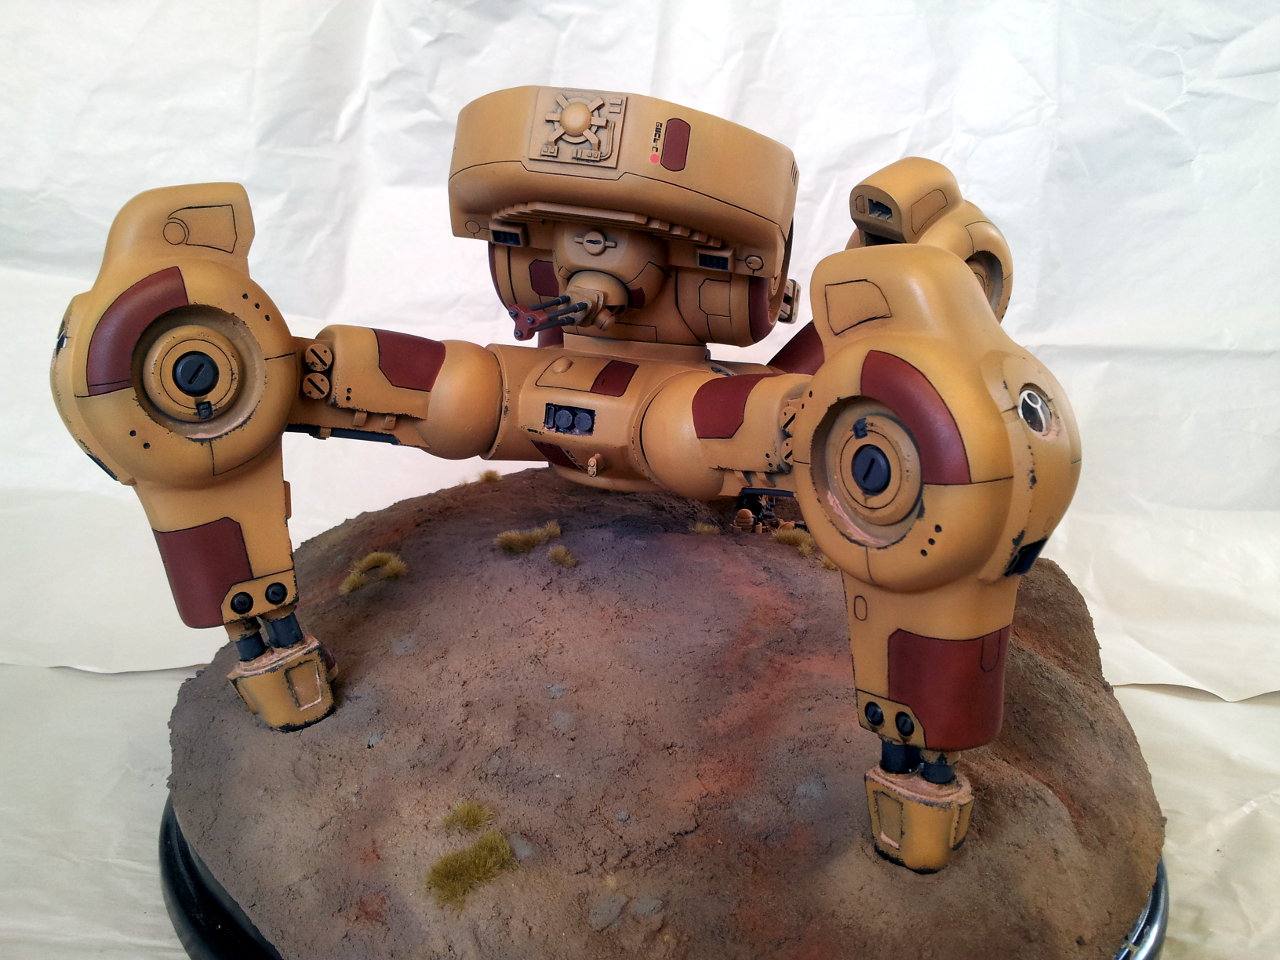
Just like with the original scratchbuild, painting has been a massive educational adventure too. This was my first time using “advanced” modelling techniques such as airbrushing, clear coats, oil paints and using pigments for anything other than rust. I screwed up a lot along the way and the finished model still isn’t perfect, but it’s good enough that for now at least I’m happy to call it done.
So enough jibber-jabber and on to the pictures. Thanks to our beautiful Queensland Summer weather light levels were perfect to take photos this morning. I didn’t take a massive number of shots – I figure I can always take more another time if need be 😉
The next project I’ll be completing is a new BFG ship, followed by painting either a Warhound Titan or an FDV1Mako kit from Filbot (yet to decide which one to do first). I guess I’ll get stuck back into the Centurion again some time this year so I can get it finished off…
Enjoy!
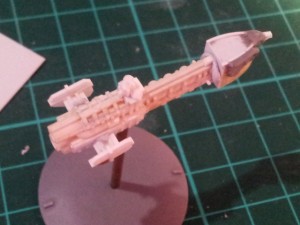
Posted by
Mangozac on January 18, 2013
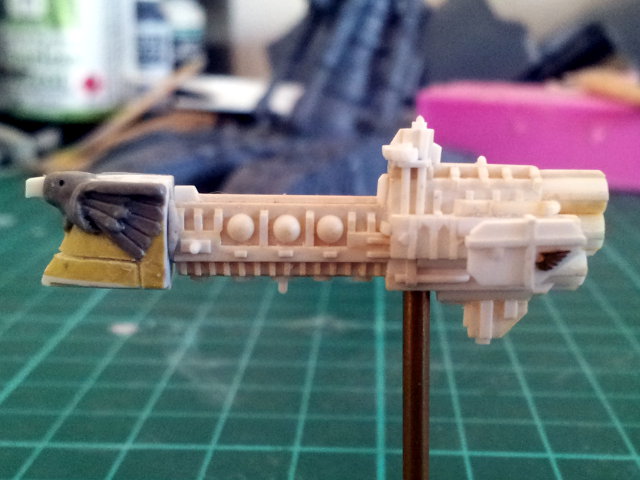
I recently had some friends asking if I was going to round out my BFG Zeus designs with a frigate to stand in as a Sword or Firestorm. I had in fact started on such a project over a year ago but in the meantime had gotten distracted by other projects. Having just completed the epic painting project of my SAW kit (pics this weekend I promise!) I decided now was as good a time as any to finish this one off!
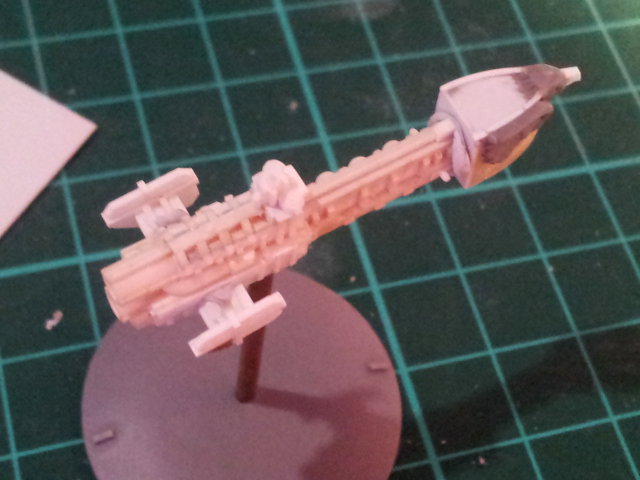
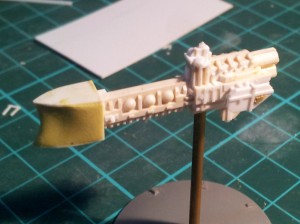
Upon pulling out the WIP model I discovered that I’d actually done a lot more than I’d realised, which was a nice surprise! I continued with some more detailing last night and snapped a quick WIP shot. Here it is following a shot I took very early on:

For reference those grid squares on the cutting mat are 10mm. Detailing at this size is so slow and fiddly but I am kind of used to it these days. Wouldn’t want to be doing it all of the time though! The goal is to get this one finished within a few of weeks (although real life may have other ideas!). It should make a nice little addition to my fleet 
Posted by
Mangozac on January 17, 2013
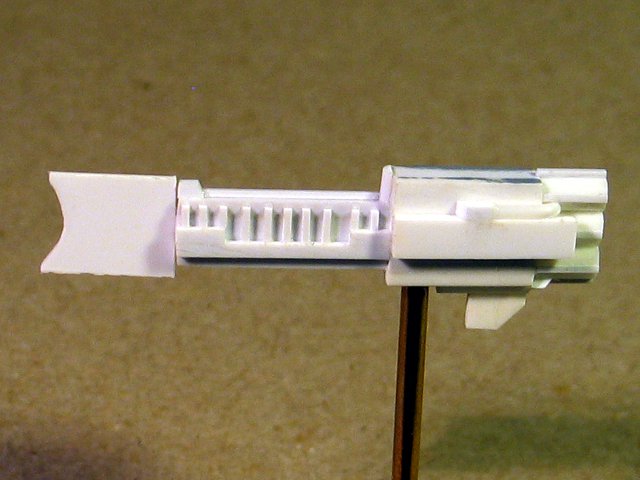
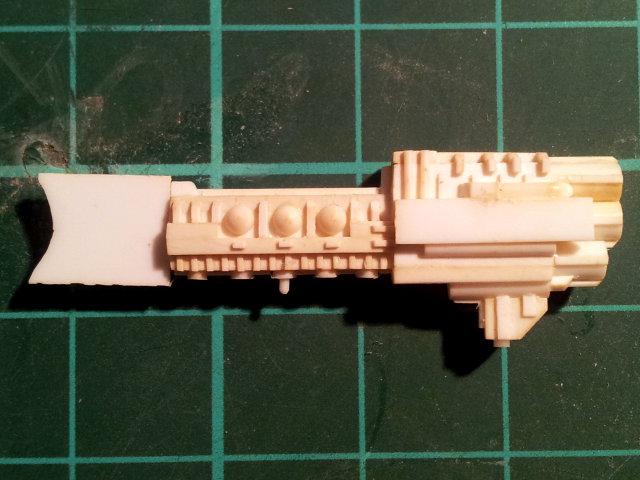
OK well as everybody knows I love my mecha so when I saw that Fil Dunn, creator of awesome Tau mecha kitbashes was releasing his own kit I just had to have one! The FDV1 Mako kit is pricey but it has a cool dieselpunk style going on and is really massive at 9″ tall.
I was lucky enough to receive kit number 4 of the initial limited edition run (of 25 kits). It arrived just before Christmas in this cool box:
Here’s a shot of the contents:
So over the Christmas break I did some cleanup and as much assembly as I could do before painting (it’s best to leave all of the armour panels, etc. off for ease of painting). Sorry but I don’t have a pic of that for you.
One thing I did decide however is that I’m not a big fan of the fact that it doesn’t have a right arm (take a look at this painted one to see what I’m talking about). Instead it has a drum containing a sensor suite (as described by Fil himself), which although it makes sense, just doesn’t do it for me visually. Although Fil has toyed with the concept of a version with a gun on each arm in the future! But because I’m a hobby masochist I’ve decided to scratchbuild a right arm for it. More to come on that in a future post.
My one big complaint with the kit is the leg design. Fil has proven he can design cool mecha legs in the past but the legs on this one are just odd. They certainly don’t look very functional and leave the model in a perpetual “taking a dump” pose. I don’t know if some reposing would help, but the legs are intended to be assembled in one position only, so reposing would be a real bitch.
Highlight of the kit: that armour plate around the gun arm shoulder. Man it’s sexy! Although really the entire gun arm is a pretty nice design 😉
Watch this space!
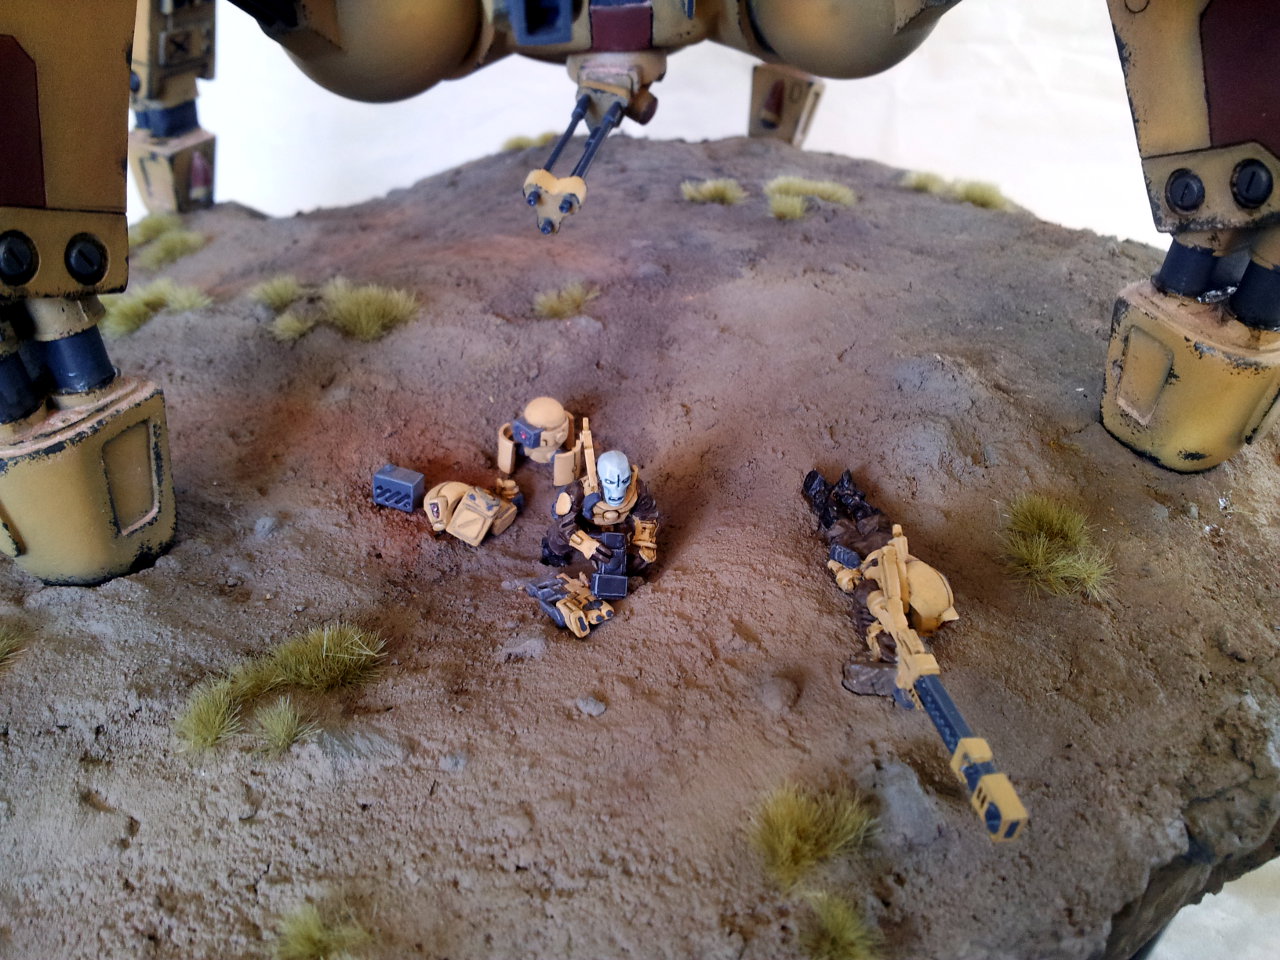
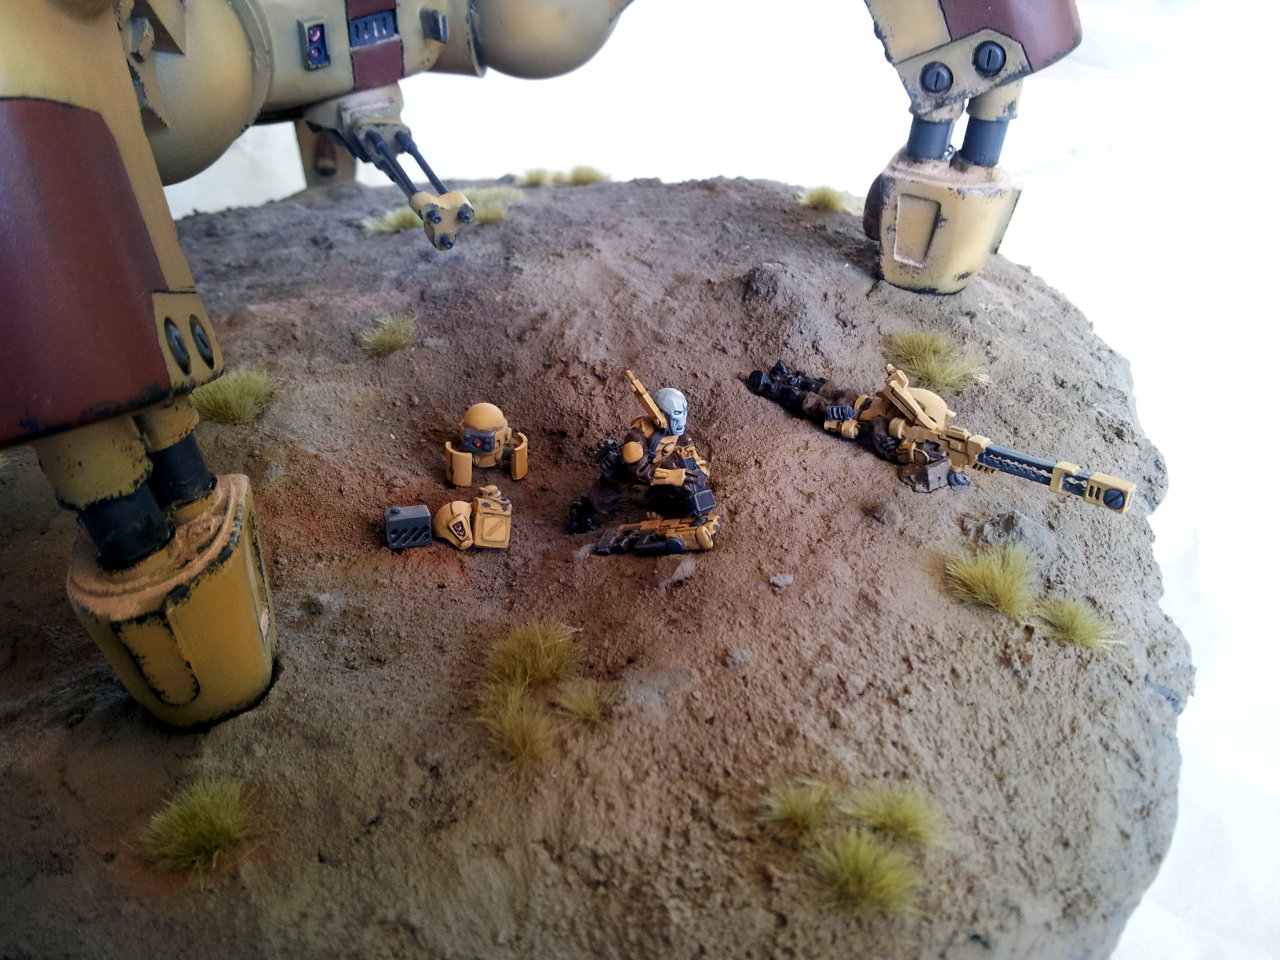
In other news my Superheavy Assault Walker Diorama is 99.9% complete so I’ll be taking some pics this coming weekend!