Posted by
Mangozac on May 26, 2013
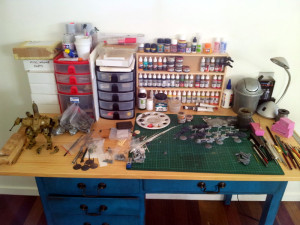
Since getting back into a lot more painting in this last year work desk space has been at a premium due to the number of paint and consumables bottles sitting on my desk. I recently realised how much of a waste of space this was and devised a shelving system to rectify it. I finally got a chance to build it this weekend and am pretty pleased with the result.
It’s pretty simple construction made from 40mm x 8mm pine strip. The size was determined by what I could make from two 1200mm lengths, however in hindsight I should have been less stingy and sprung for another length. That way I could have made it a bit wider (as constructed it’s 450mm wide), as I will be running out of space very quickly. I’d recommend 600mm wide.
The back is just a sheet of 3mm MDF.
The pieces of timber were cut to size on a drop saw. I used nails and PVA glue to fasten the pieces together, but due to how thin the pine strips are I pre-drilled all nail locations to ensure no splitting occurred.
I was quite surprised how stable the finished shelving unit is. I was expecting to have to add a base with a larger area, but in practice this is completely unnecessary.
So here’s the finished product in all its populated glory (please excuse the crappy picture – there was something weird going on with light levels):
Those with really keen eyes will see some new project on their way 
Posted by
Mangozac on July 24, 2012
Sorry for the neglect of the blog lately but to tell the truth I’ve actually been doing hardly anything hobby related for quite a few weeks now. It’s just been one of those periods of constant real life distractions. Not least of which has been moving house.
Since this has been my first chance to actually have all of my own furniture and stuff I’ve taken the opportunity to actually go with some kind of decor/theme. I like the aged vintage beach and French industrial styles so I’ve been buying furniture to fit in with that. Some stuff though it’s easier/cheaper to do yourself – the hobby desk being one such item. I have to admit though that primary inspiration for this came from my mate Seb – he recently picked up a cool looking vintage hobby desk and emailed me a photo to brag share his excitement
Since my hobby desk will again be in my bedroom (it’s a single bedroom duplex bachelor pad) I decided that my existing hobby desk was just too “office furniture” looking. I didn’t want to spend big money on a new desk though, so after looking around I came across an old used timber desk for $50. It’s a lot smaller than my old desk but since it has 5 drawers I figure I’ll be able to make more efficient use of the desktop space.
I got some paint mixed up and painted it “Calypso Blue”. Then distressed it (which entails attacking the edges randomly with sandpaper). Then wiped on a dark grey-brown glaze to give the paint an aged appearance. The end result is great.
The top that the desk came with was just crappy laminate so I decided it had to go. I bought a sheet of laminated pine from the hardware with the intention of staining it an aged colour. But I found that I quite liked the juxtaposition of the aged blue and the new pine so I simply lacquered it as it was. Admittedly I made the top a bit wide for the base – I might yet cut a little bit off each end so it looks more appropriate.
Here’s a pic:
The next trick is to sort out some drawer handles and then it will be properly finished, but in the meantime I couldn’t help but get the desk set up. I was right about the usefulness of the drawer space! The wide single drawer on the right is fantastic for storing all of the various stock materials (styrene strip and tube, etc.). The other drawers are organised into:
- Large hand tools (the Chopper II, saw, calipers, dial gauge)
- Mould making (Lego, clay, MDF boards)
- Other consumables (terrain making supplies, sandpaper)
- Misc figures and kits
I’m sure it will get organised differently once I start actively using it again. My next trick is to get my compressor and casting gear setup so that I can continue painting my SAW!
Next week on Homemaker Addict we’ll be discussing crochet for the modern housewife….. :p
Posted by
Mangozac on June 19, 2011
A few months ago I discovered that my local hobby shop was stocking a larger range of Tamiya products than it had in the past. One of these new products was the Tamiya Basic Type Modelling Putty:

This kind of putty serves a very specific purpose in the world of modelling and scratchbuilding: gap filling with a very fast curing time. You see traditionally many modellers with a wargaming background would just use Greenstuff, Milliput (my preference) or many of the other similar products available when a gap or seem needs to be filled. The problem with using such two-part putties is that they require quite a long curing time (at least 12+ hours) to get to the point where they can be further sanded or worked with. When filling very small gaps this curing time can really destroy productivity.
Enter the single part putty.
Single part putties are essentially really thick primer (think the consistency of toothpaste) that comes in a tube. They are generally lacquer based and from the moment you squeeze a portion out of the tube it begins to set quite rapidly as the lacquer evaporates. So fast, in fact, that the work time is likely to be as little as 15 seconds – enough to quickly and roughly apply the putty to the model with a sculpting tool. 15 minutes to 1 hour later (depending on the thickness applied) the putty will be fully cured and you can then continue on with the model.
Because of the relative messiness of the putty application it’s best used in applications such as filling small gaps such as along seams on larger kits (i.e. vehicles), or between joined styrene sheets when scratchbuilding. Once it’s cured you generally need to sand the seam smooth to clean it up. Unless you can apply with superhuman speed and dexterity so that there’s nothing to clean up!
Remember too that being lacquer based it can eat into the styrene a little. This generally isn’t a problem as it will fill the etched surface once it sets.
These two pictures show how the putty has been used to fill the gaps between the base prow shape and the added styrene edges:


Before using the Tamiya Putty I had been using some automotive spot putty (i.e. Bondo, but mine was a generic brand) for the same purpose and honestly it’s about the same in terms of performance. Both seem to have about the same curing time. I know it’s an ignorant way to think but I feel a preference for the Tamiya putty purely because it’s intended for modelling. The tube of Tamiya is cheaper than the spot putty, but it’s also a much smaller tube so economy wise the spot putty is better. Both types have a pretty strong smell though – if you have smelled lacquer thinner you’ll know what I’m talking about!
When you get adventurous you can also do advanced techniques with the spot putty, like creating a cast iron texture!
That’s all for now! Enjoy!


