New Scratchbuild: Centurion Mecha
Posted on 27 Jan 2012 by Mangozac in Centurion Mecha, Work in ProgressSo a little over a year ago I decided to start building a 28mm mecha model that was part dieselpunk, part 40k, with the intention of releasing it as a resin kit. It was a style I wanted to have a go at (as opposed to the clean ultra-futuristic Tau mecha stuff I had worked on in the past) and I figured a few people would want to use it as a Knight Titan stand-in.
The project got off to a nice start but a couple of months in it got shelved. I don’t quite remember why, although the influx of BFG commissions didn’t help. Oh and work got really busy. And having a girlfriend sucks away hobby time (single again – woohoo!). Anyway after getting the last in a line of BFG scratchbuild projects finished I decided I’d had enough of stupidly small details and turning up 1mm diameter gun barrels on my lathe and would get back to some 28mm modelling. Ahh what a breath of fresh air!
Now I consider myself pretty good at scratchbuilding, however I know what my talents are and drawing is not one of them. At the outset of the project I did have a couple of attempts at sketching up designs but let’s just say they were worse than atrocious. I mean they kind of conveyed basic forms but really there wasn’t enough information to reference for the build so I scrapped them. I figured I’ve had enough experience at this stuff I’ll just wing it and design as I go. That’s not to say I didn’t have basic mental ideas for the design; general proportions, configurations, etc. I looked at a lot of Warmachine Warjack models and concept art as inspiration, along with the awesome work of Luca Zampriolo (Kallamity)
Before the project got shelved I had the leg designs 75% done. All that was left was detailing and finishing. At the end of this post I’m going to dump a bunch of randomly selected pictures of the progress to that point without any explanations. Feel free to ask questions 😉
Last year I bought myself a small Chinese CNC router so my model making process is now a combination of 3D modelling, vector drawing, CNC machining, turning shapes on my lathe and good old traditional pushing putty around (Milliput is still the putty of choice). The CNC routing I generally use in just a 2.5D mode, drawing parts in Inkscape and then cutting them out in styrene sheet. It facilitates beautiful geometric shapes that would simply take far too much time to cut/file/sand manually. For example the tread on the sole of the foot was all cut on the router:
The lathe has become an indispensable piece of equipment in my scratchbuilding quiver, to the point that I don’t know how anybody else does without it! I could never turn something up by sticking it in a dremel again! It’s an old Sherline miniature lathe that I scored for AU$90 a couple of years back. You can read more about it and some of the mods/attachments I’ve done here. The CNC machining of many pieces meant that some degree of the model has been drawn up digitally, either before or after it was physically built. So I guess I did do some pre-design/concept work…
Once the parts are nearing completion I hit them all with a coat of Mr Surfacer 500. It’s a fine putty/primer that’s great for both filling small gaps/nicks/flaws in the master parts, but the primary objective is to get all of the parts a uniform colour (rather than the random mix of white styrene, green-y Milliput and grey Tamiya putty, plus pencil lines, grey Kotobukiya parts, etc.), which help immensely in getting an overall feel for how the parts are actually looking. If being real hard core one would do this a couple of times for each part, but I’m too lazy for that – it takes a lot of stuffing around setting up the airbrush (and more so cleaning it afterwards). Here’s a shot of the primed parts:
Actually, a lot of that primer gets sanded back as all of the little flaws are repaired. Oh also note the yellow tape around the large cylindrical hip joints of the upper legs. It’s just Tamiya masking tape and it’s there to prevent damage to the nice crisp edges as I muck around carving and sanding the thigh armour plates.
The thigh armour plate banding as seen in one of the earlier WIP shots was deemed too thick and thus replaced with some beautiful CNC cut pieces in 0.5mm styrene. I simply laid the parts on a scanner, scanned and scaled the parts to 100% in Inkscape and then drew up the new banding. 5 Minutes with the CNC router and I have perfectly formed new banding ready to be glued on ![]()
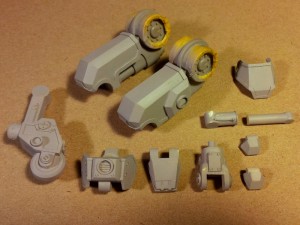
So last weekend’s distinct lack of lack of social or other engagements meant that I had a wonderful weekend of modelling and have now got something serious to show for it. All of the leg components (excluding the knee armour plate) have been moulded and duplicated in resin and the hips/pelvis are well under way.
Next we have the photographic proof of an assembled set of resin components. They assemble very easily with a few drops of super glue. Some of the moulds have a couple of small bubble air issues so I’m cutting wider/extra air channels into them, but these test parts are still a little bubbly. And have some more-than-slight mould slip in areas. None of this will be an issue for production moulds.
Note that the left leg isn’t attached to the pelvis – the hip piece will be a duplicate of the right leg hip piece (so I only need to master the one).
The next shot shows what the leg looks like side on – pretty much the same as it always has, I know, but everything looks better in monotone grey resin. Also included is a shot of the foot showing the resulting tread pattern – very happy with how this turned out!
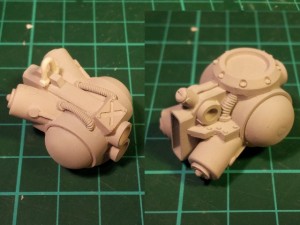
The pelvis piece has been coming along nicely also. It’s kind of hard to see in the WIP state, especially with the ball joint sections made from clear perspex (my fuzzy photography didn’t help either). The ribbed hoses are a great product from Dragon Forge Design. Although I assume they are just casts of regular wound guitar strings, being pewter they are so easy to bend into the desired shape and they stay there! Seriously anybody doing any kind of scratchbuilding or even just conversions should get some!
Oh and hex styrene rod is awesome too. Perfect for making bolt heads and nuts (rivets get boring). Pro tip: look for Plastruct stockists, as they will let you buy single rods rather than a pack of them. Such specialists materials like that you’re better off with large variety over volume.
The hip piece turned out very nicely with its recessed bolt heads:
With the pelvis and hip nearing completion it was time to go at it with the Mr Surfacer again. It’s always a mixed emotion afterwards: it’s very cool to see the parts in a uniform grey colour to get a sense of what they really look like, but it also shows up very single tiny little flaw (such as the tiny bits of leftover Milliput and stuff like that). So the next step is simply running around with some fine grit sandpaper to clean it all up once the primer has cured nicely.
I also decided that the knee armour was too boring so before I cast it up I designed and added a tie down shackle setup:
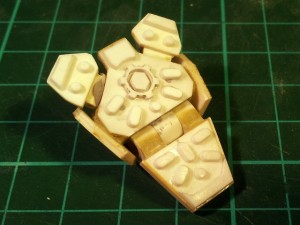
And that brings us up to date pretty much to the minute. The knee armour and hip pieces have all been finished so the next milestone will be completing the pelvis. The pelvis itself is 90% done – I’m now working on the groin armour plate which forms the front of the pelvis. It will be mounted via some beefy looking cylinders. It took me a while to come up with a shape but I’ve got something I’m happy with now and will build it up over the weekend. Then do the scanner and router trick to make up the banding for it!
I would like to place some iconography about the model so I’ll be trying out some brass etch in the coming week. I did have some failed attempts at it a year ago (the beginning of the project), but armed with the laminator I’ve modified from this article I’m expecting better results!
I have to say, any reservations I have had about this project have well and truly evaporated following the assembly of the resin parts like this! I’m really excited about where it’s going! Once the pelvis is completed and cast I’ll be able to start playing with torso mockups made of clay – I’ve got some cool ideas for that too!
Leave a Reply
You must be logged in to post a comment.


