Sorry, I just think those running legs fit in with the dancing Berzerkers.
I think a more dynamic, and less comic, pose would be later in the run cycle.
Left leg trailing, pushing off with toe.
Right leg forward, thigh at about 45deg and calf angled backward.
This would be the point just before both feet are off the ground.
ATTENTION: As of March 2017 the Resin Addict Forums are being wound down. New members are no longer being accepted. Read more about it here.
Resin Addict Forum
A place to talk about your addiction
Split Mould Casting Technique
Moderator: Wardens
Re: Split Mould Casting Technique
![]() by Lane » Fri Dec 16, 2011 8:39 am
by Lane » Fri Dec 16, 2011 8:39 am
- Lane
- Habit
- Posts: 243
- Joined: Sat Mar 19, 2011 4:02 pm
Re: Split Mould Casting Technique
![]() by Anvils Hammer » Fri Dec 16, 2011 8:52 am
by Anvils Hammer » Fri Dec 16, 2011 8:52 am
somthing like this you mean? on the left.. 
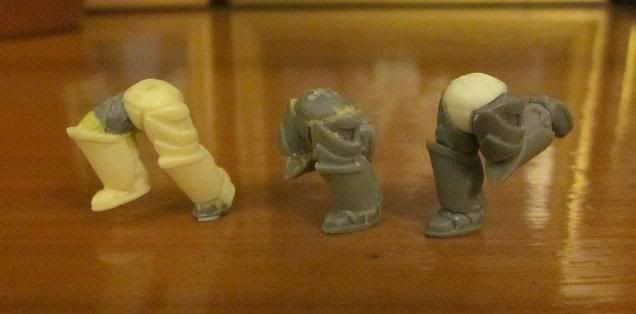
Im not the worlds fasted modeller.. I made three to start with, it just happened that only two were included in the first photo
I looked at some slow motion footage and picked three different poses from the run cycle.
AH
Im not the worlds fasted modeller.. I made three to start with, it just happened that only two were included in the first photo
I looked at some slow motion footage and picked three different poses from the run cycle.
AH
- Anvils Hammer
- Habit
- Posts: 232
- Joined: Fri Oct 07, 2011 8:58 am
Re: Split Mould Casting Technique
![]() by mangozac » Fri Dec 16, 2011 9:19 am
by mangozac » Fri Dec 16, 2011 9:19 am
The left and middle one are much better IMO. Then right end close up isn't as bad as I thought from the previous picture, but I still wouldn't use it.
I do like the fact that you researched run cycles in slow motion to design them though
I do like the fact that you researched run cycles in slow motion to design them though
Oh yeah I can make that....
-

mangozac - Resin Addict Collaborator
- Posts: 4271
- Joined: Fri Oct 16, 2009 3:40 pm
- Location: QLD, Australia
Re: Split Mould Casting Technique
![]() by blind pig » Fri Dec 16, 2011 10:51 am
by blind pig » Fri Dec 16, 2011 10:51 am
I like them.
The poses show that they really are superhumans able to pelt along, even with a full suit of armour.
The poses show that they really are superhumans able to pelt along, even with a full suit of armour.
- blind pig
- Junkie
- Posts: 581
- Joined: Fri Feb 19, 2010 2:41 am
- Location: Brisbane Australia
Re: Split Mould Casting Technique
![]() by Anvils Hammer » Fri Dec 16, 2011 11:10 pm
by Anvils Hammer » Fri Dec 16, 2011 11:10 pm
Cheers for feedback, ive now completed the running legs and Im really pleased with how theyve turned out.. split molding them is going to be a bitch but Im going to try!! :p
Back to the actual thread topic..

wahay!!! I learned a lot about my vacuum pump yesterday.. including how not to use it! (I thought 200ml in a pint glass would be ok.. I was wrong..
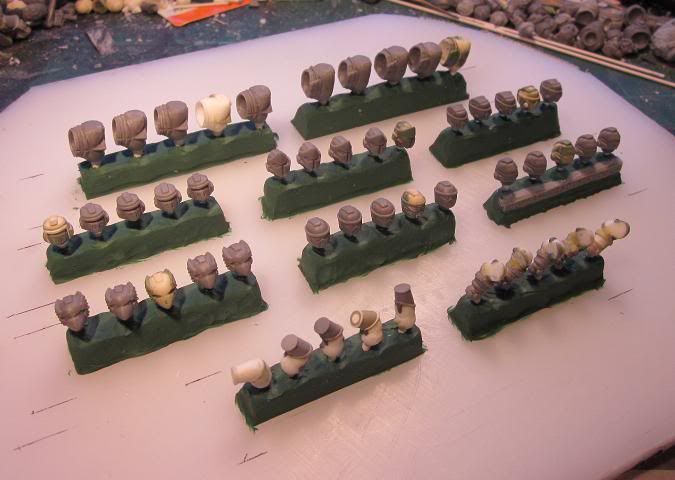
I spent hours and hours yesterday individually glueing fifty parts to sticks and putting them in neat rows in plasticine, here they are on parade-
and half full of rubber, I did the pour in two stages so I could vacuum properly without it spilling everywhere.
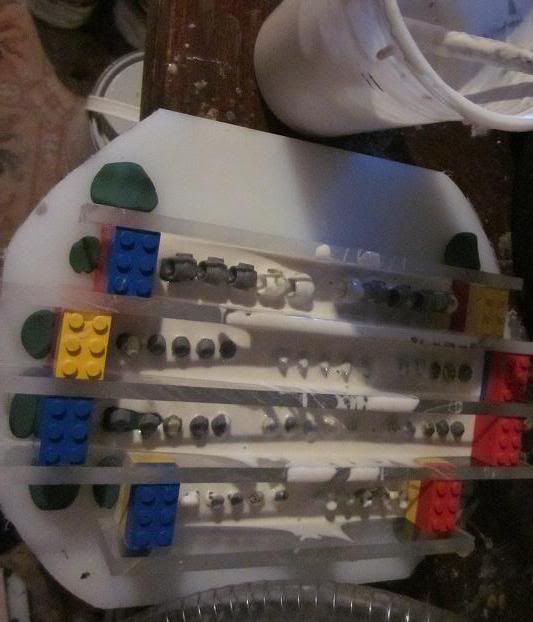
The boxes are made of strips of acrylic and lego, all sealed with vaseline where nessecary and stuck firmly together with plasticine round the edges. It worked really well!
Will get photos of the split molds and initial test casts tonight.
Turns out my vacuum pump doesnt actually "fully" pull a vacuum till its been running about 45 seconds to a minute.. I tried degasing for 15 seconds.. nothing.. degas for 45 seconds.. nothing.. degas for 2 minutes.. and you see the photo above with rubber all over the place..
The pump chucks out the white vapour for 45 seconds or so, after which the ammount of vapour coming out is massively reduced, I think this is the point at which the chamber is properly empty.
Which means later on, Im going to try vacuuming my resin filled molds for one minute (one minute to mix and pour, one minute vacuum, one minute to settle before curing) instead of the 10-15 seconds I was using yesterday. It will be interesting to see if this makes a difference..
More updates later.. AH
Back to the actual thread topic..
wahay!!! I learned a lot about my vacuum pump yesterday.. including how not to use it! (I thought 200ml in a pint glass would be ok.. I was wrong..
I spent hours and hours yesterday individually glueing fifty parts to sticks and putting them in neat rows in plasticine, here they are on parade-
and half full of rubber, I did the pour in two stages so I could vacuum properly without it spilling everywhere.
The boxes are made of strips of acrylic and lego, all sealed with vaseline where nessecary and stuck firmly together with plasticine round the edges. It worked really well!
Will get photos of the split molds and initial test casts tonight.
Turns out my vacuum pump doesnt actually "fully" pull a vacuum till its been running about 45 seconds to a minute.. I tried degasing for 15 seconds.. nothing.. degas for 45 seconds.. nothing.. degas for 2 minutes.. and you see the photo above with rubber all over the place..
The pump chucks out the white vapour for 45 seconds or so, after which the ammount of vapour coming out is massively reduced, I think this is the point at which the chamber is properly empty.
Which means later on, Im going to try vacuuming my resin filled molds for one minute (one minute to mix and pour, one minute vacuum, one minute to settle before curing) instead of the 10-15 seconds I was using yesterday. It will be interesting to see if this makes a difference..
More updates later.. AH
- Anvils Hammer
- Habit
- Posts: 232
- Joined: Fri Oct 07, 2011 8:58 am
Re: Split Mould Casting Technique
![]() by blind pig » Sat Dec 17, 2011 12:14 am
by blind pig » Sat Dec 17, 2011 12:14 am
you should use a fairly large tub to mix and vacuum degas your silicones. Something like a 2L ice cream container is perfect. It really does expand that much.
- blind pig
- Junkie
- Posts: 581
- Joined: Fri Feb 19, 2010 2:41 am
- Location: Brisbane Australia
Re: Split Mould Casting Technique
![]() by Lane » Sat Dec 17, 2011 6:54 am
by Lane » Sat Dec 17, 2011 6:54 am
I use a cut 3times the volume of the RTV.
- Lane
- Habit
- Posts: 243
- Joined: Sat Mar 19, 2011 4:02 pm
Re: Split Mould Casting Technique
![]() by mangozac » Sat Dec 17, 2011 10:31 am
by mangozac » Sat Dec 17, 2011 10:31 am
Oh yeah I can make that....
-
mangozac - Resin Addict Collaborator
- Posts: 4271
- Joined: Fri Oct 16, 2009 3:40 pm
- Location: QLD, Australia
Re: Split Mould Casting Technique
![]() by geomod » Sat Dec 17, 2011 12:25 pm
by geomod » Sat Dec 17, 2011 12:25 pm
I have often read 3 x the volume is the guide. Personally I use approx 4 x just to be on the safe side, even though I have the advantage of a lexan top (offcut from local plastics supplier) to my vac chamber.
- geomod
- User
- Posts: 52
- Joined: Sat Jul 24, 2010 4:27 pm
Re: Split Mould Casting Technique
![]() by Anvils Hammer » Mon Dec 19, 2011 7:31 am
by Anvils Hammer » Mon Dec 19, 2011 7:31 am
Yep Ill be using a much bigge mixing tube from now on to degas! its amazing how much gas there can be in a tiny ammount of rubber!!
Here are some sprues produced from my molds-
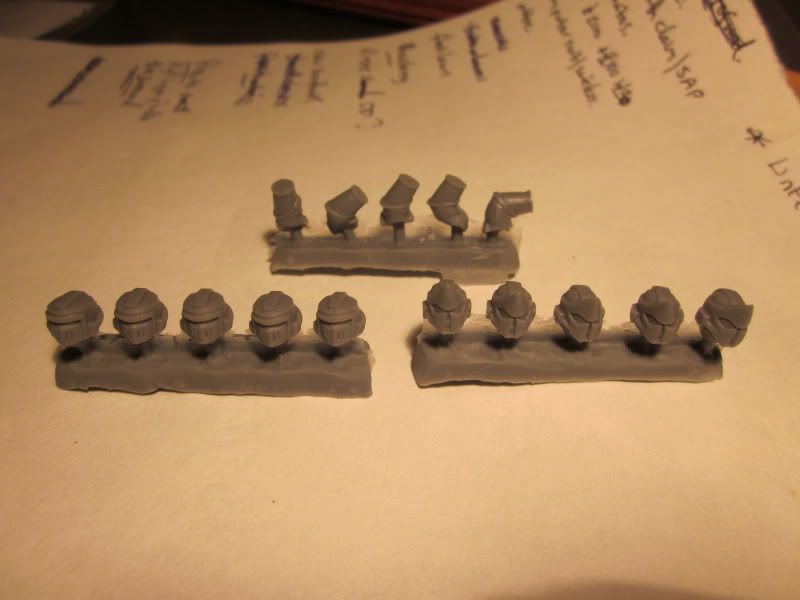
I can get them absolutly perfect. but its a pain.
I have to pour the resin, then pull apart/squeeze the molds in order to let the resin sink/be sucked into the cavaties.. then I vacuum them for a minute or so, then apply 45PSI..
Considerably more work compared to just strapping up two part molds, pouring, apply pressure..
that said, the quality of these parts is noticably better than anything Ive produced before, the helmets are exact replicas of the master, no mold lines, defects, mold misalignment etc etc.
At the moment Im thinking the way to make multiple molds is to keep the molds Ive just made as "master" molds, from which I will only produce resin copies for the purposes of making other molds.
That way I just have to take the resin sprue out, flip it upside down and mold it.
The other method im experimenting with at the moment is putting a peice of tin foil in the split, its 0.02mm thick. fill the mold with resin as normal, when it comes out, you can mold it straight away, the tin foil creates the correct split line.
If it works, Ill be able to use the same master several times to create mold copies, however the mold would probably be slightly worse quality.. and it only takes 5 minutes per mold or less to cut the slits..
Over the next few weeks Ill be experimenting a lot to refine the techniques, I need to speed up the processes of making new molds, and producing product. Work out whats optimum..
AH
Here are some sprues produced from my molds-
I can get them absolutly perfect. but its a pain.
I have to pour the resin, then pull apart/squeeze the molds in order to let the resin sink/be sucked into the cavaties.. then I vacuum them for a minute or so, then apply 45PSI..
Considerably more work compared to just strapping up two part molds, pouring, apply pressure..
that said, the quality of these parts is noticably better than anything Ive produced before, the helmets are exact replicas of the master, no mold lines, defects, mold misalignment etc etc.
At the moment Im thinking the way to make multiple molds is to keep the molds Ive just made as "master" molds, from which I will only produce resin copies for the purposes of making other molds.
That way I just have to take the resin sprue out, flip it upside down and mold it.
The other method im experimenting with at the moment is putting a peice of tin foil in the split, its 0.02mm thick. fill the mold with resin as normal, when it comes out, you can mold it straight away, the tin foil creates the correct split line.
If it works, Ill be able to use the same master several times to create mold copies, however the mold would probably be slightly worse quality.. and it only takes 5 minutes per mold or less to cut the slits..
Over the next few weeks Ill be experimenting a lot to refine the techniques, I need to speed up the processes of making new molds, and producing product. Work out whats optimum..
AH
- Anvils Hammer
- Habit
- Posts: 232
- Joined: Fri Oct 07, 2011 8:58 am
Re: Split Mould Casting Technique
![]() by geomod » Tue Jan 24, 2012 1:43 pm
by geomod » Tue Jan 24, 2012 1:43 pm
Hello fellow addicts,
I thought I would add my two cents worth to this thread.
Firstly, all praise Mangozac. I have found this technique to be far better than two part moulds for fiddly small parts.
Also, all praise Blind-Pig, forthe tip about talc and bubbles.
Over the weekend I have made a number of split moulds of parts that have been producing poor casts from two part or plug moulds with results that have stunned me because of their detail and ease.
My technique and materials are listed below. I know a lot of this has been covered already but I thought some other patient might get some benefit from another perspective. I really hope this dosen't come off as pompous.
Mould creation (vacuum and pressure):
I make my mould boxes from LEGO, as I can calculate the exact volume of silicone needed for each mould. (each 'pip' on the lego = 0.61 ml).
I base the mould box with 'klean klay' (from my silicone supplier, compatable with the silicone I use) to seal the base of the LEGO mould box. I also use this clay for the pouring plug that the parts are pushed into.
I degas my 'Pinkysil' silicone (usually takes about 27mm Hg to really kick off) using 200ml of mixed pinkysil in a one liter tall plastic beaker (again, from my supplier). Usually the silicone bubbles will collapse before it overflows the beaker.
I pour the silicone into the mould and then put the mould into my pressure pot at 40psi to set for half an hour.
I use 40psi because it does the job and isnt too scary a pressure, I know some other patients use higer pressures but 40 is what I am comfortable with.
Once the mould is set, I disassemble the LEGO and remove all the clay, leaving the mould with the parts inside. I then use a scalpel to cut the split in the mould, I am a bit untidy at this but it produces a mould that is easy to align.
Mould Pouring (vacuum and pressure):
Firstly, I dust my mould with talc (thanks Blind-Pig) and blow it out with compressed air (1,001 uses for an air compressor), this leaves a VERY fine layer of talc on the mould surface.
I use 4PU (from Barnes, again, thanks Blind-Pig, and Mangozac for your suggestions), as it is a very fluid resin and gets into the mould well.
I use Mangozac's squeeze technique to get the resin into the mould and leave a resevoir of resin in the pour plug.
Then the mould (I often do 3 or 4 small moulds at once) goes into the vacuum pot to get the bubbles out. I take the resin down to ~25mm Hg to get the bigger bubbles out and stop when the resin gets lots of small bubbles. This takes about 30 seconds.
I'm not sure if the small bubbles are gas in the resin or something important bubbling off, can anyone comment on this?
As soon as I have released the vacuum, I apply 40 psi pressure to the resin and let it go off for an hour.
I should comment at this point that I use the same converted paint pot for my vacuum and pressure applications, with different lids, this saves moving moulds full of liquid resin too often.
I am very happy with the results I have got from this method. Its something I should have tried a while ago.
Thankyou to all who have contributed to this thread so far. I have found it very heplful.
- geomod
- User
- Posts: 52
- Joined: Sat Jul 24, 2010 4:27 pm
Re: Split Mould Casting Technique
![]() by mangozac » Tue Jan 24, 2012 9:30 pm
by mangozac » Tue Jan 24, 2012 9:30 pm
Wow that's fantastic to hear! Thanks for the feedback and description - it does not at all come across as pompous! In fact the more descriptions we have of the same process the more likely we are to automatically answer readers' questions
I do have one question: why do you vacuum the Pinkysil before pouring? If you're curing the mould under pressure in my experience it's not necessary to degas first.
I must also point out that the split mould technique was not my invention, however it does seem that I may have pioneered documenting it for use in hobby casting like this?
Any chance of some piccies?
Oh yeah I can make that....
-
mangozac - Resin Addict Collaborator
- Posts: 4271
- Joined: Fri Oct 16, 2009 3:40 pm
- Location: QLD, Australia
Re: Split Mould Casting Technique
![]() by Fleafa » Tue Jan 24, 2012 10:22 pm
by Fleafa » Tue Jan 24, 2012 10:22 pm
Great to have one person's technique broken down like that. Would be cool to put together some kind of Resin Addict casting manual with everyone's experiences and pictures etc.
-

Fleafa - Junkie
- Posts: 835
- Joined: Thu Jul 07, 2011 2:56 am
- Location: Fareham, Hampshire, UK
Re: Split Mould Casting Technique
![]() by geomod » Wed Jan 25, 2012 4:59 am
by geomod » Wed Jan 25, 2012 4:59 am
Thanks for the positive reponses guys.
I degas the pinkysil for two reasons.
The first is because I had read on several sites that I should, so I gave it a shot. (It gave me a good excuse to buy a vaccum pump) .
.
The second was surprising. I have found that once degassed, the pinkysil pours more fluidly and that the resultant pressure-set silicone is more dense.
I have no idea how it works but if I 'squidge' pinkysil what I have just mixed and then set under 40psi it seems more flexable than the same silicone that has been degassed first. It might be just that 40psi dosent crush all the little bubbles as well as higher pressures or that the degassing process better mixes the silicone components.
Cheers,
geomod
I degas the pinkysil for two reasons.
The first is because I had read on several sites that I should, so I gave it a shot. (It gave me a good excuse to buy a vaccum pump)
The second was surprising. I have found that once degassed, the pinkysil pours more fluidly and that the resultant pressure-set silicone is more dense.
I have no idea how it works but if I 'squidge' pinkysil what I have just mixed and then set under 40psi it seems more flexable than the same silicone that has been degassed first. It might be just that 40psi dosent crush all the little bubbles as well as higher pressures or that the degassing process better mixes the silicone components.
Cheers,
geomod
- geomod
- User
- Posts: 52
- Joined: Sat Jul 24, 2010 4:27 pm
Re: Split Mould Casting Technique
![]() by mangozac » Wed Jan 25, 2012 8:48 am
by mangozac » Wed Jan 25, 2012 8:48 am
I just find that the Pinkysil cures too rapidly to muck around degassing it. Especially if mixing up larger volumes like 200g, since it takes a good minute or so to mix it properly!
Very interesting that it pours more fluidly when degassed though
You say that degassing makes the mould less flexible - isn't that a bad thing? I find flexibility very important to prevent fatigue from demoulding over the life of the mould.
Very interesting that it pours more fluidly when degassed though
You say that degassing makes the mould less flexible - isn't that a bad thing? I find flexibility very important to prevent fatigue from demoulding over the life of the mould.
Oh yeah I can make that....
-
mangozac - Resin Addict Collaborator
- Posts: 4271
- Joined: Fri Oct 16, 2009 3:40 pm
- Location: QLD, Australia
Who is online
Users browsing this forum: No registered users and 3 guests