[phpBB Debug] PHP Warning: in file [ROOT]/includes/bbcode.php on line 483: preg_replace(): The /e modifier is no longer supported, use preg_replace_callback instead
[phpBB Debug] PHP Warning: in file [ROOT]/includes/bbcode.php on line 483: preg_replace(): The /e modifier is no longer supported, use preg_replace_callback instead
[phpBB Debug] PHP Warning: in file [ROOT]/includes/bbcode.php on line 483: preg_replace(): The /e modifier is no longer supported, use preg_replace_callback instead
[phpBB Debug] PHP Warning: in file [ROOT]/includes/bbcode.php on line 483: preg_replace(): The /e modifier is no longer supported, use preg_replace_callback instead
[phpBB Debug] PHP Warning: in file [ROOT]/includes/bbcode.php on line 483: preg_replace(): The /e modifier is no longer supported, use preg_replace_callback instead
[phpBB Debug] PHP Warning: in file [ROOT]/includes/bbcode.php on line 483: preg_replace(): The /e modifier is no longer supported, use preg_replace_callback instead
[phpBB Debug] PHP Warning: in file [ROOT]/includes/bbcode.php on line 483: preg_replace(): The /e modifier is no longer supported, use preg_replace_callback instead
[phpBB Debug] PHP Warning: in file [ROOT]/includes/bbcode.php on line 483: preg_replace(): The /e modifier is no longer supported, use preg_replace_callback instead
[phpBB Debug] PHP Warning: in file [ROOT]/includes/bbcode.php on line 483: preg_replace(): The /e modifier is no longer supported, use preg_replace_callback instead
[phpBB Debug] PHP Warning: in file [ROOT]/includes/bbcode.php on line 483: preg_replace(): The /e modifier is no longer supported, use preg_replace_callback instead
[phpBB Debug] PHP Warning: in file [ROOT]/includes/bbcode.php on line 483: preg_replace(): The /e modifier is no longer supported, use preg_replace_callback instead
[phpBB Debug] PHP Warning: in file [ROOT]/includes/bbcode.php on line 483: preg_replace(): The /e modifier is no longer supported, use preg_replace_callback instead
[phpBB Debug] PHP Warning: in file [ROOT]/includes/bbcode.php on line 483: preg_replace(): The /e modifier is no longer supported, use preg_replace_callback instead
[phpBB Debug] PHP Warning: in file [ROOT]/includes/bbcode.php on line 483: preg_replace(): The /e modifier is no longer supported, use preg_replace_callback instead
[phpBB Debug] PHP Warning: in file [ROOT]/includes/bbcode.php on line 483: preg_replace(): The /e modifier is no longer supported, use preg_replace_callback instead
[phpBB Debug] PHP Warning: in file [ROOT]/includes/bbcode.php on line 483: preg_replace(): The /e modifier is no longer supported, use preg_replace_callback instead
[phpBB Debug] PHP Warning: in file [ROOT]/includes/bbcode.php on line 483: preg_replace(): The /e modifier is no longer supported, use preg_replace_callback instead
[phpBB Debug] PHP Warning: in file [ROOT]/includes/bbcode.php on line 483: preg_replace(): The /e modifier is no longer supported, use preg_replace_callback instead
[phpBB Debug] PHP Warning: in file [ROOT]/includes/bbcode.php on line 483: preg_replace(): The /e modifier is no longer supported, use preg_replace_callback instead
[phpBB Debug] PHP Warning: in file [ROOT]/includes/bbcode.php on line 483: preg_replace(): The /e modifier is no longer supported, use preg_replace_callback instead
[phpBB Debug] PHP Warning: in file [ROOT]/includes/bbcode.php on line 483: preg_replace(): The /e modifier is no longer supported, use preg_replace_callback instead
[phpBB Debug] PHP Warning: in file [ROOT]/includes/bbcode.php on line 483: preg_replace(): The /e modifier is no longer supported, use preg_replace_callback instead
[phpBB Debug] PHP Warning: in file [ROOT]/includes/bbcode.php on line 483: preg_replace(): The /e modifier is no longer supported, use preg_replace_callback instead
[phpBB Debug] PHP Warning: in file [ROOT]/includes/bbcode.php on line 483: preg_replace(): The /e modifier is no longer supported, use preg_replace_callback instead
[phpBB Debug] PHP Warning: in file [ROOT]/includes/bbcode.php on line 483: preg_replace(): The /e modifier is no longer supported, use preg_replace_callback instead
[phpBB Debug] PHP Warning: in file [ROOT]/includes/bbcode.php on line 483: preg_replace(): The /e modifier is no longer supported, use preg_replace_callback instead
Resin Addict Forum • View topic - Paint tank pressure chamber conversion. Help appreciated.
ATTENTION: As of March 2017 the Resin Addict Forums are being wound down.
New members are no longer being accepted. Read more about it here.

Paint tank pressure chamber conversion. Help appreciated.

Questions and discussion of tools, materials and techniques.

Moderator: Wardens

Paint tank pressure chamber conversion. Help appreciated.

Postby Fleafa » Fri Jul 08, 2011 9:21 pm

Hi, I'm new to the world of pressure casting and have been searching for information for a few days now with little success.
This forum seems like it has many helpful members, especially mangozac. I feel a little cheeky having my first post be such a request, but I would be very appreciative of any help!
So much helpful info and discussion here, you can be sure I'll be hanging around anyway!

I am starting to do resin casting from 3D printed parts (commissions accepted ;) ) and have found that I need to be casting some and eventually all parts under pressure.
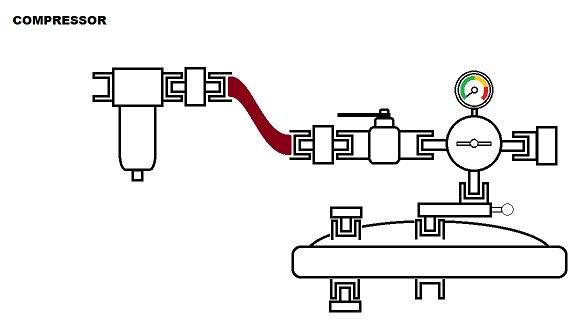
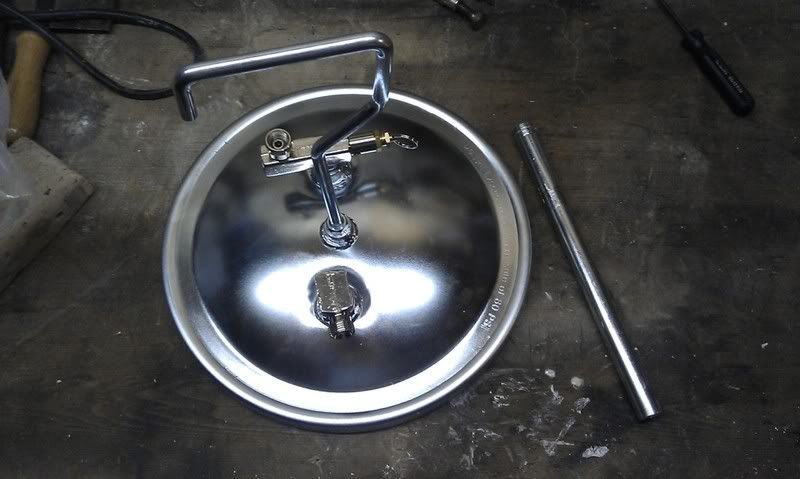
I've acquired a Wolf Sioux 25 compressor and .
My problem is that the documentation of both items is appalling and my knowledge is similarly basic so I don't know what fittings to go for.
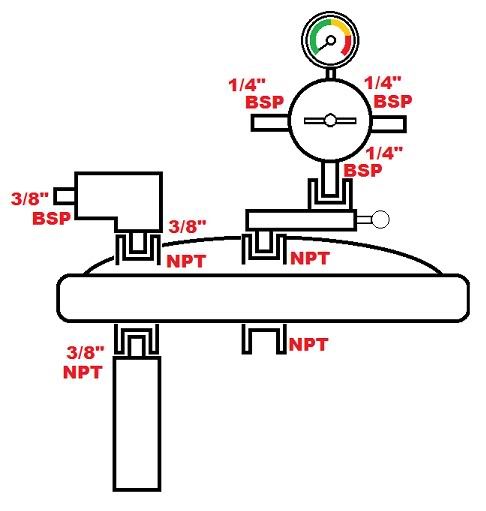
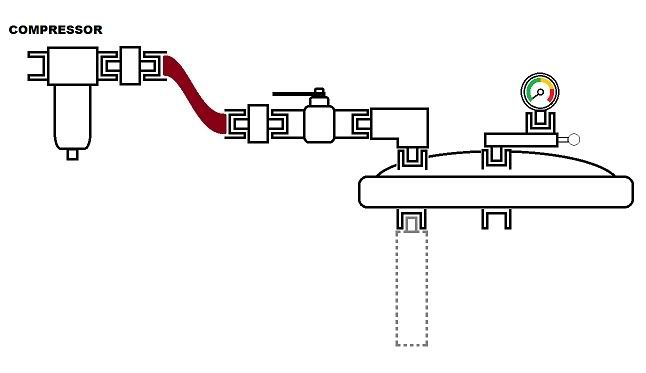
The image below shows the changes I intend to make.

Image

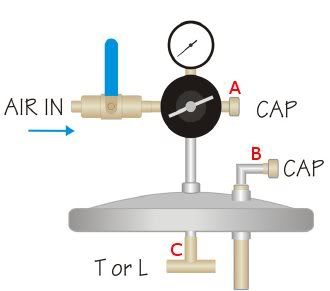
I would like to know what kind of fittings I should use and what size they would need to be. I have measured the connections but am still a little unsure whether they are imperial or metric. mangozac mentioned this in and seems to have the same tank as me.
The compressor has s but what type are they? They look to me like series25 but, like I say, I'm new to all this.
A seems to be .5" male and B is .64" male (is this 5/8"?). I'd like to just remove the right-angle fitting on B if I can and plug the hole. Measurement looks the same.
C is pretty much optional (prevents air disturbing the molds) but is .32" (5/16"?).
I can provide measurements in mm too.
I also need to add the ball valve and an adaptor to connect it to the compressor.
Can anyone recommend an inexpensive water filter too?

I've seen people on removing the whole outlet section that comes fitted to the compressor and attaching their own parts to the hole at the end of the tank. I am slightly worried about parts sticking out like that and the filter hitting the floor so would probably prefer to avoid that approach.
I have no real urge to preserve the dual outlet.


Many thanks for any help!


User avatar
Fleafa
Junkie
 
Posts: 835
Joined: Thu Jul 07, 2011 2:56 am
Location: Fareham, Hampshire, UK

Re: Paint tank pressure chamber conversion. Help appreciated

Postby Lane » Sat Jul 09, 2011 4:48 am

What I did was remove the suction pipe and outlet fitting and replace with a elbow fitting and valve to vent the tank when done. My tank also has a (overpressure) relief valve on the same adapter that the regulator connected to. I kept the connector and relief but moved the regulator, it connects to the quick disconnect on the compressor and a hose runs from it to the tank. Thus reduces the weight of the lid and some of the interference when clamping the lid.
Lane
Habit
 
Posts: 243
Joined: Sat Mar 19, 2011 4:02 pm

Re: Paint tank pressure chamber conversion. Help appreciated

Postby mangozac » Sat Jul 09, 2011 12:51 pm

Hi Fleafa welcome to RA! Don't feel too cheeky about your first post being a request - we all have to start somewhere!

Let me start off by commenting what an awesome diagram you've drawn! What software did you use? Perhaps when you've gone through this exercise we can come up with a complete parts list required for adapting the pressure pot accompanied with your pretty pictures!

Yep that looks to be the same pressure pot that 99% of the hobby casters (and some of the "professionals" I know too) are using. It's a couple of years now since I went through this process on mine, but I seem to remember something about a mix of metric and imperial fittings used.

A looks like it's a 1/4" NPT thread, which should be the same as the pressure gauge. You will basically want some kind of blank end to block A off with anyway. Judging from the pictures it looks like A is a screwed adaptor anyway, so if you want to test the size unscrew the pressure gauge and see if it will screw into the thread where A came out of. The gauge is definitely a 1/4" thread.

The naming scheme for fittings is kind of weird to those of us not used to working with them - the 1/4" refers to the pipe inside diameter, not the thread diameter.

For the ball valve it too should be a 1/4" male to female.

IIRC B is a metric fitting, something like 10mm. Honestly I have no idea how to work it out exactly though, and just doing some Googling has left me even more confused.

Your measurement for C translates to almost exactly 8mm, but for what its worth that could just be a coincidence.

Honestly your best bet is to take it down to the local hardware and ask them to identify the threads. If you're lucky they may even have the required fittings.

For the record I don't (yet) run a water filter on my compressor for casting, but since I'm planning to use it for airbrushing very soon I'm going to go pick one up today. There's really no special requirements here...

Sorry I couldn't offer more help :(
Oh yeah I can make that....
User avatar
mangozac
Resin Addict Collaborator
 
Posts: 4271
Joined: Fri Oct 16, 2009 3:40 pm
Location: QLD, Australia

Re: Paint tank pressure chamber conversion. Help appreciated

Postby Fleafa » Sat Jul 09, 2011 8:59 pm

Thanks for the friendly welcome! And the info!
How strange to measure fittings by the internal pipe diameter but, as I have the pipes, knowing that makes it a lot easier for me.

A is marked 1/4" and B is marked 3/8" :D

No idea about C, but that is optional, I reckon. Can rig my own solution to prevent too much air knocking things about.

As for the diagram, I totally stole it from the second of these documents:
[url]amp.rokket.biz/docs/amp_easy-resin-casting_web.pdf[/url]
[url]amp.rokket.biz/docs/amp_easy-resin-casting2_pressure_web.pdf[/url]

...and then made some changes. I would be happy to knock up some diagrams for such a document though.

There's a great little tool shop near me run by an old fellow who may be able to help me. Otherwise, I'll try to find a decent retailer on the web.

Still a little unsure of the quick-connect type on the compressor. May try to remove one of them and connect an adaptor so that A connects straight to the compressor.

@ Lane: Good idea moving the regulator. Going to think about your mods.


User avatar
Fleafa
Junkie
 
Posts: 835
Joined: Thu Jul 07, 2011 2:56 am
Location: Fareham, Hampshire, UK

Re: Paint tank pressure chamber conversion. Help appreciated

Postby Fleafa » Sun Jul 10, 2011 1:30 am

@ mangozac: Do you think the fittings are more likely to be NPT than BSP?

EDIT: Looks like I'm going to have to get counting!


User avatar
Fleafa
Junkie
 
Posts: 835
Joined: Thu Jul 07, 2011 2:56 am
Location: Fareham, Hampshire, UK

Re: Paint tank pressure chamber conversion. Help appreciated

Postby mangozac » Sun Jul 10, 2011 8:45 am

Oh you're absolutely right! I had another look at my connection B and it is indeed 3/8"!

You're going to struggle counting the difference between 18 and 19 threads per inch when the length of the threaded section is less than 1/2" long. Things like these pressure pots are generally primarily aimed at the US market by the Chinese manufacturers, so it's most likely to be NPT.

For C I don't actually have anything dissipating the air flow, but that means I have to be really careful about the rate at which I fill the tank. If you can find a suitable tee fitting that would certainly be the way to go. Otherwise I know others have simply bent up a piece of metal to sit just underneath the air inlet and glued it into place.

Do you have a hose for the compressor that uses quick connector couplings? If so you should be able to get the male coupling with 1/4" thread to fit onto the ball valve. I recommend the quick connects if you can.

If you wouldn't mind it would be great if you could take some pictures of the conversion process and we'll use them to write up a definitive guide!
Oh yeah I can make that....
User avatar
mangozac
Resin Addict Collaborator
 
Posts: 4271
Joined: Fri Oct 16, 2009 3:40 pm
Location: QLD, Australia

Re: Paint tank pressure chamber conversion. Help appreciated

Postby paulson games » Sun Jul 10, 2011 6:22 pm

That pot looks like it's the same chinese made one I have, no brand label or anything. I picked mine up on TCPGlobal. The threading is all set to american standard.

Here's a shot of how I set up my lid.

I bought two 1/4 inch ball valves (brass) a 1/2 inch ball valvue (silver) Also you will need to replace the safety pressure valve. The stock one is only good for 45 psi and you'll need one that can hold up to 70. You can get them cheap on ebay it ran me $5 I think with shipping.

The brass valave that has the handle in the up posistion never gets used and could be replaced with a cap if you can find one the right size. I couldn't locate one so I just used the valve. The quick release nipple is where I attach my pressure line.

Image

Image


You'll probably just want to cut the suction tube short, the lock-tite stuff they use on that lid is damn near impossible to break free. Keep in mind that any length of tube that isn't cut away will hang down inside the pot and you'll need to keep space clear fro it otherwise it'll hang up on teh molds and not close correctly.

A diverter would be a good idea if you can figure out a way to weld a washer or something or attach a elbow fitting. Otherwise over time you get stuff like this, not any problem for casting just extra mess. Just make sure to place a board over the top of your molds so the air doesn't blast all teh resin out.

Image


Total parts list if I recall correctly:

2x 1/4 inch ball valve (male to female)
1x 1/2 inch ball valve (male to female)
1x female quick connect nipple
1x 70 PSI saftey release valve (male)
Silicon tape
User avatar
paulson games
Resin Addict Collaborator
 
Posts: 940
Joined: Wed Oct 21, 2009 8:09 pm

Re: Paint tank pressure chamber conversion. Help appreciated

Postby Fleafa » Sun Jul 10, 2011 8:58 pm

Thanks paulson! Shouldn't the safety pressure valve be OK since I'll be casting at 35-40psi? Also, the tank is rated to 80. Odd for the manufacturer to put such a low safety pressure valve on there.

Looking at the Axminster (retailer I bought the tank from) tools page, they state 1/4" BSP inlet but the tank's fittings are obviously NPT (flat topped threads). So here's what I think I've got:
Image

My first instinct was to end up with this:
Image

but what do you guys think about this?
Image

Ends up a bit simpler, though I'd have to buy a new pressure gauge as well as everything else. Means no messing about with NPT-BSP conversions too.
Tempted to leave the paint pipe in for now and build a shelf on the bottom of it, allowing air to enter underneath the molds. Limits space, of course.

EDIT: Just re-read mangozac's and found a bunch of info I missed first time. Think the 2nd option is the way forward then.


User avatar
Fleafa
Junkie
 
Posts: 835
Joined: Thu Jul 07, 2011 2:56 am
Location: Fareham, Hampshire, UK

Re: Paint tank pressure chamber conversion. Help appreciated

Postby Fleafa » Mon Jul 11, 2011 4:26 am

OK, ordered my parts. Thought I'd get one physical job out of the way today, so...

I removed the rubber ring...
Image

...heated the joint...
Image

...and removed the pipe :)Image


User avatar
Fleafa
Junkie
 
Posts: 835
Joined: Thu Jul 07, 2011 2:56 am
Location: Fareham, Hampshire, UK

Re: Paint tank pressure chamber conversion. Help appreciated

Postby mangozac » Mon Jul 11, 2011 7:10 am

Sounds like you know what you're doing then ;)

I will point out that the benefit of going with your first picture is that you have the regulator on top of the pot in addition to the one on the regulator, so if by any chance the compressor regulator gets knocked it won't pop the safety valve.

Another thought I had - do you think it would be possible to bend the paint pipe? If so you could cut if off short and bend it around at an angle so it diverts sideways...
Oh yeah I can make that....
User avatar
mangozac
Resin Addict Collaborator
 
Posts: 4271
Joined: Fri Oct 16, 2009 3:40 pm
Location: QLD, Australia

Re: Paint tank pressure chamber conversion. Help appreciated

Postby Fleafa » Mon Jul 11, 2011 7:30 am

You're right about the first one, but I've gone with simplicity. Can always change in the future.
I was thinking about bending the pipe but I don't think I can apply enough heat. Ordered a used 1/8" NPT elbow from America which will do the job for less hassle.


User avatar
Fleafa
Junkie
 
Posts: 835
Joined: Thu Jul 07, 2011 2:56 am
Location: Fareham, Hampshire, UK

Re: Paint tank pressure chamber conversion. Help appreciated

Postby Fleafa » Tue Jul 19, 2011 3:38 am

Accidentally ordered a 1/8" pressure gauge :/
So, rather than go to the expense of buying a second 1/4" gauge plus postage, I ordered a 1/8" to 1/4" bush. I received a 1/8" to 3/8" bush :/ Awaiting replacement!


User avatar
Fleafa
Junkie
 
Posts: 835
Joined: Thu Jul 07, 2011 2:56 am
Location: Fareham, Hampshire, UK

Re: Paint tank pressure chamber conversion. Help appreciated

Postby mangozac » Tue Jul 19, 2011 7:18 am

Easier than the other way around ;)
Oh yeah I can make that....
User avatar
mangozac
Resin Addict Collaborator
 
Posts: 4271
Joined: Fri Oct 16, 2009 3:40 pm
Location: QLD, Australia

Re: Paint tank pressure chamber conversion. Help appreciated

Postby Fleafa » Sat Aug 06, 2011 12:30 am

1st results! SO hard to photograph.

Image
Image


User avatar
Fleafa
Junkie
 
Posts: 835
Joined: Thu Jul 07, 2011 2:56 am
Location: Fareham, Hampshire, UK

Re: Paint tank pressure chamber conversion. Help appreciated

Postby mangozac » Sat Aug 06, 2011 8:48 am

Woohoo nice work mate! Are you happy with the results? What kind of mould did you use?

I must ask though - what's with the love heart design!? :!:
Oh yeah I can make that....
User avatar
mangozac
Resin Addict Collaborator
 
Posts: 4271
Joined: Fri Oct 16, 2009 3:40 pm
Location: QLD, Australia

Next

Return to Dr Polymer

Who is online

Users browsing this forum: No registered users and 4 guests

cron