[phpBB Debug] PHP Warning: in file [ROOT]/includes/bbcode.php on line 483: preg_replace(): The /e modifier is no longer supported, use preg_replace_callback instead
[phpBB Debug] PHP Warning: in file [ROOT]/includes/bbcode.php on line 483: preg_replace(): The /e modifier is no longer supported, use preg_replace_callback instead
[phpBB Debug] PHP Warning: in file [ROOT]/includes/bbcode.php on line 483: preg_replace(): The /e modifier is no longer supported, use preg_replace_callback instead
[phpBB Debug] PHP Warning: in file [ROOT]/includes/bbcode.php on line 483: preg_replace(): The /e modifier is no longer supported, use preg_replace_callback instead
[phpBB Debug] PHP Warning: in file [ROOT]/includes/bbcode.php on line 483: preg_replace(): The /e modifier is no longer supported, use preg_replace_callback instead
[phpBB Debug] PHP Warning: in file [ROOT]/includes/bbcode.php on line 483: preg_replace(): The /e modifier is no longer supported, use preg_replace_callback instead
[phpBB Debug] PHP Warning: in file [ROOT]/includes/bbcode.php on line 483: preg_replace(): The /e modifier is no longer supported, use preg_replace_callback instead
[phpBB Debug] PHP Warning: in file [ROOT]/includes/bbcode.php on line 483: preg_replace(): The /e modifier is no longer supported, use preg_replace_callback instead
[phpBB Debug] PHP Warning: in file [ROOT]/includes/bbcode.php on line 483: preg_replace(): The /e modifier is no longer supported, use preg_replace_callback instead
[phpBB Debug] PHP Warning: in file [ROOT]/includes/bbcode.php on line 483: preg_replace(): The /e modifier is no longer supported, use preg_replace_callback instead
[phpBB Debug] PHP Warning: in file [ROOT]/includes/bbcode.php on line 483: preg_replace(): The /e modifier is no longer supported, use preg_replace_callback instead
[phpBB Debug] PHP Warning: in file [ROOT]/includes/bbcode.php on line 483: preg_replace(): The /e modifier is no longer supported, use preg_replace_callback instead
[phpBB Debug] PHP Warning: in file [ROOT]/includes/bbcode.php on line 483: preg_replace(): The /e modifier is no longer supported, use preg_replace_callback instead
[phpBB Debug] PHP Warning: in file [ROOT]/includes/bbcode.php on line 483: preg_replace(): The /e modifier is no longer supported, use preg_replace_callback instead
[phpBB Debug] PHP Warning: in file [ROOT]/includes/bbcode.php on line 483: preg_replace(): The /e modifier is no longer supported, use preg_replace_callback instead
[phpBB Debug] PHP Warning: in file [ROOT]/includes/bbcode.php on line 483: preg_replace(): The /e modifier is no longer supported, use preg_replace_callback instead
[phpBB Debug] PHP Warning: in file [ROOT]/includes/bbcode.php on line 483: preg_replace(): The /e modifier is no longer supported, use preg_replace_callback instead
[phpBB Debug] PHP Warning: in file [ROOT]/includes/bbcode.php on line 483: preg_replace(): The /e modifier is no longer supported, use preg_replace_callback instead
[phpBB Debug] PHP Warning: in file [ROOT]/includes/bbcode.php on line 483: preg_replace(): The /e modifier is no longer supported, use preg_replace_callback instead
[phpBB Debug] PHP Warning: in file [ROOT]/includes/bbcode.php on line 483: preg_replace(): The /e modifier is no longer supported, use preg_replace_callback instead
[phpBB Debug] PHP Warning: in file [ROOT]/includes/bbcode.php on line 483: preg_replace(): The /e modifier is no longer supported, use preg_replace_callback instead
[phpBB Debug] PHP Warning: in file [ROOT]/includes/bbcode.php on line 483: preg_replace(): The /e modifier is no longer supported, use preg_replace_callback instead
[phpBB Debug] PHP Warning: in file [ROOT]/includes/bbcode.php on line 483: preg_replace(): The /e modifier is no longer supported, use preg_replace_callback instead
[phpBB Debug] PHP Warning: in file [ROOT]/includes/bbcode.php on line 483: preg_replace(): The /e modifier is no longer supported, use preg_replace_callback instead
[phpBB Debug] PHP Warning: in file [ROOT]/includes/bbcode.php on line 483: preg_replace(): The /e modifier is no longer supported, use preg_replace_callback instead
[phpBB Debug] PHP Warning: in file [ROOT]/includes/bbcode.php on line 483: preg_replace(): The /e modifier is no longer supported, use preg_replace_callback instead
[phpBB Debug] PHP Warning: in file [ROOT]/includes/bbcode.php on line 112: preg_replace(): The /e modifier is no longer supported, use preg_replace_callback instead
Resin Addict Forum • View topic - Centurion Mecha
ATTENTION: As of March 2017 the Resin Addict Forums are being wound down.
New members are no longer being accepted. Read more about it here.

Centurion Mecha

Discussion of sculpting and scratchbuilding

Moderator: Wardens

Re: Centurion Mecha

Postby mangozac » Sat Apr 21, 2012 7:23 pm

I've only just realised how long it has been since a proper update. While progress has been slower over the last few weeks (mainly due to my hobby time being hijacked by my SAW build up), there has been progress. I guess I just haven't posted about it because I'm working on the torso and still aren't 100% sure of the direction it's going it. It really is just "build and see" (and then rebuild because the first go didn't work out).

Anyway I made some progress today that I'm proud of and decided to share. Again I've run into the headache of photographing tiny styrene parts (as encountered on my BFG scratchbuild diaries) so I apologise in advance for the crappy photos :(

First up we have the motivation for the update: the main hatch. I've put way more work into this than one would expect, but it turning out really nicely. This pic is a collage, so clockwise from top left we have:
1. Hatch mounted to the cockpit top ring (there is a technical name for this; I just can't remember). Hatch hinge yet to be added.
2. Hatch underside. Note the handwheel and locking bolts.
3. Hatch top side. Lever and other detail yet to be added.
4. Inspiration for the hatch mechanism. This is from a large scale model tank.

Image

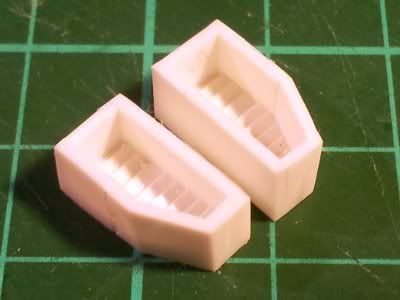
Next up we have the two symmetrical vents that will mount either side of the torso front. They need to be sanded down a little so they're not so deep, but the overall design has turned out really nicely. The baffles inside are technically pointing in the wrong direction, bit I only realised this far into their construction and I wasn't going to redo fiddly stuff like that again if I don't need to!

Image

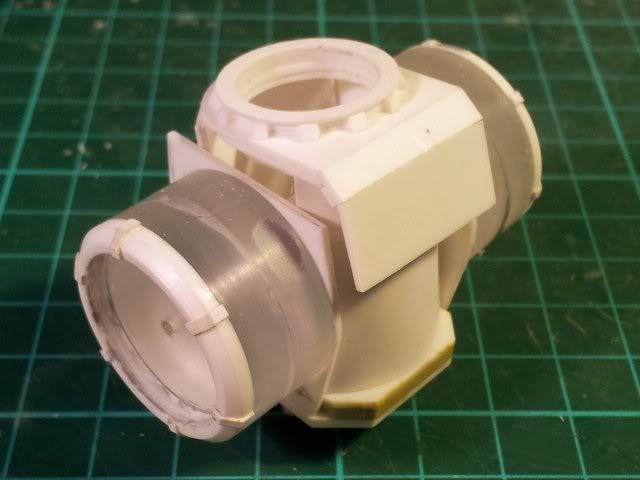
Finally we have a very crude shot showing the torso itself. The central core is hollow (that's where the cockpit is) but for the time being I have some strategically glued temporary braces holding it all together for the construction process. I have a set of shoulder armour plates made up but they're far too small and need to be replaced so I didn't bother showing them. It's all still very WIP so probably isn't really worth commenting on....

Image

Hopefully that will tide all of my fans over until the next update! The torso is really going to start coming together soon!
Oh yeah I can make that....
User avatar
mangozac
Resin Addict Collaborator
 
Posts: 4271
Joined: Fri Oct 16, 2009 3:40 pm
Location: QLD, Australia

Re: Centurion Mecha

Postby mangozac » Wed Jul 03, 2013 8:23 am

Wow I can't believe it's been a year since the last update!

Following some recent 3D discussion over on WargamerAU (and subsequent goading by AwesomeShotDude), I decided that I would kick this project back into gear by 3D printing the parts which have been putting off re-making: the shoulder cylinders. Here's the existing parts on the torso:


I was unhappy with the size of the existing cylinders that I had created and decided they needed to be about 25% larger diameter. While they're not especially hard to make by hand, it takes a lot of time screwing around with the CNC router, lathe and then gluing on all of the individual little detail bits. In contrast it took all of about 15 minutes to draw up in 3D CAD!

This was my first time trying Frosted Ultra Detail (called FUD for short, which I always mentally read as F!@#&d Up Detail) from Shapeways and if I'm honest I was pretty dubious as to what the surface finish was going to be like. I got two of the part printed, which cost US$25.00 each. Including shipping I paid US$70.00 all up. Not cheap, but definitely cheaper than spending 3 or 4 hours making them by hand.

Well the parts arrived yesterday and I immediately unboxed them to see what they were like. I have to say, I was impressed. While there is still noticeable striation surface texture, it's only very shallow. Last night I tried sanding it and can report that even without a coat of primer it actually sands very nicely with 400 grit paper. Remember though that I deliberately kept the detail on this part to a minimum in anticipation for the sanding and cleanup, which makes it easier.

Pics (the unsanded part - click for high res):


So would I use Shapeways again? For printing basic parts of a master model, almost certainly. Figures or highly detailed parts I personally don't think I'd be happy with, but I'm sure it would do for others who are less anal about it than I.

With the new parts in hand I did some laying out of the Centurion torso last night (between the painfully boring job of painting the brass banding on the armour plates of my Warhound). I've got some ideas and will begin doing some proper design tonight. Hopefully I'll have an update later in the week ;)
Oh yeah I can make that....
User avatar
mangozac
Resin Addict Collaborator
 
Posts: 4271
Joined: Fri Oct 16, 2009 3:40 pm
Location: QLD, Australia

Re: Centurion Mecha

Postby Vaaish » Wed Jul 03, 2013 12:52 pm

A lot of the Taccmd guys use FUD for the initial prints of 6mm stuff. Pretty effective and useful.
-Vaaish
Vaaish
Junkie
 
Posts: 827
Joined: Sat Oct 31, 2009 7:55 am
Location: Greenville, SC

Re: Centurion Mecha

Postby mangozac » Wed Jul 03, 2013 3:36 pm

Yeah I was aware that it was pretty commonly used, but most examples I'd seen still had noticeable striations; one of my pet hates.
Oh yeah I can make that....
User avatar
mangozac
Resin Addict Collaborator
 
Posts: 4271
Joined: Fri Oct 16, 2009 3:40 pm
Location: QLD, Australia

Re: Centurion Mecha

Postby Fleafa » Wed Jul 03, 2013 8:57 pm

I actually use FUD for everything I do. Because of the nature of the parts I produce, I get away with it. Large, flat surfaces show the layers more than anything but I produce small, detailed components which hide them!
For figures though, I prefer to use a more expensive process. That being said, my Star God figure is FUD. Has its problems, but not bad.


User avatar
Fleafa
Junkie
 
Posts: 835
Joined: Thu Jul 07, 2011 2:56 am
Location: Fareham, Hampshire, UK

Re: Centurion Mecha

Postby mangozac » Thu Jul 04, 2013 8:27 am

Wow I didn't know that Ben! But surely you still get some texture from the printing? Do you do much/any cleanup?
Oh yeah I can make that....
User avatar
mangozac
Resin Addict Collaborator
 
Posts: 4271
Joined: Fri Oct 16, 2009 3:40 pm
Location: QLD, Australia

Re: Centurion Mecha

Postby mangozac » Fri Jul 05, 2013 8:11 am

Just a quickie for today. I was playing around with torso layouts last night and feel like the following is going in the right direction:


Obviously it's all still very rough (especially the armour plating - I'm not quite sold on the plating on the front). The two clay blobs on the left are actually spikes - I thought that some stumpy spikes on each side of the torso would look suitably Romanesque.

I'll do some more playing over the weekend...
Oh yeah I can make that....
User avatar
mangozac
Resin Addict Collaborator
 
Posts: 4271
Joined: Fri Oct 16, 2009 3:40 pm
Location: QLD, Australia

Re: Centurion Mecha

Postby Xeones » Sat Jul 06, 2013 1:06 am

It's good to see this guy back on the workbench again Zac. It's particularly helpful to see a shot like this from the front as you can really get a good idea of what you've accomplished so far. I think your overall direction looks pretty solid to me.

I did a quick photoshop of your WIP to illustrate a few comments:

First, I really like the shoulder armor you've created. When you get the other side done, I think it really gives a great silhouette to the upper portions of the mech.

I'm having trouble visualizing what you have in mind with the spikes from what I'm seeing with the clay. I have my doubts, and I liked the vents you made earlier which I thought were going on that general spot, so I guess I'll have to reserve judgment until I see more. I added one of your vents to the other side (not really sure what size they are though) just to see what it looked like.

The front armor you have at the moment is not really that bad as a starting point. I think if you chop the top of the chest at an angle and enclose it with another piece of card, while making the head opening smaller it's a pretty good look imo. I don't know if it's quite clear from this angle what I'm thinking, but hopefully you get what I'm trying to say.

I dropped the overall height of the torso just a bit from what you had in your shot just enough so that there wasn't a gap in between where the chest armor stops and the pelvis/cod piece starts. I personally like the proportions better this way and it makes a bit of sense from a more practical point of view to make sure those torso actuators and other mechanical bits don't get shot to pieces from the front.

I don't really know what you have in mind for the "battletech" arms, but my quick paint up shows the general sort of bulk and placement that I feel works well with the angles of the shoulder pieces and balances the upper torso with the visual weight of the lower leg assemblies.

I'm looking forward to more. 8-)

Xeones
Resin Addict Collaborator
 
Posts: 143
Joined: Wed Oct 28, 2009 11:48 pm
Location: Greenville, South Carolina

Re: Centurion Mecha

Postby mangozac » Sun Jul 07, 2013 9:27 pm

See Nate, you might not post too often, but this is why I love having you as a hobby buddy ;)

For starters, it's really encouraging to hear that you like where it's going! I figure if you artistically trained guys like the direction I'm going then I must be on the right track! Thanks for the Photo-chop - I contemplated doing one too but didn't have the time.

The shoulder armour was something I've struggled with a lot, but I realised what needed to be done was creating the perpendicular parts on the inside of it, which I'm really pleased with. I'm still playing around with the angles and stuff (the pad in the picture is sitting a bit too high).

I don't think anybody is convinced with the spikes (comments were that people thought they were missiles), but I feel that it's worth taking them through to construction to see how they work. If I/the audience don't like them then I can swap out for something else then ;)

I'm glad that you like what I'm doing with the chest armour. I'm still not sure whether it should be integrated into the torso (as opposed to "floating" like the codpiece and shin armour), but I think it would make covering some of the waist mechanics easier.

For the arms my plan has always been to have the weapons bolt directly onto the shoulders. I'm still contemplating whether I'll have a proper arm (and hand) on one side though. I doubt I'll start working on them until the torso is nearing completion.

Thanks for all of your advice! I'll hopefully have another update during the week.
Oh yeah I can make that....
User avatar
mangozac
Resin Addict Collaborator
 
Posts: 4271
Joined: Fri Oct 16, 2009 3:40 pm
Location: QLD, Australia

Re: Centurion Mecha

Postby mangozac » Sat Jul 13, 2013 12:48 pm

My hobby time of late is split between painting the brass banding on the Warhound (a loathsome task) and working on the Centurion torso. The beauty of having a painting and scratchbuilding project going at the same time is that working on one is a nice break from the other (rather than spending all of my available time just paint or just scratchbuilding, which is an easy way to burn one's self out).

I finished the basic form of the shoulder pads as per the following pictures, but I'm contemplating whether a concave curve like I've pencilled in on the left side of the photos might look better. I just don't want it to look like it's been copied from the . Once I device on that I can then start cutting out and applying the banding to the shoulder pads.


I'm yet to decide what's going to happen with the chest area. Previous WIP posts have shown some armour plates there but I wasn't completely sold on it. I think it might need something protruding a bit, as is common in many Japanese mecha designs. Do you have any ideas, Nate? Either way there will be a floating armour plate protecting the abdominal mechanics. Spikes still aren't off the table either...

Oh you can also see the progress I've made on the head so far. Yes it's tiny - it's supposed to be. Once it has a plume it will look a bit bigger ;)
Oh yeah I can make that....
User avatar
mangozac
Resin Addict Collaborator
 
Posts: 4271
Joined: Fri Oct 16, 2009 3:40 pm
Location: QLD, Australia

Re: Centurion Mecha

Postby Xeones » Tue Jul 16, 2013 4:52 am

hmmm... well, there's this sort of option:


Which is a bit more in the vein of what you where talking about with the Japanese style mechs. It does seem like you might want a bit of depth to the chest just to balance how far forward the knees stick out in the crouched position. Whatever guns you add will also help with this, but I'm still leaning toward some sort of protrusion there.

I'm not really sure about the waist as it seems quite narrow, though if you place the "arm" weapons in a wide enough stance, you might be able to balance that out.

Not sure this is exactly the ticket, but maybe it'll give you some ideas. If I have more time at some point, I can try to do a couple more with different options.

The concave curve on the shoulders isn't out of place stylistically with your design since you do have some precedence in the curves of the thigh armor, but I do think that it'll end up pushing the design more toward a GW look to the model. So whether that's a good or a bad thing is something you'll have to decide for yourself. Personally, I don't think the current angular look is a bad one.
Xeones
Resin Addict Collaborator
 
Posts: 143
Joined: Wed Oct 28, 2009 11:48 pm
Location: Greenville, South Carolina

Re: Centurion Mecha

Postby mangozac » Tue Jul 16, 2013 8:24 am

Actually, that works really well! For some reason I had been thinking that the area just below the head needed to be different, but with a bit of detailing I think that will look great. As always, I really appreciate the concept work! This will be fine for now - it's confirmed where I need to go!

Still deciding on the front vents though...

I don't think the narrow waist is a problem per se, but the issue is that the entire torso sprats out from directly above the skinny waist section and that is what looks odd. I've got an idea of how to shape the waist armour so that the skinny waist is retained (a style that I do like) but without causing such an abrupt change in profile where it joins the torso.

I bit the bullet and cut out the curve on the shoulder pads. It does look a lot better IMO. Yes, it does take it further toward GW aesthetics, but honestly the link between it and the Decimator armour style came to me after I sketched the shape onto the shoulder pad. Ultimately, it does tie in with the rest of the armour really well (when you look at it, all of the armour plates have a concave shape on them somewhere).

I started doing the banding on the shoulder pads and it's coming along really nicely. I'll try to grab some pics tonight!
Oh yeah I can make that....
User avatar
mangozac
Resin Addict Collaborator
 
Posts: 4271
Joined: Fri Oct 16, 2009 3:40 pm
Location: QLD, Australia

Re: Centurion Mecha

Postby Xeones » Wed Jul 17, 2013 3:13 am

Xeones
Resin Addict Collaborator
 
Posts: 143
Joined: Wed Oct 28, 2009 11:48 pm
Location: Greenville, South Carolina

Re: Centurion Mecha

Postby mangozac » Thu Jul 18, 2013 9:39 pm

Well I think I've worked out what to do on the front of the torso. It's really difficult to design polysurface shapes like this in styrene so I decided to go one step back and mashed a big blob of clay to the front. From there it's really easy to sculpt shapes and modify them.

I did this until I came up with the following. Please excuse the terrible photography!


The lighting makes it hard to really get a feel for the shape, but I'm really pleased with it. Ignore those weird looking plates either side of the waist - that is just an experiment for waste armour. It's a bit dumb like that but I like the general direction of having a small plate either side.

I've got one of the shoulder pads mostly finished - it takes ages gluing on all of the banding! I've added three large dome rivets recessed into holes. I imagine these would be what fixes the shoulderpad to the shoulder.


I'll probably make a mould of the shoulderpads as soon as they're finished. I'd like to also do an alternative shoulderpad for one side with some iconography sculpted onto it but I'll do that to a resin copy, not one of the masters ;)
Oh yeah I can make that....
User avatar
mangozac
Resin Addict Collaborator
 
Posts: 4271
Joined: Fri Oct 16, 2009 3:40 pm
Location: QLD, Australia

Re: Centurion Mecha

Postby mangozac » Sun Aug 04, 2013 9:49 am

As you last saw I had come up with a chest armour design I was happy with and have spent the small amount of hobby time I've had available since transferring the design to plastic. I was happy with how it was progressing. Then my Pacific Rim art book arrived and one picture in particular grabbed me with its coolness:


Believe it or not that plate was actually originally a shot of a German cruiser ship factory which was then digitally painted over to create the Jaeger factory. You can see the before and after near the end of . Mind blowing! But what I loved most about that picture was the Jaeger design featured and suddenly I didn't feel as confident with the torso armour I was building for the Centurion.

After a few days I couldn't take it any more so I grabbed a clump of clay, mashed it onto the front of the torso and started sculpting away again. It took a couple of attempts but I finally come up with something that I really liked:


I'm going to try to articulate what I felt the problem was with the original design. You see, when you're doing a design aesthetic with angled (rather than curved) armour plates, it's tempting to start trying to form shapes mimicking curved surfaces using lots of polygons (much the same way as a computer 3D model works, except that the polygons are much smaller). The problem is that in my opinion it just starts to looks like a paper model. At that stage you would have been better off building proper curved armour. So the angled armour style needs to look deliberately angular; not polygons mimicking a curved surface. I feel that this new armour design achieves that far better than the first one.

Here's a comparison of the two:


That's all I've got for today. Now I have to make the new armour plating...
Oh yeah I can make that....
User avatar
mangozac
Resin Addict Collaborator
 
Posts: 4271
Joined: Fri Oct 16, 2009 3:40 pm
Location: QLD, Australia

PreviousNext

Return to Sculpting and Scratchbuilding

Who is online

Users browsing this forum: No registered users and 16 guests

cron