ATTENTION: As of March 2017 the Resin Addict Forums are being wound down. New members are no longer being accepted. Read more about it here.
Resin Addict Forum
A place to talk about your addiction
Centurion Mecha
Moderator: Wardens
Re: Centurion Mecha
![]() by Vaaish » Thu Feb 09, 2012 9:35 am
by Vaaish » Thu Feb 09, 2012 9:35 am
That seems to have given FAR better results than your last test. At least in the pic the depth looks pretty good too.
-Vaaish
- Vaaish
- Junkie
- Posts: 827
- Joined: Sat Oct 31, 2009 7:55 am
- Location: Greenville, SC
Re: Centurion Mecha
![]() by mangozac » Thu Feb 09, 2012 10:10 am
by mangozac » Thu Feb 09, 2012 10:10 am
Absolutely! Yeah the depth is OK, but a little more would be better - it's still a bit hard to cut through the thin copper of the outline with a knife.
Oh yeah I can make that....
-

mangozac - Resin Addict Collaborator
- Posts: 4271
- Joined: Fri Oct 16, 2009 3:40 pm
- Location: QLD, Australia
Re: Centurion Mecha
![]() by mangozac » Thu Feb 09, 2012 9:13 pm
by mangozac » Thu Feb 09, 2012 9:13 pm
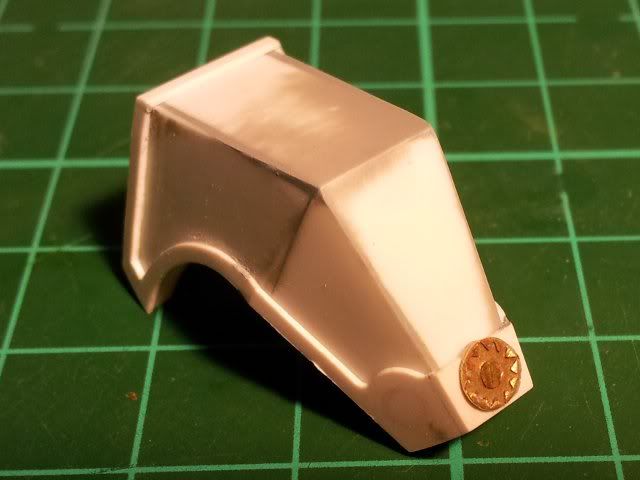
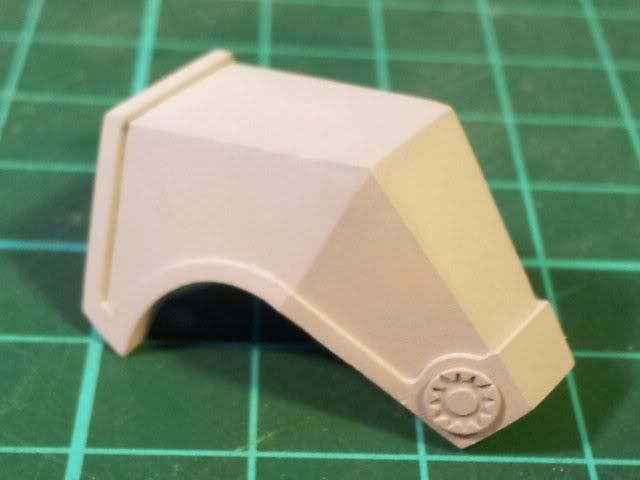
Well I cleaned up the small brass etch icon I cut out and sure enough it is slightly too small to go where I wanted. I'm not sure exactly why as I did measure before designing the brass etch sheet - I guess I was just a little sloppy with my measuring. So the options are to do a smaller one or just add a curved section to the top of the banding. Or just leave it off altogether (although I am liking it).
I wasn't going to post these next pics yet since it's still very conceptual, however people are hassling me to see progress on the mecha itself. So here is the "armature" I'm using to support the clay torso mockup sculpt. The sculpt itself is very rough and more for just getting an idea of proportions at the moment. It is giving me lots of ideas though on how to refine it though
The head is just a placeholder - the actual design direction I will take is still very much up in the air!
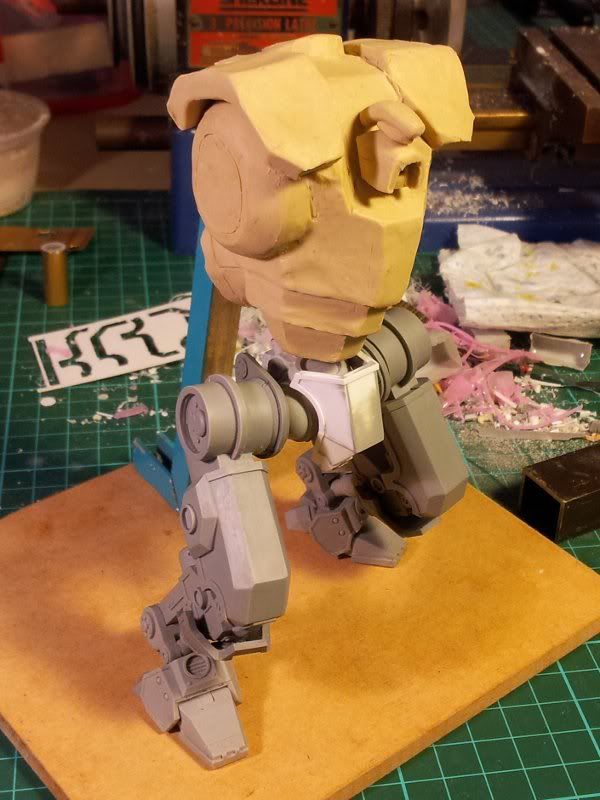
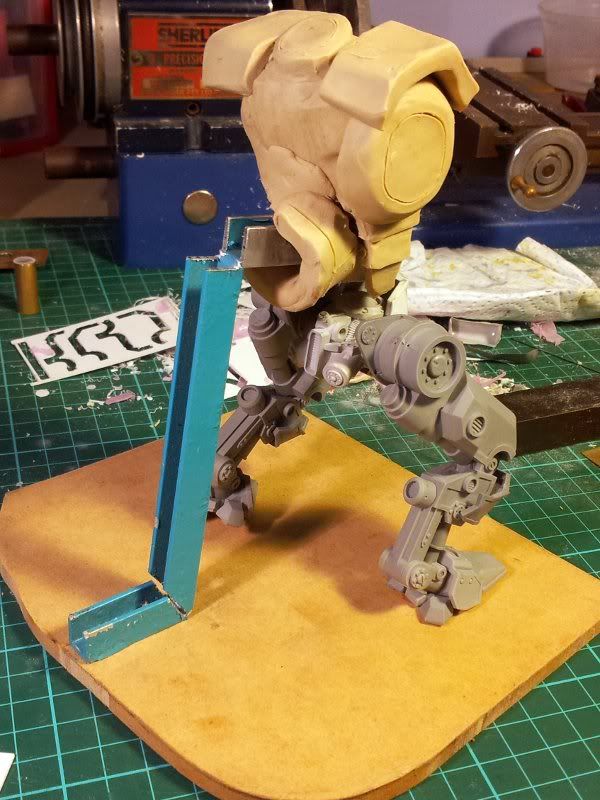
Enjoy!
I wasn't going to post these next pics yet since it's still very conceptual, however people are hassling me to see progress on the mecha itself. So here is the "armature" I'm using to support the clay torso mockup sculpt. The sculpt itself is very rough and more for just getting an idea of proportions at the moment. It is giving me lots of ideas though on how to refine it though
The head is just a placeholder - the actual design direction I will take is still very much up in the air!
Enjoy!
Oh yeah I can make that....
-
mangozac - Resin Addict Collaborator
- Posts: 4271
- Joined: Fri Oct 16, 2009 3:40 pm
- Location: QLD, Australia
Re: Centurion Mecha
![]() by Fleafa » Thu Feb 09, 2012 10:26 pm
by Fleafa » Thu Feb 09, 2012 10:26 pm
I reckon a curved backing would look good.
-

Fleafa - Junkie
- Posts: 835
- Joined: Thu Jul 07, 2011 2:56 am
- Location: Fareham, Hampshire, UK
Re: Centurion Mecha
![]() by Xeones » Fri Feb 10, 2012 4:25 am
by Xeones » Fri Feb 10, 2012 4:25 am
Hey Zac,
I've been keeping up with your progress on this pretty regularly, but I haven't really left any comments since it was tough to make any without having a feel for the bigger picture of where you were headed. Now that things are a little more defined, I think I've got a little more I can say.
First, I'm liking the level of mechanical detail that you are showing here. I think it's a good balance between that detail, and the armored look that you'd expect from something designed to take/dish out a pounding.
I realize that the clay mockup is still very rough so I won't bother commenting on any of the details you have, but I have to say that the overall size seems to me to be a little tall and perhaps too bulky compared to the length and mass of the legs. I'm also thinking that the feet are looking kinda small, now that the torso has been added. Not only does this create some aesthetic issues for me, but I also wonder how this will effect the stability of the model. Basing the model is, of course, always an option but I'd think with a model this size --and one that may or may not be used for gaming-- you'd want to make something that was really stable just standing on its own feet. I kinda hate to mention that since I know you put a lot of effort into the feet already, but I can't help but feel they look a little... what's the word I need... dainty? It might be as simple as replacing the two rear-facing toes with either longer versions or perhaps an actual heel (I kinda like the sound of that better) which you could probably even work up to fit into the existing toe slots. I suspect that it would look better to lengthen the front toe as well, but if you extend the back, you might be able to get away with leaving the front alone.
Back to the topic of the torso for a second, I think that I'd personally prefer to see the overall height reduced by at least 1/3 and the width reduced where possible. I know you're going for a piloted design so there are obviously certain constraints there, but you might still try to trim a little. I mention this because, from the look of the legs, I though you were going for a lankier look than the bulk of the current torso seems to suggest.
So in general, great job as always and keep up the good work. The usual caveats apply about this being your project and you doing what looks good to you. I simply take my job as part of the peanut gallery very seriously!
Best regards,
Nate
- Xeones
- Resin Addict Collaborator
- Posts: 143
- Joined: Wed Oct 28, 2009 11:48 pm
- Location: Greenville, South Carolina
Re: Centurion Mecha
![]() by mangozac » Fri Feb 10, 2012 8:03 am
by mangozac » Fri Feb 10, 2012 8:03 am
Nate don't ever be worried about holding back when it comes to critiquing. If I didn't value your advice I'd just ignore it anyway
OK you're not the only one to be thinking the torso is too tall. I too identified it but am not sure by how much I want to reduce the height. I think 1/3 would be far too much but perhaps as much as 1/4 would be in the ball park. I'll probably hack at it over the weekend until I'm happy. Indeed going too much shorter will give issues fitting the cockpit in.
I should point out (and I'm sure we have discussed this in the past) that I find that the main mecha proportional aesthetic I enjoy is something I dub the "footballer". Basically the exaggerated (cartoon) form of an American football player: short, stocky legs, big, wide torso, hunched back and pin head. Obviously the short legs isn't happening here as these legs are quite long, however I do want to go for the wide torso/hunchback/pinhead style.
On to the feet. You know I hadn't noticed it until you mentioned it now, but yes the feet are probably smaller than optimal. It actually depends on the angle they're being viewed from - from front angles IMO they look fine, whereas rear angles do feel a little small. Perhaps that lends some weight to your suggestion of just modifying the rear toes. My concern though is that I did play around with longer rear toe sizes early on and could never come up with anything I liked much.
In terms of imaginary stability, I figure the mech has active stabilising systems which keep it upright during normal operation. Perhaps the reason for the tie downs around the place is that once it's powered down (transport or storage) it needs to be locked in place to remain somewhat upright...
Actual model stability has never been a concern to me, as I had expected from the start that it would be mounted to a base (be it a gaming base or diorama). In really neutral poses it will balance on its feet ok, but if any interesting pose is to be achieved then it needs to be based, pure and simple.
If you wanted to graphically suggest an improved rear toe setup I'd be more than happy to consider it (nudge, nudge). The front toe and middle of the foot have a lot of work invested in them and I really don't want to modify them (or at this stage feel the need to).
Thanks for your feedback man, it's really appreciated!
Oh yeah I can make that....
-
mangozac - Resin Addict Collaborator
- Posts: 4271
- Joined: Fri Oct 16, 2009 3:40 pm
- Location: QLD, Australia
Re: Centurion Mecha
![]() by Vaaish » Fri Feb 10, 2012 3:28 pm
by Vaaish » Fri Feb 10, 2012 3:28 pm
Zac, I think you might be alright by cutting off the bottom segment near the waist on the clay mock up. I know it's not as interesting, but perhaps you could also show shots from the side and front in a more neutral pose. That will help work out proportions without exaggerating aspects due to angle.
-Vaaish
- Vaaish
- Junkie
- Posts: 827
- Joined: Sat Oct 31, 2009 7:55 am
- Location: Greenville, SC
Re: Centurion Mecha
![]() by Xeones » Sat Feb 11, 2012 5:15 am
by Xeones » Sat Feb 11, 2012 5:15 am
- Xeones
- Resin Addict Collaborator
- Posts: 143
- Joined: Wed Oct 28, 2009 11:48 pm
- Location: Greenville, South Carolina
Re: Centurion Mecha
![]() by mangozac » Sat Feb 11, 2012 11:40 am
by mangozac » Sat Feb 11, 2012 11:40 am
Wow thanks Nate!
I really like the circular piece for the rear of the foot, but it would require revising the main foot piece so that the "hoop" can attach and still flex properly. The other option would be to split the hoop in two so that it's effectively two arc shaped toes. I'll keep the idea in mind as the project progresses - we'll see how the foot proportions look in context as the torso nears completion
The sketching over you've done looks great and definitely gives me some ideas (the pectoral vents are a nice addition). I love how you're refined the shoulder armour and pilot hatch! The height looks about right like that so is probably around about what I'll go with. I tried to do some more clay sculpting today but with the summer heat the clay is just a bit too soft to easily work with. But I've decided that enough mocking up has been done and I'm armed with a good enough idea of what to do to begin actual work on the torso.
You're right in remembering that I'm going to go with Battletech style gun-arms rather than anthropomorphic arms, however I guess eventually if the market demands I'll do a close combat arm and steal some of the arm ideas from your sketch
I had a power lunch yesterday with a local guy I'd met only once before at the local games club a couple of years back. He's got some decent sculpting skills and he's going to sculpt me up a pilot chick in a neutral pose which I will then duplicate in resin and modify into different poses (i.e. in the cockpit, outside, climbing out of the hatch). I'm also swilling a couple of cockpit configuration ideas around in my head (some of which are a little less conventional).
Thanks again for the sketches, it's really appreciated!
Oh yeah I can make that....
-
mangozac - Resin Addict Collaborator
- Posts: 4271
- Joined: Fri Oct 16, 2009 3:40 pm
- Location: QLD, Australia
Re: Centurion Mecha
![]() by Xeones » Sat Feb 11, 2012 12:09 pm
by Xeones » Sat Feb 11, 2012 12:09 pm
Cool. Well, it was fun to do and if any of it gives you some ideas, then it was worth something. Yeah maybe splitting the hoop would do the trick. Speaking of tricks, if you toss your clay in the freezer for a bit when it gets too hot, you can get harder edges on your sculpts. A tip for next time maybe. 
Looking forward to your updates!
Looking forward to your updates!
- Xeones
- Resin Addict Collaborator
- Posts: 143
- Joined: Wed Oct 28, 2009 11:48 pm
- Location: Greenville, South Carolina
Re: Centurion Mecha
![]() by mangozac » Sat Feb 11, 2012 12:59 pm
by mangozac » Sat Feb 11, 2012 12:59 pm
Nice tip! I would have ended up trying something like that, but ultimately it's an excuse to stop playing around with clay and start work on the real thing 
Oh yeah I can make that....
-
mangozac - Resin Addict Collaborator
- Posts: 4271
- Joined: Fri Oct 16, 2009 3:40 pm
- Location: QLD, Australia
Re: Centurion Mecha
![]() by mangozac » Sat Feb 11, 2012 3:44 pm
by mangozac » Sat Feb 11, 2012 3:44 pm
I had a play around with the brass etch today and thought I'd post a quick update. I ended up putting two of the smallest size icons on the sides of the bottom pelvis armour banding and think it's turned out quite nicely. I also hit it with a final coating of Mr Surfacer to prep it for moulding (along with the pelvis). I guess I'll make the moulds up tomorrow.
Just for kicks I also hit the brass etch sheet with a coat of Mr Surfacer to bring it all up to a uniform colour:
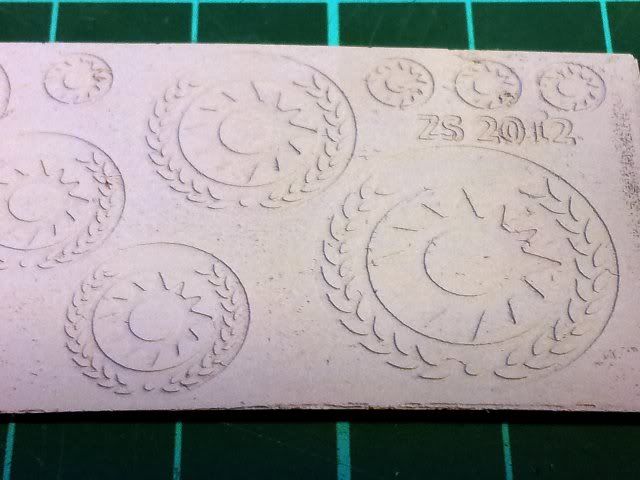
Looking at it like this the depth of etch seems just fine. The only reason deeper etch is necessary is to make it easier to cut the individual icons from the sheet. I really like the icon with the laurels around it - for reference the largest one is 20mm diameter. I'll do one with an additional circular border around it to use as a main icon somewhere on the torso. Although 20mm diameter is far too big - the 14mm ones produce adequately sized details that will reproduce in resin nicely enough.
I've officially begun work on the torso by sourcing some 6mm perspex from which I'll cut circular shapes (starting off with the arm mounts). Hopefully I'll have some reportable progress (i.e. pics) during the week
Just for kicks I also hit the brass etch sheet with a coat of Mr Surfacer to bring it all up to a uniform colour:
Looking at it like this the depth of etch seems just fine. The only reason deeper etch is necessary is to make it easier to cut the individual icons from the sheet. I really like the icon with the laurels around it - for reference the largest one is 20mm diameter. I'll do one with an additional circular border around it to use as a main icon somewhere on the torso. Although 20mm diameter is far too big - the 14mm ones produce adequately sized details that will reproduce in resin nicely enough.
I've officially begun work on the torso by sourcing some 6mm perspex from which I'll cut circular shapes (starting off with the arm mounts). Hopefully I'll have some reportable progress (i.e. pics) during the week
Oh yeah I can make that....
-
mangozac - Resin Addict Collaborator
- Posts: 4271
- Joined: Fri Oct 16, 2009 3:40 pm
- Location: QLD, Australia
Re: Centurion Mecha
![]() by Lane » Mon Feb 13, 2012 11:36 am
by Lane » Mon Feb 13, 2012 11:36 am
- Lane
- Habit
- Posts: 243
- Joined: Sat Mar 19, 2011 4:02 pm
Re: Centurion Mecha
![]() by mangozac » Mon Feb 13, 2012 5:54 pm
by mangozac » Mon Feb 13, 2012 5:54 pm
Yeah it would, I'm just not sold on the how much better looking vs extra effort ratio
Oh yeah I can make that....
-
mangozac - Resin Addict Collaborator
- Posts: 4271
- Joined: Fri Oct 16, 2009 3:40 pm
- Location: QLD, Australia
Re: Centurion Mecha
![]() by mangozac » Tue Feb 14, 2012 9:11 pm
by mangozac » Tue Feb 14, 2012 9:11 pm
Work on the torso has commenced, starting with the waist section where it joins the pelvis. This is made from some styrene shapes cut out on the router that will be laminated and then turned on the lathe. Unfortunately it's the lathe turning part that has caused a hiccup: the speed controller on the lathe is borked! I can have super-painfully-slow speed or insane-about-to-take-off-fast speed - no inbetween.
Fortunately my day job as an electronic engineer means that I can fix it myself. I'll take it to work tomorrow and get things going again (although I suspect it may be the SCR that has died, for which a replacement will take a couple of days to arrive). So until the lathe is fixed things progress is going to be non-existent
In the meantime I've started playing around sketching ideas for the reactor, etc. that will go on the rear of the torso. I did mould up the pelvis and groin armour, but the resin duplicates are identical to the original parts so I'm not going to bother showing them.
Oh yeah I can make that....
-
mangozac - Resin Addict Collaborator
- Posts: 4271
- Joined: Fri Oct 16, 2009 3:40 pm
- Location: QLD, Australia
Return to Sculpting and Scratchbuilding
Who is online
Users browsing this forum: No registered users and 12 guests