[phpBB Debug] PHP Warning: in file [ROOT]/includes/bbcode.php on line 483: preg_replace(): The /e modifier is no longer supported, use preg_replace_callback instead
[phpBB Debug] PHP Warning: in file [ROOT]/includes/bbcode.php on line 483: preg_replace(): The /e modifier is no longer supported, use preg_replace_callback instead
[phpBB Debug] PHP Warning: in file [ROOT]/includes/bbcode.php on line 483: preg_replace(): The /e modifier is no longer supported, use preg_replace_callback instead
[phpBB Debug] PHP Warning: in file [ROOT]/includes/bbcode.php on line 483: preg_replace(): The /e modifier is no longer supported, use preg_replace_callback instead
[phpBB Debug] PHP Warning: in file [ROOT]/includes/bbcode.php on line 483: preg_replace(): The /e modifier is no longer supported, use preg_replace_callback instead
[phpBB Debug] PHP Warning: in file [ROOT]/includes/bbcode.php on line 483: preg_replace(): The /e modifier is no longer supported, use preg_replace_callback instead
[phpBB Debug] PHP Warning: in file [ROOT]/includes/bbcode.php on line 483: preg_replace(): The /e modifier is no longer supported, use preg_replace_callback instead
[phpBB Debug] PHP Warning: in file [ROOT]/includes/bbcode.php on line 483: preg_replace(): The /e modifier is no longer supported, use preg_replace_callback instead
[phpBB Debug] PHP Warning: in file [ROOT]/includes/bbcode.php on line 483: preg_replace(): The /e modifier is no longer supported, use preg_replace_callback instead
[phpBB Debug] PHP Warning: in file [ROOT]/includes/bbcode.php on line 483: preg_replace(): The /e modifier is no longer supported, use preg_replace_callback instead
[phpBB Debug] PHP Warning: in file [ROOT]/includes/bbcode.php on line 483: preg_replace(): The /e modifier is no longer supported, use preg_replace_callback instead
[phpBB Debug] PHP Warning: in file [ROOT]/includes/bbcode.php on line 483: preg_replace(): The /e modifier is no longer supported, use preg_replace_callback instead
[phpBB Debug] PHP Warning: in file [ROOT]/includes/bbcode.php on line 483: preg_replace(): The /e modifier is no longer supported, use preg_replace_callback instead
[phpBB Debug] PHP Warning: in file [ROOT]/includes/bbcode.php on line 483: preg_replace(): The /e modifier is no longer supported, use preg_replace_callback instead
[phpBB Debug] PHP Warning: in file [ROOT]/includes/bbcode.php on line 483: preg_replace(): The /e modifier is no longer supported, use preg_replace_callback instead
[phpBB Debug] PHP Warning: in file [ROOT]/includes/bbcode.php on line 483: preg_replace(): The /e modifier is no longer supported, use preg_replace_callback instead
[phpBB Debug] PHP Warning: in file [ROOT]/includes/bbcode.php on line 483: preg_replace(): The /e modifier is no longer supported, use preg_replace_callback instead
[phpBB Debug] PHP Warning: in file [ROOT]/includes/bbcode.php on line 483: preg_replace(): The /e modifier is no longer supported, use preg_replace_callback instead
[phpBB Debug] PHP Warning: in file [ROOT]/includes/bbcode.php on line 483: preg_replace(): The /e modifier is no longer supported, use preg_replace_callback instead
[phpBB Debug] PHP Warning: in file [ROOT]/includes/bbcode.php on line 483: preg_replace(): The /e modifier is no longer supported, use preg_replace_callback instead
[phpBB Debug] PHP Warning: in file [ROOT]/includes/bbcode.php on line 483: preg_replace(): The /e modifier is no longer supported, use preg_replace_callback instead
[phpBB Debug] PHP Warning: in file [ROOT]/includes/bbcode.php on line 483: preg_replace(): The /e modifier is no longer supported, use preg_replace_callback instead
[phpBB Debug] PHP Warning: in file [ROOT]/includes/bbcode.php on line 483: preg_replace(): The /e modifier is no longer supported, use preg_replace_callback instead
[phpBB Debug] PHP Warning: in file [ROOT]/includes/bbcode.php on line 483: preg_replace(): The /e modifier is no longer supported, use preg_replace_callback instead
[phpBB Debug] PHP Warning: in file [ROOT]/includes/bbcode.php on line 483: preg_replace(): The /e modifier is no longer supported, use preg_replace_callback instead
[phpBB Debug] PHP Warning: in file [ROOT]/includes/bbcode.php on line 483: preg_replace(): The /e modifier is no longer supported, use preg_replace_callback instead
[phpBB Debug] PHP Warning: in file [ROOT]/includes/bbcode.php on line 112: preg_replace(): The /e modifier is no longer supported, use preg_replace_callback instead
[phpBB Debug] PHP Warning: in file [ROOT]/includes/bbcode.php on line 112: preg_replace(): The /e modifier is no longer supported, use preg_replace_callback instead
Resin Addict Forum • View topic - Scratch Built 21cm MW4 Hunchback Model (Battletech)
ATTENTION: As of March 2017 the Resin Addict Forums are being wound down.
New members are no longer being accepted. Read more about it here.

Scratch Built 21cm MW4 Hunchback Model (Battletech)

A gallery for completed projects only. Please share yours.

Moderator: Wardens

Scratch Built 21cm MW4 Hunchback Model (Battletech)

Postby smtk » Fri Jan 27, 2012 8:24 am

I been a lurker for a while many people’s post have help guide me in taking this mech and my first dip into resin casting. I always loved the MW4 Hunchback redesign plucky little robot with a BFG. I have fond memories of Palace gates as part of a Heavy Gauss rifle Hunchie tag team

Based from Blaars papercraft plans I set upon mock up the paint scheme I saw in another picture.

Image

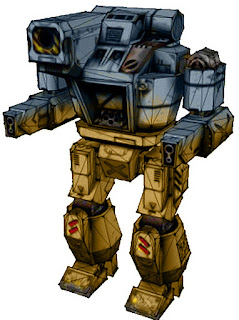
I nick named this scheme Desert ridge line. I think MW4 had a similar camo skin. I went in to far more care and detail with this model as I was planning to take moulds of the whole Mech and casting it in resin. This also meant I had to think about how each part would be cast. Paying particular attention to surface details and how far to assemble parts.

Image
Image
Image

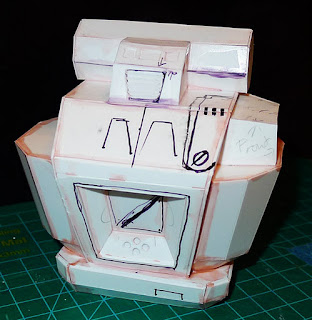
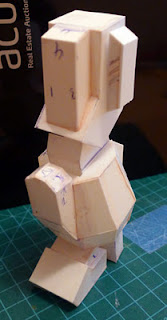
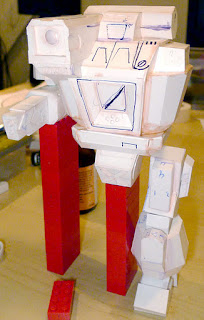
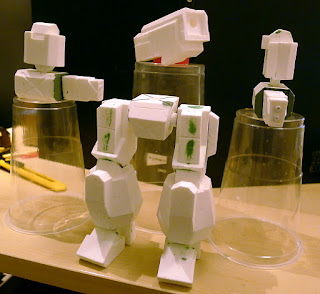
Here the Styrene master loosely put together to make sure everything matches. The pen marks are notes to myself on details, surface joints etc (all those white squares are easy to muddle!) It took me about 1 month to get to this stage.

Image

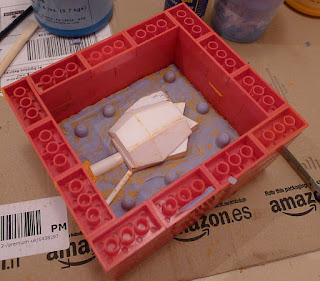
Now the fun process of mould making can begin. There's no doubt this stage is super fun but also quite messy so I don't have that many photos.

I used the smooth on starter kit, Lego and plasticine (play doe) to make the moulds. (Casting such a large model drinks pints and pints of silicone about 6kgs in this case!). There's a good 8 part video guide on youtube which I followed


Once the moulds are done you ready to pop out mechs like cookies! This has to be the best stage to reach you finally get to see your work go from boxlike substructures to stompy stompy mech like goodness. It took 2months to get to this point and now you can cast a whole Mech in under 1hr bang tidy!

Image
Image

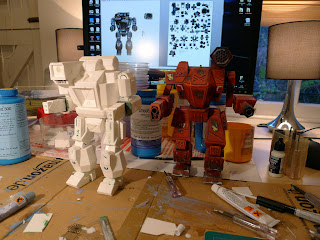
You'll note the use of green stuff modelling putty. This is needs to fill cast lines, gaps and bubbles that appear in the resin casting process if you don't have access to the pressure casting equipment. You'll also notice I'm in the process of adding extra details using styrene, wire etc I decided to add these after casting because i wasn't 100% sure how sharp they would come out. On to painting

Image
Image
Image
Image
Image

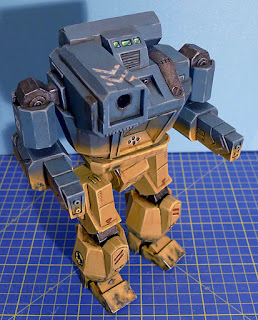
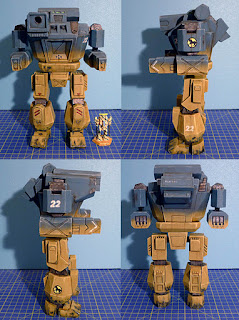
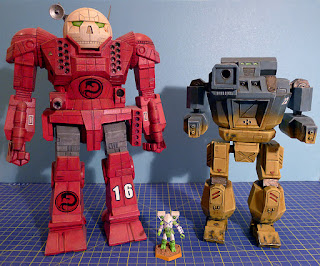
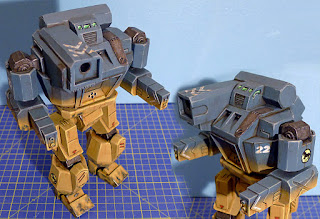
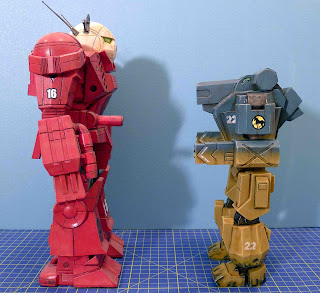
Painting is where I feel most experienced in model making. I love how well the paint scheme came out, I like my mechs solid colours and weathered (you can see the improvement from the Armorcast atlas painted 10years earlier which I did with car spray paint eek!). I chose Eridani Light Horse decals for no other reason than they complimented this paint job.

I stunned myself with how well this came together. The final height is 21cm around 1/43 scale and weighs in at 750g. Knowing that you can cast parts really focuses ones mind on getting the details right and removes those headaches of building free hand symmetrical objects like legs.

Image

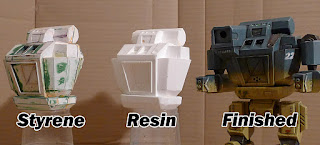
Here's a nice image of the steps of production.

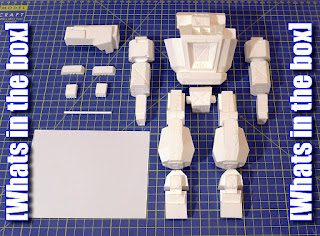
I have also cast another Hunchback from my left over resin that's going on eBay so you too can enjoy owning and painting your very own large scale Hunchback. Everything you see here (bar my craft mat, cheeky monkeys) is included;

http://www.ebay.co.uk/itm/230734304586
Image


There are better pictures on my Mech build blog

My next project is an Osiris more on later..
Build Blog
smtk
User
 
Posts: 88
Joined: Fri Jan 27, 2012 8:06 am

Re: Scratch Built 21cm MW4 Hunchback Model (Battletech)

Postby mangozac » Fri Jan 27, 2012 12:40 pm

Wow, talk about entering with a bang! Fantastic work there SMTK! 21cm is quite a large model so it's no surprise that the cast is so heavy. Perhaps for future models you intend to cast you can do the large parts in a two-piece clamshell design to save resin, weight and shipping costs?

In the current environment where it seems everybody is swapping to 3D modelling/printing it's nice to see manual scratchbuilding like this!

The final result is great and your painting definitely does it justice ;)

I'd love for you to run your future projects as project logs on here too.
Oh yeah I can make that....
User avatar
mangozac
Resin Addict Collaborator
 
Posts: 4271
Joined: Fri Oct 16, 2009 3:40 pm
Location: QLD, Australia

Re: Scratch Built 21cm MW4 Hunchback Model (Battletech)

Postby smtk » Sat Jan 28, 2012 6:41 am

I made a mistake building the torso in one piece it was tall deep and wide the mould box was huge and gobbled up RTV. My next project is built in smaller parts. I'm not too worried about resin costs it the rtv that really seems to add up and I dont feel able enough to make clam shell parts. I bought the equipment to pressure cast this one. However the courier for the resin and the one for the vacuum pump both can't seem to find my house which means I won't be casting this weekend bah!

I been used your vacuum pressure equipment post as a guide on what to buy. Finding a pump was a pita how many different units/ways can they measure vacuum! I found a 3CFM/15micon one listed as a vaccum on eBay hopefully it'll do the job (waits of all the ohnoes that wont work replies :( )
Build Blog
smtk
User
 
Posts: 88
Joined: Fri Jan 27, 2012 8:06 am

Re: Scratch Built 21cm MW4 Hunchback Model (Battletech)

Postby Fleafa » Sat Jan 28, 2012 11:07 am

I just bought one with that spec from HVAC. Made in China. Now I've figured out where to pour the oil in I'll start testing.


User avatar
Fleafa
Junkie
 
Posts: 835
Joined: Thu Jul 07, 2011 2:56 am
Location: Fareham, Hampshire, UK

Re: Scratch Built 21cm MW4 Hunchback Model (Battletech)

Postby mangozac » Sat Jan 28, 2012 12:27 pm

3CFM is a little on the slow side, but still suitable. 15 microns is great :D

I hear you on the RTV costs! I'm doing a lot of moulding for my current project (as well as a couple of side projects for friends) so am going through a lot of it at the moment. Making a hollow torso really shouldn't be hard so long as you approach it with that in mind from the start.
Oh yeah I can make that....
User avatar
mangozac
Resin Addict Collaborator
 
Posts: 4271
Joined: Fri Oct 16, 2009 3:40 pm
Location: QLD, Australia

Re: Scratch Built 21cm MW4 Hunchback Model (Battletech)

Postby smtk » Sat Jan 28, 2012 9:12 pm

3cfm is low for silicone it should be ok

for the resin if I'm going to pressure cast it does it need to be degassed? If I do have to degas it I can fill the 10l pressure pot up with dense foam cut to fit in one piece with a hole in the middle for the pot to reduce the volume.

I really been suffering with metric to imperial conversions. gah why do they still use imperial for all this stuff its horrid! I wanted to replace the wing nuts for bolts and today what came were nothing like what I needed :| need to by a new t section aswell
Build Blog
smtk
User
 
Posts: 88
Joined: Fri Jan 27, 2012 8:06 am

Re: Scratch Built 21cm MW4 Hunchback Model (Battletech)

Postby blind pig » Sat Jan 28, 2012 9:45 pm

Firstly, welcome to RA and bloody well done!!! Nice to see some scratch building. ;)

Polyurethane resins do not need to be degassed prior to pouring. CLEAR Polyurethanes do.

Also:
Sadly, your moulds that you made and cured at one atmosphere cannot be used to pressure cast the moulds. The workbench cured silicone contains thousands of little bubbles throughout its' mass. Pressure casting these moulds will crush all the air bubbles, causing the mould to distort as the bubbles are crushed. The cured resin piece will come out with many hundreds of little sharp points that are formed as the air bubbles crush near the surface of the resin.

Vacuuming a mould cured at room pressure, will cause the air bubbles trapped in the silicone to expand, again distorting the mould and causing pimples over the surface of the resin.

If you are lucky, pressuring or vacuuming will not have damaged your room cured mould, but from my experience, it buggers up the surface of the mould for good. :(

The bigger the mould, the more obvious will be the distortion of the mould and the spikes and pimples on the surface.
blind pig
Junkie
 
Posts: 581
Joined: Fri Feb 19, 2010 2:41 am
Location: Brisbane Australia

Re: Scratch Built 21cm MW4 Hunchback Model (Battletech)

Postby smtk » Sat Jan 28, 2012 10:24 pm

Ah I should of been more clear I plan to vacuum mould pressure cast my next project (the Osiris)

here's a sneaky peek
Image
Build Blog
smtk
User
 
Posts: 88
Joined: Fri Jan 27, 2012 8:06 am

Re: Scratch Built 21cm MW4 Hunchback Model (Battletech)

Postby blind pig » Sat Jan 28, 2012 10:54 pm

blind pig
Junkie
 
Posts: 581
Joined: Fri Feb 19, 2010 2:41 am
Location: Brisbane Australia

Re: Scratch Built 21cm MW4 Hunchback Model (Battletech)

Postby smtk » Sun Jan 29, 2012 1:14 am

yes all the parts are styrene boxes

I'm guessing your going to tell me that not good news :?
Build Blog
smtk
User
 
Posts: 88
Joined: Fri Jan 27, 2012 8:06 am

Re: Scratch Built 21cm MW4 Hunchback Model (Battletech)

Postby wormwood » Sun Jan 29, 2012 2:33 am

Great work.
wormwood
Casual
 
Posts: 22
Joined: Fri Jan 27, 2012 2:15 am

Re: Scratch Built 21cm MW4 Hunchback Model (Battletech)

Postby mangozac » Sun Jan 29, 2012 9:27 am

If you're going to mould the hollow parts under pressure or vacuum then I would suggest using a syringe to fill them with resin first, otherwise they could implode/explode inside the silicone!
Oh yeah I can make that....
User avatar
mangozac
Resin Addict Collaborator
 
Posts: 4271
Joined: Fri Oct 16, 2009 3:40 pm
Location: QLD, Australia

Re: Scratch Built 21cm MW4 Hunchback Model (Battletech)

Postby paulson games » Sun Feb 05, 2012 2:13 pm

That hunchback came out awesome, you should also post it to www.lordsofthebattlefield.com there are a bunch of people into the larger scale battlemechs.

I was wondeirng if you'd had any problems with casting under pressure with a hollow model. I trie dthat a while back and had my parts crush as the styrene was thin and the pressure changed smashed it. :( With stuff that large bubbling should be minimal and you may not need to pressurize it.

I hope to see more of your work as it's very well done and I'm a huge BT fan :)
User avatar
paulson games
Resin Addict Collaborator
 
Posts: 940
Joined: Wed Oct 21, 2009 8:09 pm

Re: Scratch Built 21cm MW4 Hunchback Model (Battletech)

Postby mangozac » Sun Feb 05, 2012 5:59 pm

Oh yeah I can make that....
User avatar
mangozac
Resin Addict Collaborator
 
Posts: 4271
Joined: Fri Oct 16, 2009 3:40 pm
Location: QLD, Australia

Re: Scratch Built 21cm MW4 Hunchback Model (Battletech)

Postby smtk » Sun Feb 05, 2012 8:08 pm

I haven't had the chance to pressure cast anything yet. I've got all my parts neededbut its started to snow and its just too cold to chance it. I'm going to built my future models with filler inside like millput or bondo I'll just have to be careful not to distort the master doing it.

I did try joining lords of the battle field 2 weeks ago but my account was never activated by an admin. I'm happy to let one of you post over their if you like.

On another note who did the concept art for the MW4 hunchback is bidding to by my spare model which I think is very cool.
Build Blog
smtk
User
 
Posts: 88
Joined: Fri Jan 27, 2012 8:06 am


Return to Solitary (Vaaish & Others Paint Stuff)

Who is online

Users browsing this forum: No registered users and 9 guests

cron